
Oracle EBS Inventory- Defining Unit of Measure, catalog and Categories
Defining Units of Measure
In this practice, you will:
- Define unit of measure classes.
- Define units of measure.
- Set up unit of measure conversions.
Assumptions
- You are skilled in Oracle navigation.
- You must have access to an Oracle Application Vision database or comparable training or test instance at your site on which to complete this practice.
- Replace ## with your terminal number or initials.
- Responsibility = Inventory, Vision Operations USA
Tasks
Defining Unit of Measure Classes
Define the unit of measure class (Quantity Class) with the base unit of measure Each. Use your team number (##) to uniquely identify your unit of measure class.
Defining Units of Measure
Define the following units of measure for your class. Use your team number (##) to uniquely identify your units of measure.
- Dozen
- Gross
- Case
Setting up UOM Conversions
Set up the standard conversion for your units of measure. Use your team number (##) to uniquely identify your class from the other teams in the classroom.
Note: A Gross = 144 each, and a case = 24 each.
Solution – Defining Units of Measure
Defining Unit of Measure Classes
Responsibility = Inventory, Vision Operations USA
1. Navigate to the UOM Classes window.
- (N) Setup > Units of Measure > Classes
2. The application prompts you to select an organization if it is a first-time access to the database. Select M1 Seattle Manufacturing from the list of values.
3. (M) File > New
- Name ##-Qty
- Description ##-Quantity Class
- Base Unit ##-Each
- UOM (abbreviation) ##E
4. (M) File > Save.
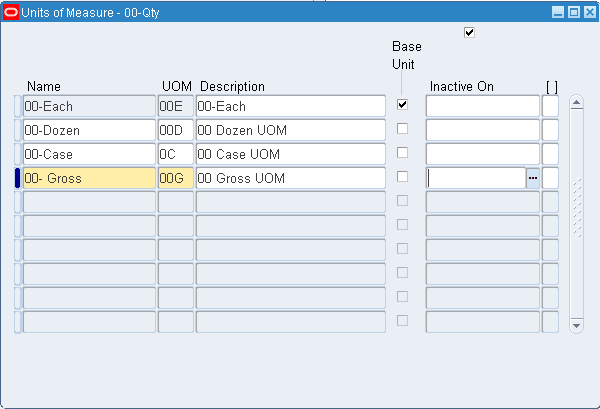
Defining Units of Measure
5. Navigate to the Unit of Measure window.
6. (B) Units of Measure
7. (M) File > New
8. Enter the units of measure information according to the following table:
|
Name |
UOM |
Description |
|
##-Dozen |
##D |
## Dozen UOM |
|
##-Gross |
##G |
## Gross UOM |
|
##-Case |
##C |
## Case UOM |
Note: Select (M) File > New (after each new unit of measure).
9. (M) File > Save.
10. (M) File > Close form.
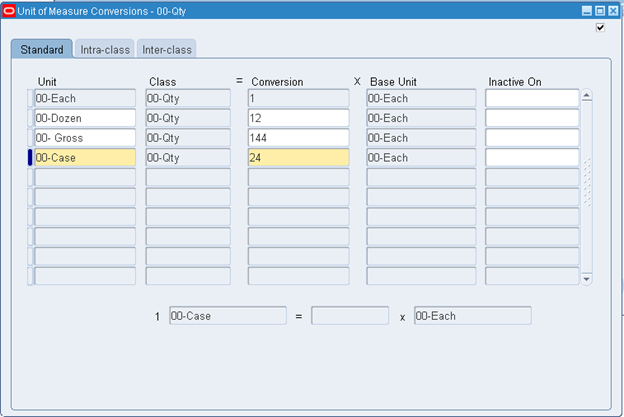
Setting up Unit of Measure Conversions
11. Navigate to the Unit of Measure Conversions window.
- (N) Setup > Units of Measure > Conversions
12. (M) File > New
13. Enter the unit of measure conversion information according to the following table:
|
Unit |
Class |
Conversion |
Base Unit |
|
##-Dozen |
##-Qty |
12 |
##-Each |
|
##-Gross |
##-Qty |
144 |
##-Each |
|
##-Case |
##-Qty |
24 |
##-Each |
Note: Select (M) File > New between each new unit of measure conversion. Verify that you are creating a standard unit of measure conversion.
14. (M) File > Save
15. (M) File > Close Form
Guided Demonstration – Creating Unit of Measure Classes
Responsibility: Inventory, Vision Operations USA
1. (N) > Setup > Units of Measure > Classes.
2. (M) File > New.
3. Enter the following unit of measure information:
- Name: 00-Metric
- Description: 00-Metric Class
- Base Unit 00-Meter
- UOM: 00M
4. (M) File > Save.
5. (M) File > Close Form.
Setting Up Catalog Groups
Responsibility: Inventory, Vision Operations USA
Create an Item Catalog Group
1. Navigate to the Item Catalogs window.
- (N) Setup > Items > Catalog Groups
2. (M) File > New
3. Enter the following information:
- Name: ## Mugs
- Description: Kinds of Mugs
4. (B) Save
5. (B) Details
6. Enter the details according to the following table:
|
Seq |
Name |
Description |
Required |
Description Default |
|
1 |
Country |
Country of origin |
Deselected |
Selected |
|
2 |
Style |
Style of mug |
Selected |
Selected |
|
3 |
Capacity |
Number of ounces |
Selected |
Selected |
|
4 |
Material |
What is it made of? |
Selected |
Deselected |
7. (B) Save
8. (M) File > Close Form
Create Items
9. Navigate to the Master Item window.
- (N) Items > Master Items
10. Create items according to the following table:
Note: Use the Finished Good template and enable all parts in M1 Seattle Manufacturing and M2 Boston Manufacturing.
|
Item |
Description |
|
## Mug 1 |
Mug 1 |
|
## Mug 2 |
Mug 2 |
|
## Mug 3 |
Mug 3 |
|
## Mug 4 |
Mug 4 |
Update Items with Catalog Information
Update the above items with item catalog descriptive elements. If you used the save and proceed option when you created your mugs you will not have to re-query them for the following steps.
11. Navigate to the Master Item window.
- (N) Items > Master Items
12. Find the first item
- (M) View > Find
13. Enter ## Mug 1 in the Item field.
14. (B) Find
15. (M) Tools > Catalog
16. Enter the following information:
- Catalog Group: ## Mugs
- Country: US
- Style Covered
- Capacity: 12 oz
- Material: Pewter
17. (B) Update Description
18. (B) Save
19. Repeat steps 14-17 for the remaining items in the table:
|
Item |
Country |
Style |
Capacity |
Material |
|
## Mug 2 |
US |
Uncovered |
12 oz |
Copper |
|
## Mug 3 |
US |
Covered |
16 oz |
Plastic |
|
## Mug 4 |
US |
Uncovered |
16 oz |
Glass |
20. (M) File > Close Form
Search for items Using Catalog Attributes
21. Navigate to the Item Search window.
- (N) Items > Item Search
22. Enter the following information:
- Organization: M1
- Show: Item Catalog
- Catalog Group: ## Mugs
- Capacity: 16 oz
23. Click (B) Find.
The items that match the item catalog attributes display in the Item Search window.
Practice – Defining Categories
Overview
In this practice, you will set up item categories and add your items to these categories
Assumptions
- Replace ## with your terminal number or initials.
- You must have access to an Oracle Application Vision database or comparable training or test instance at your site on which to complete this practice.
- Responsibility = Inventory, Vision Operations USA
Tasks
Create Item Categories
1. Create the following item categories: ##No Controls and ##Controls.
Create a Category Set
2. Create a category set called ##Category set
Assign Categories to Your Items
3. Assign the following items your categories:
|
Item |
Category |
|
AS18947 |
##No Controls |
|
AS54888 |
##No Controls |
|
##-Item01 |
##No Controls |
|
##-Item02 |
##Controls |
|
##-Item03 |
##Controls |
|
##-Item04 |
##Controls |
|
##-Item05 |
##Controls |
|
##-Item06 |
##Controls |
|
##-Item07 |
##Controls |
|
##-Item08 |
##Controls |
Defining Categories
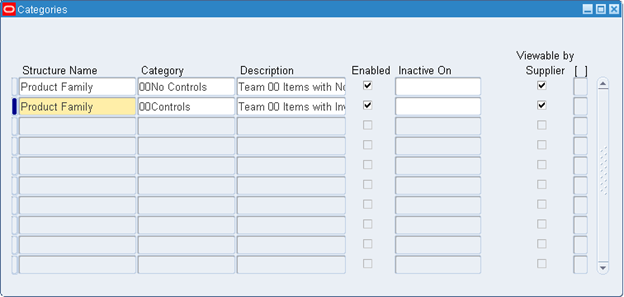
Create Item Categories
Responsibility = Inventory, Vision Operations USA
1. Navigate to the Categories window.
- (N) Setup > Items > Categories > Category Codes
2. (B) New
3. Enter the following information:
|
Structure Name |
Category |
Description |
Enabled |
|
Product Family |
##No Controls |
Team ## Items with No Controls |
Selected |
|
Product Family |
##Controls |
Team ## Items with Inventory Controls |
Selected |
4. (M) File > Save
5. (M) File > Close Form
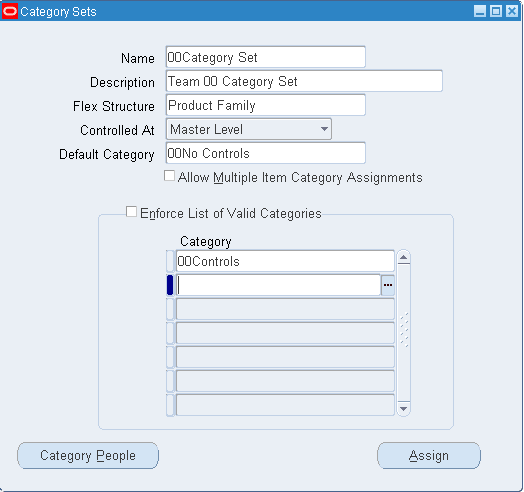
Create a Category Set
6. Navigate to the Category Sets window.
- (N) Setup > Items > Categories > Category Sets
7. Enter the following information:
- Name: ##Category Set
- Description: Team ## Category Set
- Flex Structure: Product Family
- Controlled At: Master Level
- Default Category: ##No Controls
- Category: ##Controls
8. (M) File > Save
9. (M) File > Close Form
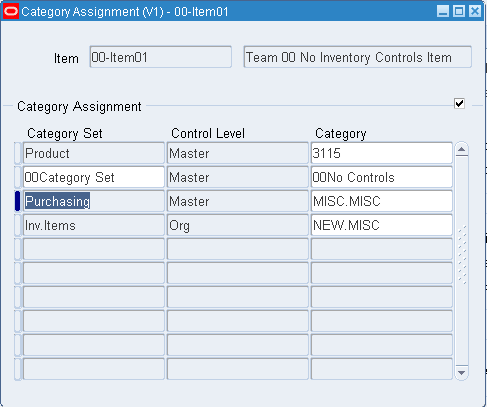
Assign Categories to Your Items
10. Navigate to the Master Item window.
- (N) Items > Master Items
11. Query the items and assign them to your category set and the appropriate categories.
12. (M) View > Query By Example > Enter
13. Enter the item in the Item field.
14. (M) View > Query by Example > Run
15. (M) Tools > Categories
16. Repeat the preceding steps for each of the items listed in the following table:
|
Item |
Category Set |
Category |
|
AS18947 |
## Category Set |
##No Controls |
|
AS54888 |
## Category Set |
##No Controls |
|
##-Item01 |
## Category Set |
##No Controls |
|
##-Item02 |
## Category Set |
##Controls |
|
##-Item03 |
## Category Set |
##Controls |
|
##-Item04 |
## Category Set |
##Controls |
|
##-Item05 |
## Category Set |
##Controls |
|
##-Item06 |
## Category Set |
##Controls |
|
##-Item07 |
## Category Set |
##Controls |
|
##-Item08 |
## Category Set |
##Controls |
17. (M) File > Save
18. (M) File > Close Form