
Oracle Apps AME
What is AME?
AME is a web application providing the following services to calling applications:
- A ceteralized rules respository for defining and sharing rules.
- An execution engine to evaluate rules based on transaction specific data.
- List management capabilities.
- History of Approval statuses.
AME does not manage the notification, routing or responses from approvers. These remain the responsibility of the calling application or the workflow process.
Calling application refers to the application that is using AME components to define the
approval process. Calling applications can be Oracle applications or any application that is uses
PL/SQL code.
When Can I use AME?
You can use AME to derive lists of approvers based on user defined rules, and maintain a history of approvers statuses. These features help you manage proceses such as:
- Authorizing expenses.
- Transferring employees from one division / cost centre to another.
- Approving purchase orders with line or total order values.
- Paying invoices.
- Other business Processes
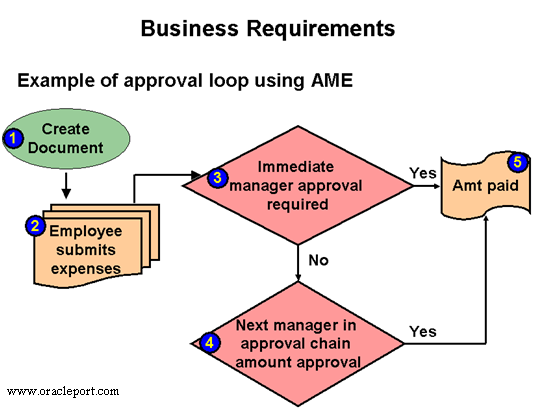
Business Requirements: Example of approval loop using AME
The diagram above shows a basic business process using AME.
- An employee creates their expense reports
- An employee submits their expenses for approval.
- These expenses go to the immediate manager (defined in the supervisor hierarchy) who
- may have a sign off limit.
- If the expenses cannot be approved by the immediate manager, they will then get passed to
- the next manager in the chain.
- You can use AME, to define simple or complex rules which allow line level approval
- based on the sign off authority. For example, you may set up a substitution rule, which
- says that if an expense value is below $100, then manager 1 can approve the expenses and
- if the value is more than $100, then manager 2 needs to approve the transaction. If the
- default approvers fail to approve the transaction, and the transaction includes additional
- approvers, AME applies the substitution rule a second time on the additional approvers.
- Note: AME processes substitution rules a second time at the end of the only when the attribute REPEAT_SUBSTITUTION is set to true.
- The expenses get paid.
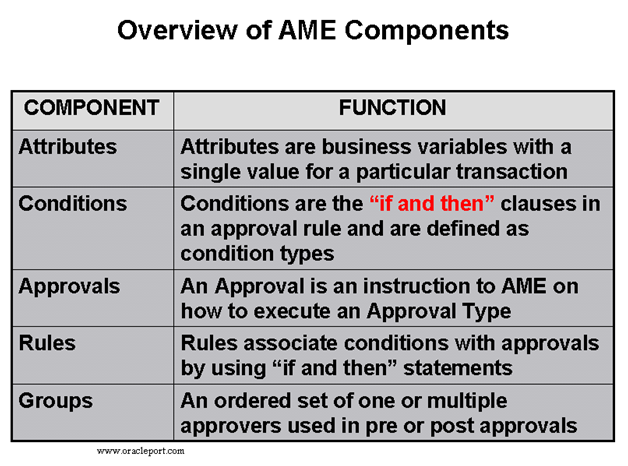
Overview of AME Components
Oracle SSHR provides standard AME attributes for self-service transactions. You can use
these standard attributes to better define your approvals processes. For the complete list of
attributes, see Oracle Approvals Management (AME) Configuration in the online help.
Assigning Responsibility.
By default, the “Approvals Management Administrator” and “Approvals Management Business Analyst” responsibilities do not have any functions associated with them, because their access is restricted by Role Based Access Control (RBAC). In this section, I will detail the steps needed to add functions so that we can get into using AME.
Firstly, we’ll create a new user for this demonstration, and assign them the two responsibilities, thus:
If I now log into the eBusiness Suite as that user and try to switch to either of those responsibilities, the system indicates that there are no functions available for the user (see screenshot below). As I said above, this is because role based access control ensures that only users with the right roles as well as responsibilities can access the functions.

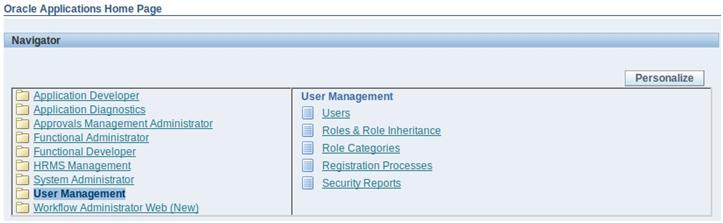
So, now we need to modify the user to give them the right roles to administer AME properly. As a system administrator, open the User Management responsibility, as shown below.
If you do not have any functions assigned to the responsibility, then you will need to use the SYSADMIN user and assign the Security Administrator role to your user. Select the Users option to continue.
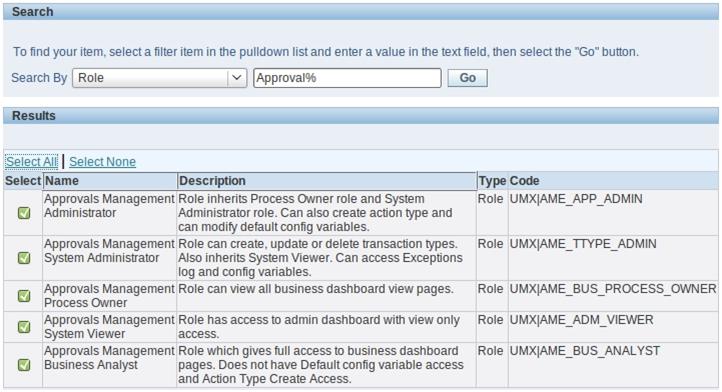
Search for the user that you want to add the functions to (in my case, the 530571 user I created earlier), open the user details and then click on the Assign Roles button. You are then presented with a search window, where you should search for all Roles beginning Approval:
You are then returned to the user screen, where you should complete a justification for granting the roles to the user ” if you don’t then the screen will prevent you from continuing. Once you have entered the justification, you should then hit the Apply button.
Log out as this user, and when you log in as the AME user, you now have functions associated with the two responsibilities:

Now that we have granted the roles to the user, they can access the functions correctly. However, RBAC means that when we open the Dashboard, the data is still protected and cannot be viewed:
Again, we need to grant some RBAC roles to allow the user to access the different transaction types. The main principle behind this is to enable organizations to split the Transaction Type maintenance between different roles ” for example to allow HR Super Users to maintain only the HR rules.
Using a different user, navigate to the Functional Administrator responsibility and click on the Create Grant button to create the new grant. In this example, we will create a specific grant for the 530571 user, however in the real world it is more likely that you will create the grant for a group of users. The Object is set to AME Transaction Types, thus:
In the second step, accept the default data context type of All Rows and continue to the third step. Define the Set to be AME Calling Applications as shown in the following screenshot:

Finally, review the settings that you have entered and click on the Finish button. In order to ensure that the changes are replicated, now flush the cache by clicking on the Core Services tab then choose the Caching Framework sub-menu. Choose Global Configuration from the sidebar and then click on the Clear All Cache button. You will be presented with a warning message (see below) which you can ignore and click on the Yes button.
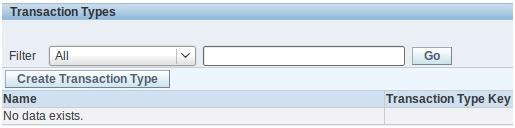
Log out of this user and log back in as the 530571 user, and navigate to one of the AME responsibilities ” you are now given a list of the AME Transaction Types that are configured in the system:

Practice – Working with Approvals
Overview
In these practices you learn about approvals. You also see how approvers receive notifications
informing them of transactions.
Assumptions
- You must have access to an Oracle Application Vision database or comparable training
- or test instance at your site on which to complete this practice.
- The names used throughout this practice are for the purpose of the practice and bear no
- resemblance to any particular organization or individuals.
- Unless otherwise indicated, use the Manager Self-Service responsibility.
- Use the Vision Corporation business group unless otherwise indicated.
- When using a search function, you can use as a wildcard. For example, you can enter
- %Aur% to display all entries containing the string AUR.
Tasks
Using a Function that Requires Approval
When you set up this supervisor hierarchy, log on as Mary Martin and use the Change Pay to
change the pay for Helen Carr from GBP 27.5 per hour to GBP 30. The Approvals mechanism
should trigger an approval notification for Malcolm Aurora. You can access the notification as
Malcolm by selecting either the All Actions Awaiting Your Attention function from the Manager
Self-Service responsibility or by selecting the Worklist function from the Workflow User Web
Applications responsibility.
When the Review page appears for transactions requiring approvals, you can add additional
approvers or notification recipients. When the Review page appears for the Change Pay
transaction, specify that Mary Martin should receive a notification of the transaction.
Display Workflow Notifications
Use the Workflow User Web Applications responsibility as Mary Martin to display the FYI
Notification of the transaction. The log on as Malcolm Aurora (xxUSER1) to display the
approval notification.
Solution – Working with Approvals
Using a Function that Requires Approval
1. Log on to SSHR as user2.
2. Select the Manager Self-Service responsibility.
3. Select the Change Pay function.
The People in Hierarchy page appears.
4. Select the Action icon for Helen Carr.
The Change Pay: Perform Action page appears.
Check that the Change Pay action is in the Selected Actions table.
Select Start to initiate the transaction.
The Effective Date Options page appears.
5. Use today’s date as the effective date.
6. Click the Continue button.
The Pay Rate page appears.
7. Navigate to the Proposed Pay Rate region.
8. In the Description field, select Productivity.
9. In the Hourly Rate Annualised field, enter 2.5.
The remaining fields in the Proposed Pay Rate table are completed.
10. Choose the Next button.
The Review page appears.
Navigate to the Approvers region.
The Approvers table lists Malcolm Aurora as the approver.
11. Expand the Add Ad-hoc Approvers region.
12. In the Approver Type field, select HR People.
13. In the Approver field, enter Martin% and click the Search icon.
14. Select Mary Martin xx.
15. In the Category field, select For Your Information.
16. In the Insertion Point field, select Append to List.
17. Choose Submit to save the transaction.
18. Return to the homepage.
Display the Workflow Notification
Responsibility = Workflow User Web Applications responsibility.
19. Select the Notifications function.
20. The Worklist page is displayed.
21. Make sure that the worklist contains the notification for Helen Carr.
22. Click on the subject title to open the notification.
23. Choose the Logout link.
24. Log on to SSHR as xxuser1/welcome.
25. Select the Notifications function.
26. The Worklist page is displayed.
27. Make sure that the worklist contains the Change Pay notification.
28. Click on the subject title to display the information.
29. Click the Approve button to approve the transaction.
30. Choose the Logout link.
Practice – Creating an AME Rule
Overview
You can use Oracle Approvals Management (AME) to customize and configure your approvals
processes to meet your specific requirements.
After creating your own custom workflow process, you decide that an additional approval level
is required for SSHR transactions that use this workflow process.
In this practice you create the following list creation rule in AME:
If the SSHR transaction calls your custom workflow process
(xx_HR_PERSONAL_INFO_JSP_PRC) then the second immediate supervisor in the
chain of authority as well as the immediate supervisor of the person submitting the
transaction must approve the transaction.
To create this rule, you must also carry out the following tasks:
Check the delivered Workflow Process attribute.
Define a condition.
Define the list creation rule.
Assumptions
You must have access to an Oracle Application Vision database or comparable training
or test instance at your site on which to complete this practice.
Prefix all names of rules, attributes and conditions with your assigned unique group
number or your initials.
Use the responsibility/user as offered by the trainer
Tasks
Define Condition
Define an ordinary header condition that references your workflow process. Use the
WORKFLOW_PROCESS_NAME attribute.
Define Rule
Define a list creation rule, which will use the attributes, conditions and approval types mentioned
above. Create a rule called xxWorkflow Process that uses the chains of authority based on number of supervisory levels approval type. Use the WORKFLOW_PROCESS_NAME header
attribute and your new condition.
Test Rule
Use the Test feature to create a test transaction. Change the header approver attributes so that the
value of the TRANSACTION_REQUESTOR_PERSON_ID is Helen Carr xx and the
WORKFLOW_PROCESS_NAME is xxHR_PERSONAL_INFO_JSP_PRC. Check that the
required approvers are returned
Solution – Creating an AME Rule
Define Condition
Responsibility = Approvals Management Business Analyst
1. Log on to SSHR as xxuser1/welcome.
2. Select the transaction type Oracle Self Service Human Resources and click the Conditions
link.
3. Click Create.
4. Select the Ordinary for the condition type.
5. In the attribute field, select WORKFLOW_PROCESS_NAME from the list of values.
6. In the String Value field for the Workflow Process Name attribute, enter the internal name
of your custom workflow process, for example, xxHR_PERSONAL_INFO_JSP_PRC.
7. Click Apply.
8. A confirmation message is displayed to confirm that the condition has been created.
9. Check that the condition is listed in the conditions list.
Define Rule
10. Click the Rules tab.
11. Click Create.
12. In the Name field, enter xxWorkflow Process.
13. In the Rule Type field, select List-creation.
14. Accept the default start and end dates.
15. Click Next to continue to the next step.
16. Click Add Condition
17. All possible conditions for the Workflow Process are listed in the Header Conditions region.
Select your condition.
18. Click Continue to continue to the next step.
19. Select the Action “Require approvals up to the first two superiors” for the Supervisory Level
action type.
20. Click Continue, review your rule, and select Finish.
Your rule has been created.
Test Rules
21. Click the Test Workbench tab.
22. Click Create.
23. Select Helen Carr XX as the test data for the
TRANSACTION_REQUESTOR_PERSON_ID parameter.
24. Select your workflow process name as the test data for the
WORKFLOW_PROCESS_NAME parameter, for example,
xxHR_PERSONAL_INFO_JSP_PRC
25. Click Run Test Case.
26. AME will list any rule detected that match your test transaction – yours should be listed. The
appropriate people to approve this transaction if initiated by Helen Carr are also listed:
Mary Martin and Malcolm Aurora.
Hi Faisal
Very Informative post. I need Online training for Workflow. Can you help me?
Faisal,
I need an online training for AME for Property Manager. Can you help me in this regards.
Hi Bilal,
Please drop an email on training@oracleport.com
Thanks.
Great work. This document is very much informative.
Hi ,
When I mailed to training@oracleport.com this address it is failing.
Regards,
Swetha.
Hi,
its trainings@oracleport.com. Where did you see training@oracleport.com?
Regards,
Admin OraclePort.