
Oracle Apps R12 Inventory : Min-Max Planning , Replenishment Count Using the Mobile Application
Performing Min-Max Planning
In this lab you will perform min-max planning for an item.
Assumptions
- You completed the define items lab.
- You must have access to an Oracle Application Vision database or comparable training or test instance at your site on which to complete this practice.
Tasks
Enable Min-Max Planning for Item
Enter Min-max planning for ##-Item03 and restrict to your ##FGI subinventory.
Use the following minimum and maximum quantities:
- Minimum quantity: 300
- Maximum quantity: 900
Request a Min-Max Planning Report
Request a min-max planning report for your item and subinventory using the following information:
- Planning level: Subinventory
- Subinventory: ##FGI
View the Min-Max Planning Report
View your min-max planning report.
Solution – Performing Min-Max Planning
Enable Min-Max Planning for Item
Responsibility: Inventory, Vision Operations USA
1. Navigate to the Organization Items window and find your ##-Item03 item.
- (N) Items > Organization Items
2. Find your ##-Item03 item.
3. (T) General Planning
- Inventory Planning Method: Min-Max

4. (M) File > Save
5. (M) Tools > Item Subinventories
6. Enter the minimum and maximum quantities for the item/subinventory combination as follows:
- Name: ##FGI
- Min-Max Planning: selected
- Minimum Quantity: 300
- Maximum Quantity: 900
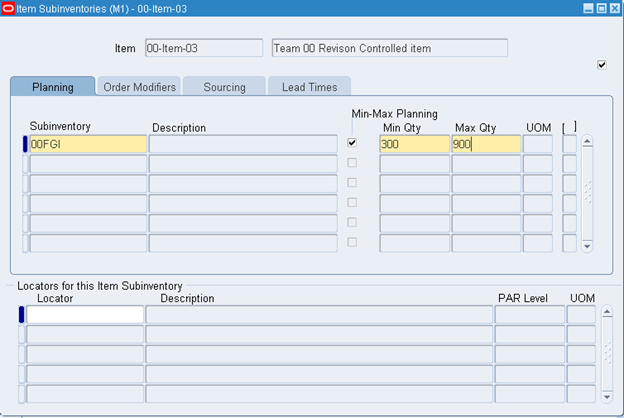
7. Save and Close window.
- (M) File > Save
- (M) File > Close Form
Request a Min-Max Planning Report
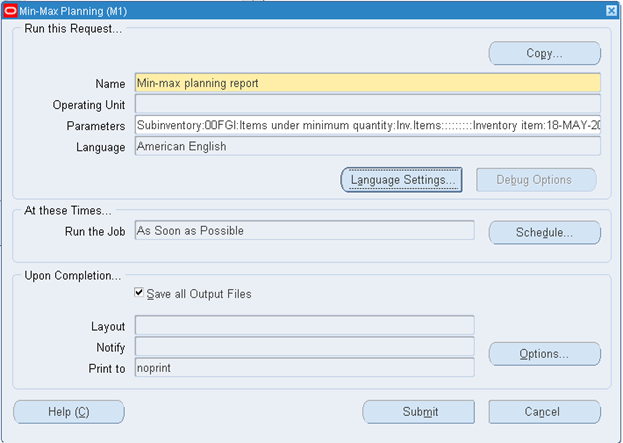
8. Navigate to the Min-Max Planning window.
- (N) Planning > Min-Max Planning
9. Enter the following information in the Parameters window:
- Planning Level: Subinventory
- Subinventory: ##-FGI
- Demand Cuttoff Date: 1 month from today
- Supply Cuttoff Date 1 month from today
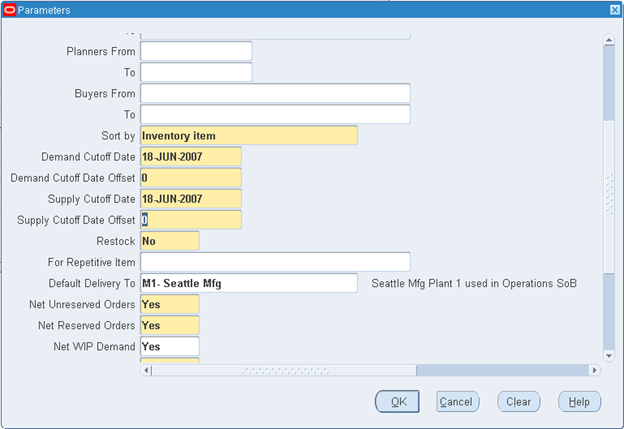
10. (B) OK.
11. (B) Submit.
12. (B) No.
View the Min-Max Planning Report
13. (N) Requests
14. Select My Completed Requests
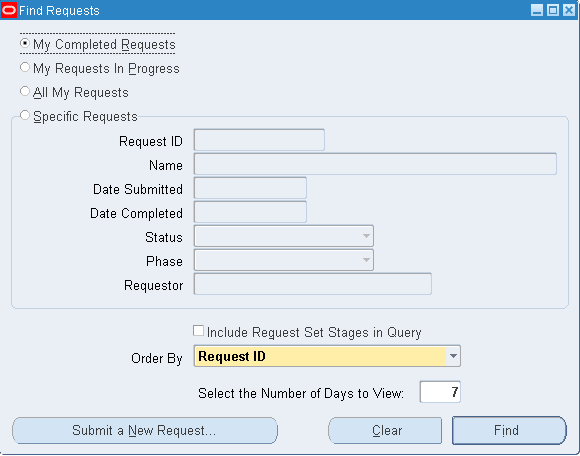
15. Select Find.
16. Select your request.

17. (B) View Output.
18. (M) File > Close.
19. (M) File >Close Form.
Setting up Min-Max Planning
Responsibility: Inventory, Vision Operations USA
Setting Up Min-max Planning for an Item
1. Navigate to the Organization Items window.
- (N) Items > Organization Items.
2. Find Item AS18947
3. (T) General Planning
4. Change the Inventory Planning Method to Min-Max.
5. (M) File > Save.
6. (M) Tools > Item Subinventories.
7. (M) File > New
8. Enter FGI as the subinventory.
9. Select the Min-Max Planning check box.
10. Enter 300 as the Minimum Qty.
11. Enter 900 as the Maximum Qty.
12. (M) File > Save.
13. (M) File > Close Form.
Running the Min-max Planning Report
14. Navigate to the Min-Max Planning window.
- (N) Planning > Min-Max Planning
15. Enter the following planning information.
- Planning Level: Subinventory
- Subinventory: FGI
- Item Selection: All min-max planned items
16. (B) OK
17. (B) Submit
18. (B) No
Viewing the Min-Max Planning Report
19. (N) Requests.
20. Find your request.
21. Choose View Output.
22. (M) File > Close.
23. (M) File > Close Form.
Replenishment Count Using the Mobile Application
Overview
In this practice you will perform a replenishment count using the mobile application. The following are the steps in this practice:
- Entering the replenishment count header information using forms
- Entering the replenishment count using the mobile application
- Processing the count information using the mobile application
Assumptions
- You are skilled in Oracle Navigation.
- You completed the practice Performing a Replenishment Count Using Forms.
- You must have access to an Oracle Application Vision database or comparable training or test instance at your site on which to complete this practice.
- If you are in an education center, verify you are logged in to the launch pad.
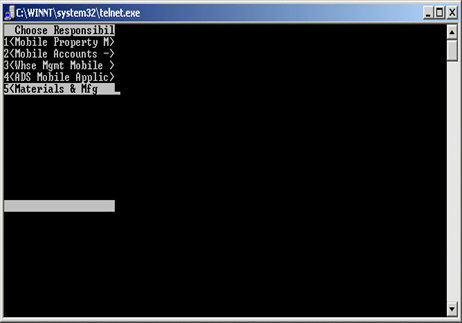
- Responsibility: Materials & Mfg
Tasks
Enter Replenishment Count Header Information
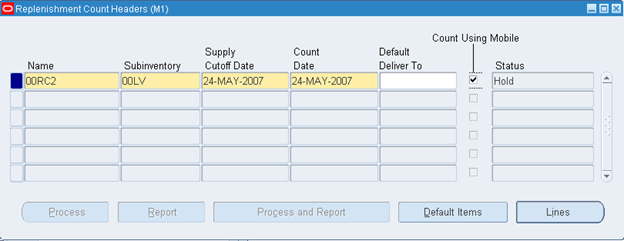
Create a replenishment count header using the following information:
- Name: ##RC2
- Subinventory: ##-LV
- Count Using Mobile: Yes
Enter Replenishment Count Lines
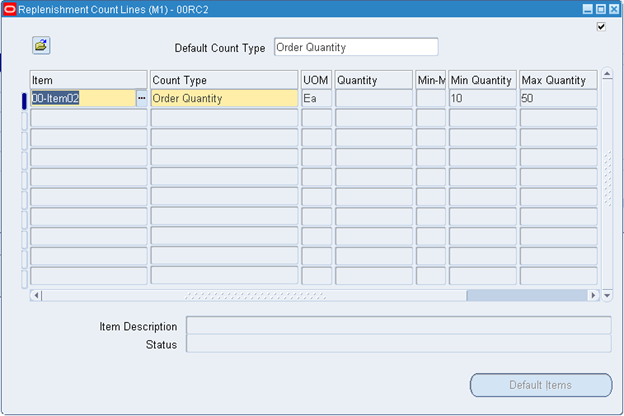
Enter the replenishment count line information for ##RC2 using the forms:
- Item: ##-Item02
- Count Type: Order Quantity
Enter Replenishment Count Using the Mobile Application
Enter the replenishment count for ##RC2 in the mobile application using the following information:
- Organization: M1
- Subinventory: ##-LV
- Replenishment Count: ##RC2
- Item: ##-Item02
- Order Quantity: 30
Process the Count Information Using the Mobile Application
Process the count entered for ##RC2 using the mobile application.
Answer the following question after you complete the lab.
Can you enter the count in the Replenishment Count Lines window for ##RC2? Why?
Replenishment Count Using the Mobile Application
Enter Replenishment Count Header Information
Responsibility: Inventory, Vision Operations USA
1. Navigate to the Replenishment Count Headers window.
- (N) Counting > Replenishment Counts > Counts
2. (B) New
3. Create a new replenishment count header using the following information:
- Name: ##RC2
- Subinventory: ##-LV
- Count Using Mobile: Yes
Enter Replenishment Count Lines
4. (B) Default Items.
5. Enter the following information:
- Item: 00-Item02
- Count Type: Order Quantity
6. (M) File > Save
7. (M) File > Close Form
Enter a Replenishment Count Using the Mobile Application
Responsibility: Materials & Mfg
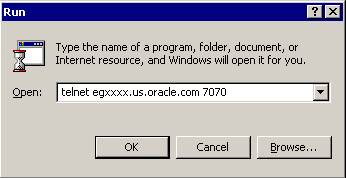
8. Start the Telnet session.
- (N) Windows Start menu > Run
9. Enter the login URL for the Tenet server as provided by the instructor. For example, enter telnet egxxxx.us.oracle.com 7070 in the Run dialog box, where xxxx is the instance number.
10. Select <Default> from the Device List.

11. Enter your user name and password. Note that the Materials & Mfg responsibility must be assigned to your user name.
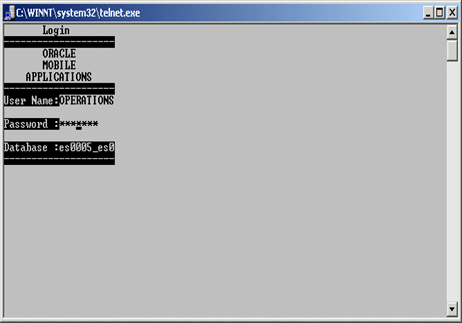
12. Select <Materials & Mfg>
13. Select <Inventory> from the Materials & Mfg Menu.
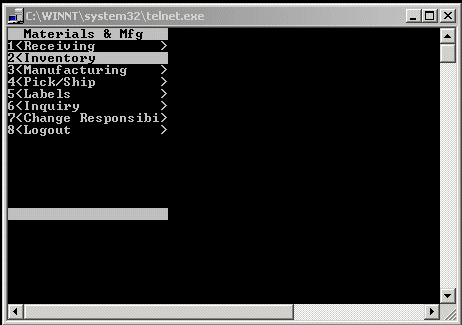
14. Select <Counting> from the Inventory menu.

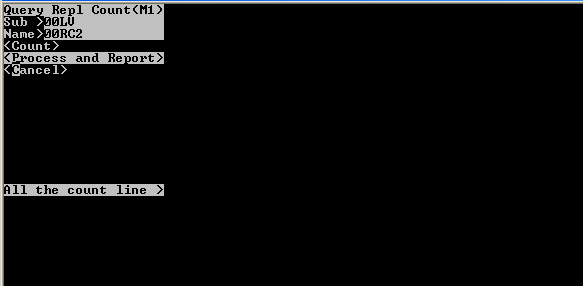
15. Select <Repl Count> from the Counting menu.

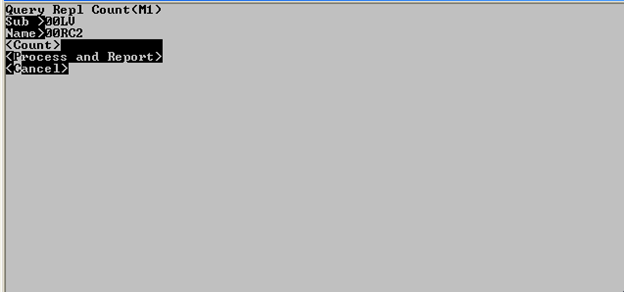
16. Enter the following information when prompted.
Note: The mobile application screen is case sensitive.
- Organization Code: M1
- Subinventory: ##-LV
- Replenishment Count Name: ##RC2
17. Select <Count> to enter the order quantity.
18. Enter ##-Item02 in the Item field.
19. Enter 30 in the Order Qty field.
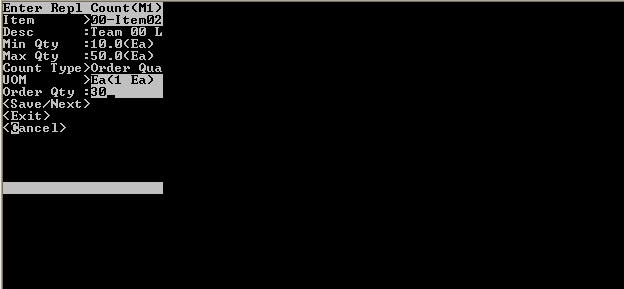
20. Select <Save/Next>
21. Press Ctrl+B to view the Message Page.
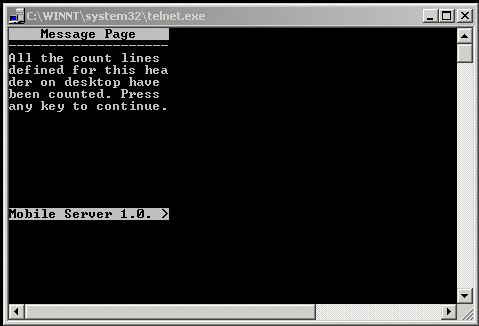
Process the Count Information Using the Mobile Application
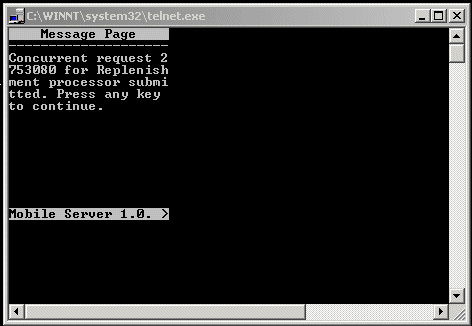
22. Select <Process and Report>
23. Press Ctrl+B to view the Message Page. The request number is displayed. You can view the details of the Replenishment Count Report by querying for the request number in the Requests window.
24. Select Logout to exit the mobile application.
25. Can you enter the count in the Replenishment Count Lines window for ##RC2? Why? No, you cannot enter the count in the Replenishment Count Lines for ##RC2. This is because you would have selected the Count Using Mobile check box in the Replenishment Count Headers window, you can enter the count only using the mobile application.