
Oracle Purchasing (R12) User Practice
Practice – Create a Supplier with Two Sites
Summary
Your supervisor has notified you that the company will be purchasing materials and services from a new supplier. In this activity, you will create a supplier with two sites.
Expectations
- Logon to the system using the XXUSERNAME you created earlier.
- Replace XX with your terminal number or initials.
- Prior activities are completed. Activities build on earlier activities.
- You must have access to an Oracle Application Vision database or comparable training or test instance at your site on which to complete this activity.
Tasks
- Create a Supplier
- Create a Pay Site
- Create a Purchasing Site
- Create a Contact for the Pay Site
- Create a Contact for the Purchasing Site
Solution
Create a Supplier
Responsibility = Purchasing, Vision Operations
1. Navigate to the Suppliers page:
(N) Supply Base > Suppliers
2. (B) Create Supplier
- Supplier Type = Standard supplier
- Organization Name = XXIBM Corporation
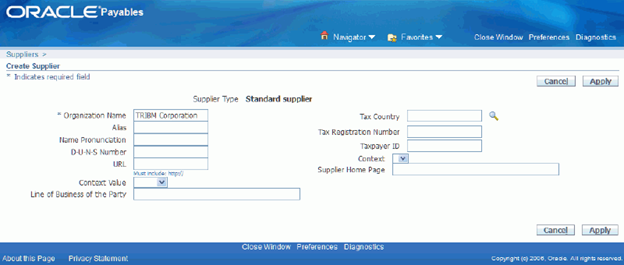
3. (B) Apply
4. (H) Organization (left side of page)
- Type = Manufacturing
5. (B) Save
6. (H) Tax and Reporting (left side of page)
- Allow Tax Applicability check box = Select

7. (B) Save
8. (H) Purchasing (left side of page)
- Create Debit Memo from RTS Transaction check box = Select
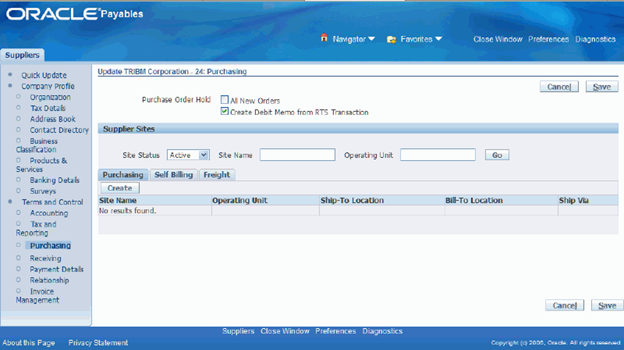
Note: Select the Create Debit Memo from RTS Transaction check box if you want the system to automatically create a Debit Memo in Payables when you enter a Return to Supplier (RTS) in Purchasing. The value for supplier site defaults from the Purchasing Options window.
9. (B) Save
10. (H) Receiving (left side of page)
- Receipt Routing = Requires: Standard receipt, Deliver (Standard Receipt)
- Match Approval Level = 3-Way
- Allow Substitute Receipts check box = Select
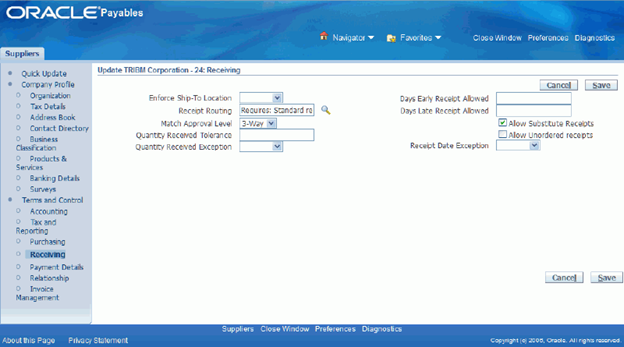
11. (B) Save
12. (H) Invoice Management (left side of page)
- Invoice Currency = US dollar
- Invoice Match Option = Purchase Order
- Terms = Immediate
- Pay Group = Standard Supplier Paygroup
- Always Take Discount check box = Select

13. (B) Save
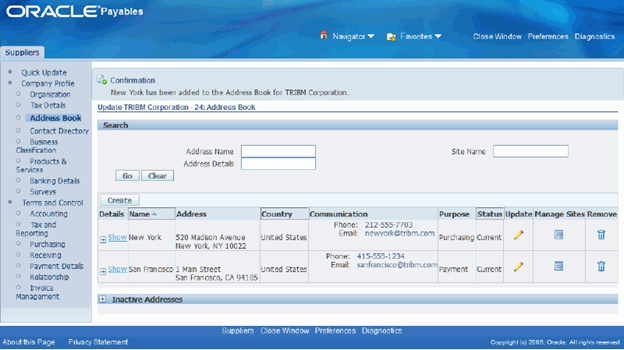
Create a Pay Site
14. (H) Address Book
15. (B) Create
16. Enter the supplier site address information as follows:
- Country = United States
- Address Line 1 = 1 Main St.
- City = San Francisco
- County = San Francisco
- State = CA
- Postal Code = 94105
- Address Name = San Francisco
- Addressee = San Francisco
- Phone Area Code = 415
- Phone Number = 555-1234
- Email Address = sanfrancisco@xxibm.com
- Address Purpose: Payment check box = Select
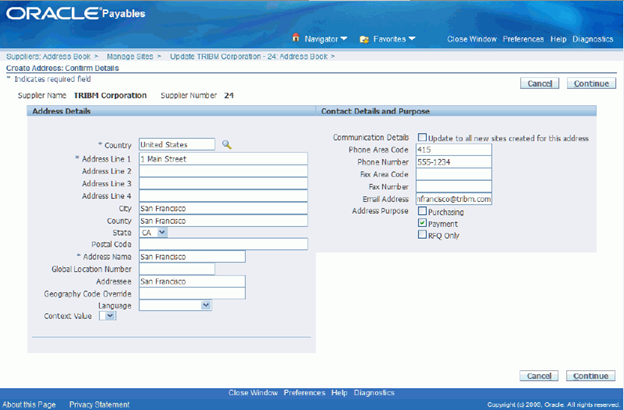
Important: This address should be complete as this is the address that will appear on any checks cut to this site.
17. (B) Continue
18. Enable the Vision Operations operating unit for this site by selecting the check box next to the Site Name San Francisco.
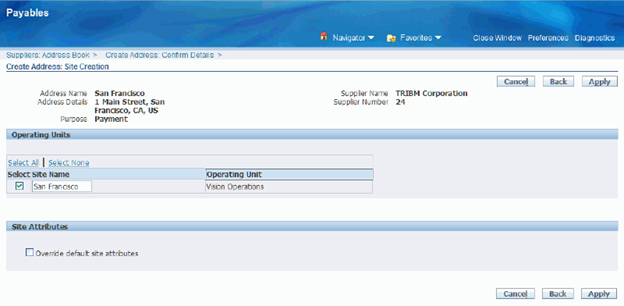
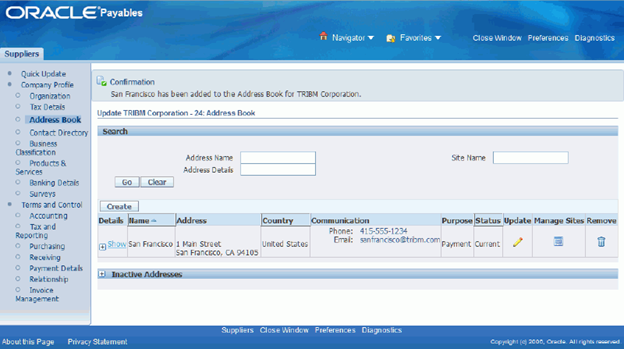
19. (B) Apply. This creates the basic supplier site.
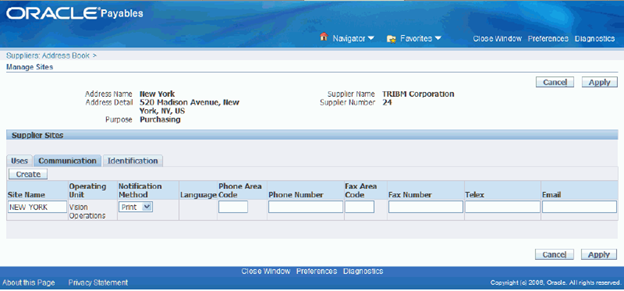
20. To update the supplier site attributes, click (I) Manage Sites in the Manage Sites column of the address table.
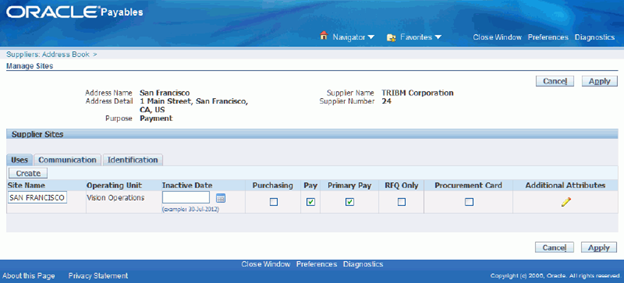
21. (T) Uses
- Pay check box = Select
- Primary Pay check box = Select
22. (T) Communication
- Notification Method = Print
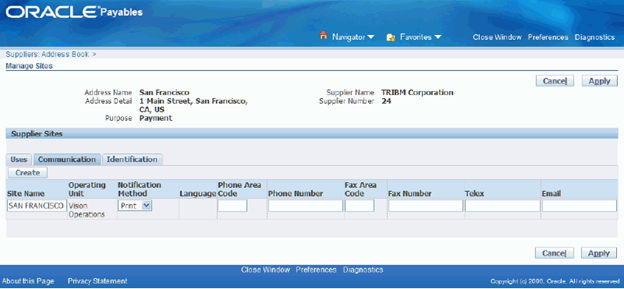
23. (B) Apply
Create a Purchasing Site
24. (B) Create
25. Enter the supplier site address information as follows:
- Country = United States
- Address Line 1 = 520 Madison Ave.
- City = New York
- County = New York
- State = NY
- Postal Code = 10022
- Address Name = New York
- Addressee = New York
- Phone Area Code = 212
- Phone Number = 555-7703
- Email Address = newyork@xxibm.com
- Address Purpose: Purchasing check box = Select

26. (B) Continue
27. Enable the Vision Operations operating unit for this site by selecting the check box next to the Site Name New York.
28. (B) Apply. This creates the basic supplier site.
29. To update the supplier site attributes for New York, click (I) Manage Sites in the Manage Sites column in the table.
30. (T) Communication
- Notification Method = Print
Note: When you enter and approve purchase orders for this supplier, the Supplier Notification Method will default. We’ve selected printed document here. However, if we select Email and specified an e-mail address, that information would default during purchase order approval so we could send the purchase order using the supplier’s preferred method. Valid options are Email, Fax, and Print.
31. (B) Apply
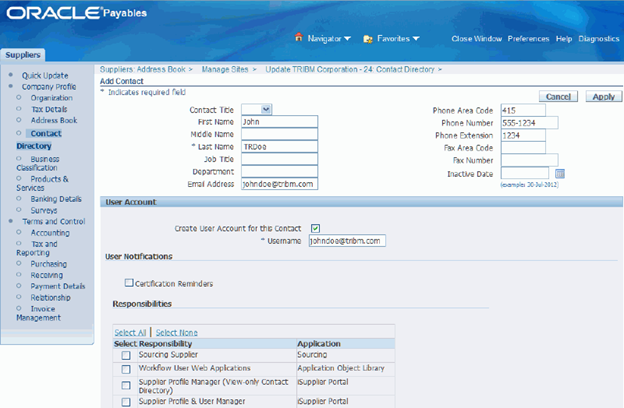
Create a Contact for the Pay Site
32. (H) Contact Directory
33. (B) Create
- First Name = John
- Last Name = xxDoe
- Email Address = johndoe@xxibm.com
- Phone Area Code = 415
- Phone Number = 555-1234
- Phone Extension = 1234
- Create User Account for this Contact check box = Select
- iSupplier Portal Full Access Responsibility = Select
34. Scroll down the page to the Addresses for the Contact region and then (B) Add Another Row.
35. Select San Francisco.

36. (B) Apply
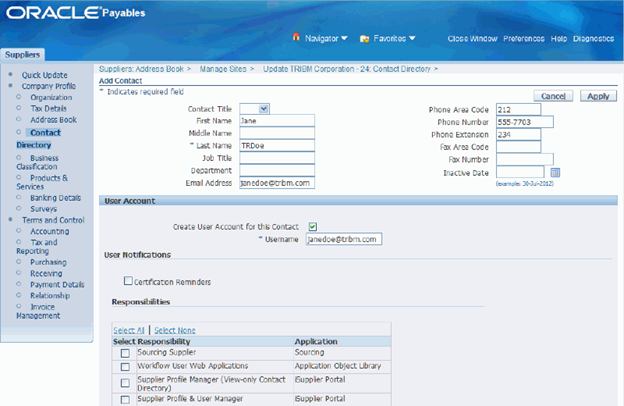
Create a Contact for the Purchasing Site
37. (B) Create
- First Name = Jane
- Last Name = xxDoe
- Email Address = janedoe@xxibm.com
- Phone Area Code = 212
- Phone Number = 555-7703
- Phone Extension = 234
- Create User Account for this Contact check box = Select
- iSupplier Portal Full Access Responsibility = Select
38. Scroll down the page to the Addresses for the Contact region and then (B) Add Another Row.
39. Select New York.
40. (B) Apply
41. Close the page and return back to the Navigator.
Practice – Create a Location
Summary
In this activity, you will create a location to use with later activities.
A location is a physical address that will be associated with organizations. In Oracle Purchasing, these locations will be added to the purchasing documents to direct the supplier to ship goods to the “ship to” location and send the invoice bill to the “bill to” location.
Expectations
- Logon to the system using the XXUSERNAME you created earlier.
- Replace XX with your terminal number or initials.
- Prior activities are completed. Activities build on earlier activities.
- You must have access to an Oracle Application Vision database or comparable training or test instance at your site on which to complete this activity.
Tasks
- Create a Location
Solution
Create a Location
Responsibility = Purchasing, Vision Operations
1. Navigate to the Location window:
- (N) Setup > Organizations > Locations
2. Enter the following:
- Global check box = Select
- Name = XXSan Diego
- Description = XXSan Diego
Note: Clear the Global check box if you want the location to only be available within the default Business Group of your current responsibility. Select the Global check box if you want the location to be a global location and therefore available to all Business Groups.
3. (T) Address Details
- Address Style = United States.
4. Click in the Address field and enter:
|
Field |
Value |
| Address | 13400 West Ocean Air Drive |
| City | San Diego |
| State | CA |
| Zip | 92130 |
| County | San Diego |
| Country | United States |
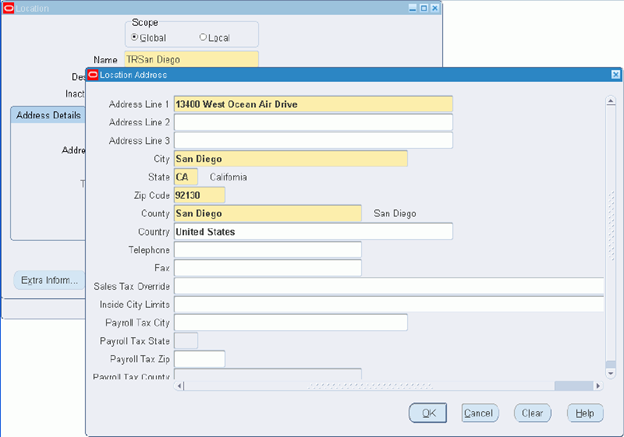
5. (B) OK
6. Enter the following:
- Timezone = Pacific Time
7. (I) Save
8. (T) Shipping Details
- Contact = Select any contact name
- Ship-To Location = XXSan Diego
9. (I) Save
10. Check to make sure the site is a Ship-To Site, Receiving Site, Office Site, Bill-To Site, and Internal Site.
Note: Selecting the check boxes means that you are making the Location Name a valid location in the list of values on a Purchasing document. For example, selecting Ship-To Site makes the location name a valid choice in the list of values for the Ship-To field on a purchase order header.
Note: If you define a default Ship-To or Bill-To Location in the Supplier-Purchasing region of the Financials Options window for your organization that is the location that defaults onto your purchase orders. But if you wanted to change that default, the Location Name that you define here and enable as a Ship-To or Bill-To site is available in the list of values for you to select from in the Ship-To or Bill-To fields.
11. (I) Save
12. (T) Other Details
- Inventory Organization = Blank
Note: Leaving this field blank will enable this location to be used with multiple inventory organizations. Specifying an inventory organization will ensure that the location is ONLY used with the specified inventory organization.
- EDI Location = Blank
Note: If you use Electronic Data Interchange (EDI) to receive Advance Shipment Notices (ASNs) or ASNs with billing information (ASBNs), enter a defined location. This location should match the ship-to location specified on an ASN or ASBN.
13. (I) Save
14. Close the Location window to return to the Navigator.
Summary
Creating an Inventory organization is part of the initial Purchasing setup. In this activity, you will create an inventory organization that will be used in later activities.
Expectations
- Logon to the system using the XXUSERNAME you created earlier.
- Replace XX with your terminal number or initials.
- Prior activities are completed. Activities build on earlier activities.
- You must have access to an Oracle Application Vision database or comparable training or test instance at your site on which to complete this activity.
Tasks
- Create an Inventory Organization
- Assign the Organization to an Existing Item Master
- Specify Receiving Information
Solution
Create an Inventory Organization
Responsibility = Purchasing, Vision Operations
1. Navigate to the Organization window:
- (N) Setup > Organizations > Organizations
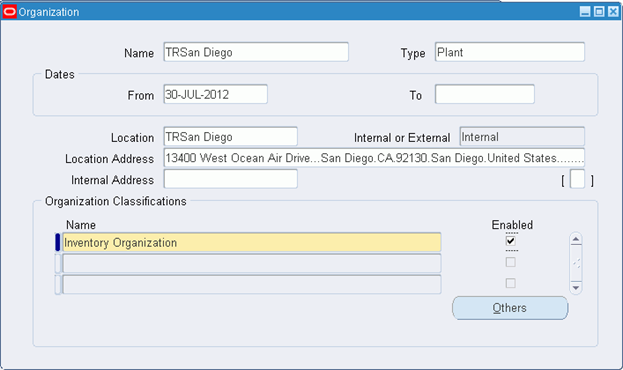
2. (B) New
- Name = XXSan Diego
- Type = Plant
- Enter a date in the From field early enough for any historical information that you need to enter. The field defaults to the current date.
- To Date = Leave Blank
- Location = XXSan Diego
3. (I) Save
Note: Multiple inventory organizations can share the same physical location if the Inventory Organization field associated with the Location was left blank (as in the prior Activity: Create a Location).
4. For the Name field in the Organization Classifications region, use the list of values to select Inventory Organization.
5. Select the Enabled check box (use the mouse or the space bar).
6. (I) Save
7. (B) Others
8. In the Additional Organization Information window, select Accounting Information and (B) OK.
9. Click in the Accounting Information field:
- Primary Ledger = Vision Operations
- Legal Entity = Vision Operations
- Operating Unit = Vision Operations
10. (B) OK
11. (B) OK
12. (B) Yes to save changes.
Assign the Organization to an Existing Item Master
13. Re-open the Organization Parameters window:
- (B) Others
14. In the Additional Organization Information window, select Inventory Information and (B) OK.
15. (T) Inventory Parameters
- Organization Code = XXS
- Item Master Organization = Vision Operations
- Calendar = Vision01
- Demand Class = West US
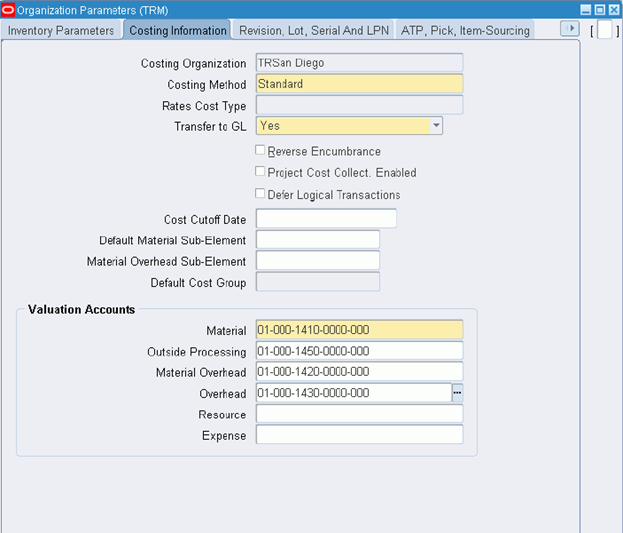
16. (T) Costing Information
|
Account Type |
Account |
| Material | 01-000-1410-0000-000 |
| Outside Processing | 01-000-1450-0000-000 |
| Material Overhead | 01-000-1420-0000-000 |
| Overhead | 01-000-1430-0000-000 |
| Resource | Leave field blank |
| Expense | Leave field blank |
17. (T) Revision, Lot, Serial And LPN
- Starting Serial Number = 1
18. (T) Other Accounts (use the active right arrow on the top right of window to access this tab).
|
Account Type |
Account |
| Purchase Price Variance | 01-540-5210-0000-000 |
| Invoice Price Variance | 01-540-5220-0000-000 |
| Inventory AP Accrual | 01-000-2215-0000-000 |
| Sales | 01-540-4160-0000-000 |
| Cost of Goods Sold | 01-540-5200-0000-000 |
| Deferred COGS Account | 01-540-5200-0000-000 |
19. (I) Save
20. (B) OK when the pop-up note concerning Organizational Costing Methods appears.
Note: A huge difference between a Location and an Inventory Organization is that Inventory Organizations determine a lot of accounting that gets sent to the General Ledger. For Purchasing, we are mainly concerned about Purchase Price Variance, Invoice Price Variance and Inventory AP Accrual accounts.
21. Close the Organization Parameters window but do NOT close the Organization window.
Specify Receiving Information
22. Re-open the Organization Parameters window:
- (B) Others
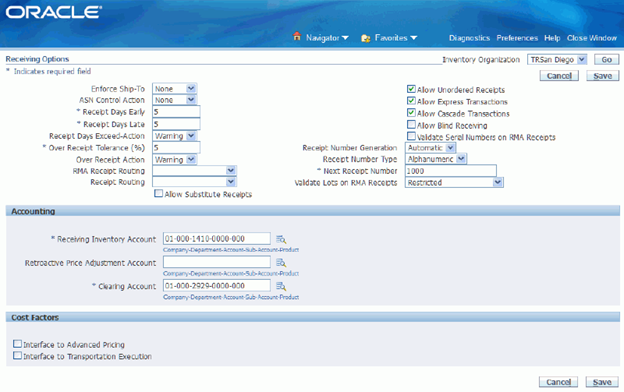
23. In the Additional Organization Information window, select Receiving Information and (B) OK. The Receiving Options page appears in another window.
- Receipts Days Early = 5
- Receipts Days Late = 5
- Receipt Days Exceed-Action = Warning
- Over Receipt Tolerance(% )= 5
- Over Receipt Action = Warning
- Receipt Routing = Standard Receipt
- Allow Unordered Receipts check box = Select
- Allow Express Transactions check box = Select
- Allow Cascade Transactions check box = Select
- Next Receipt Number = 1000
- Receiving Inventory Account = 01-000-1410-0000-000
- Clearing Account = 01-000-2929-0000-000
24. (B) Save and close the Receiving Options page.
25. Close the Organization window to return to the Navigator.
Practice – Define a Unit of Measure
Expectations
- Logon to the system using the XXUSERNAME you created earlier.
- Replace XX with your terminal number or initials.
- Prior activities are completed. Activities build on earlier activities.
- You must have access to an Oracle Application Vision database or comparable training or test instance at your site on which to complete this activity.
Tasks
- Create a Unit of Measure Class
- Create Three Units of Measure
- Create Conversions for Your Units of Measure
Solution
Create a Unit of Measure Class
Responsibility = Purchasing, Vision Operations
1. Navigate to the Unit of Measure Classes window:
- (N) Setup > Units of Measure > Classes
2. Select M1 Seattle Manufacturing Inventory Organization.
3. (I) New
4. Enter the following:
- Name = XXQty
- Description = XX-Quantity Class
- Base Unit = XX-Each
- UOM = XXE
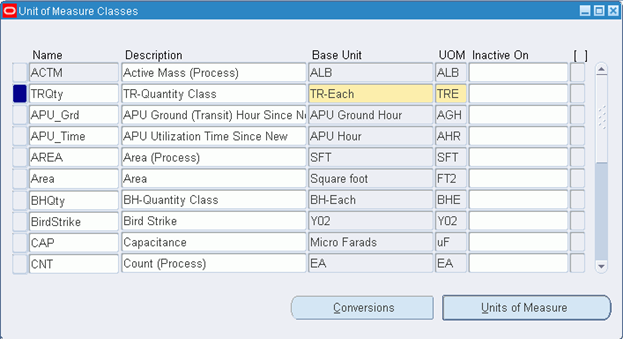
5. (I) Save
Create Three Units of Measure
6. From the Units of Measure Classes window:
- (B) Units of Measure
7. Enter the following:
- Name = XX-Dozen
- UOM = XXD
- Description = XX-Dozen
8. Enter the following:
- Name = XX-Case
- UOM = XXC
- Description = XX-Case
9. Enter the following:
- Name = XX-Gross
- UOM = XXG
- Description = XX-Gross
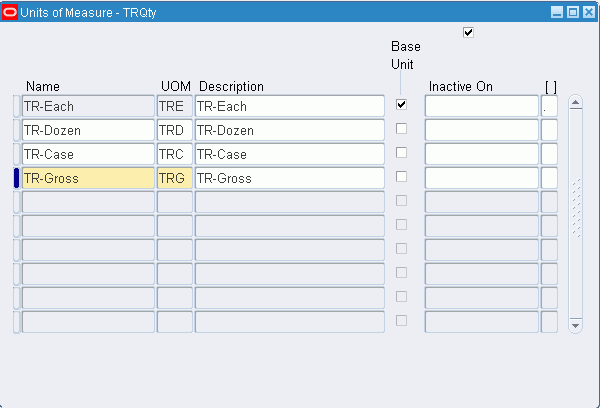
10. (I) Save and close the Units of Measure window which will return you back to the Unit of Measure Classes window.
Create Conversions for Your Units of Measure
11. From the Unit of Measure Classes window:
- (B) Conversions
- (T) Standard
- Enter the following:
- Unit = XX-Dozen
- Conversion = 12
- Enter the following:
- Unit = XX-Case
- Conversion = 24
- Enter the following:
- Unit = XX-Gross
- Conversion = 144
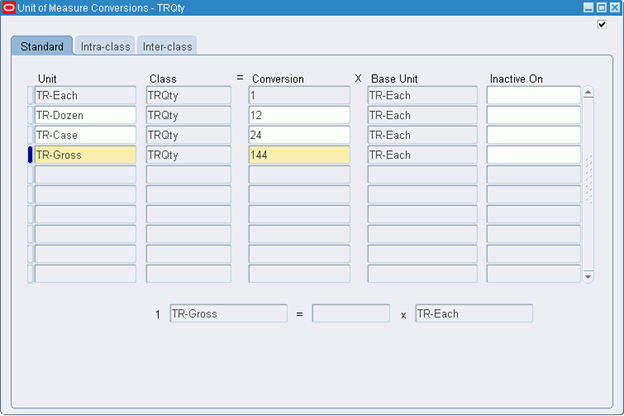
15. (I) Save.
Now you will set up a conversion for an existing item to your newly created unit of measure.
16. (T) Inter-class
17. Enter the following:
- Item = AS18947
- Base Unit = XX-Each
- Conversion = 2
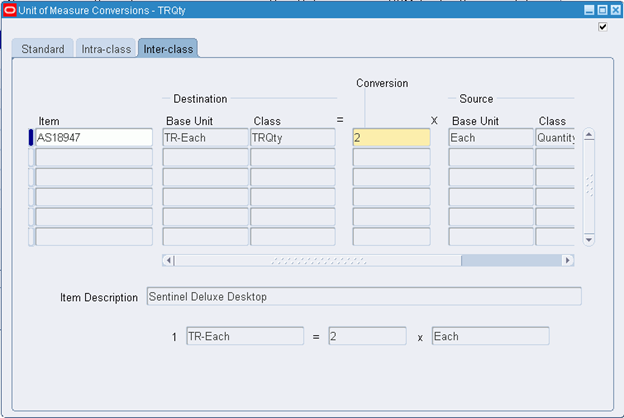
18. (I) Save and close the windows to return to the Navigator.
Practice – Create a Purchasing Category
Summary
In this activity, you will create a purchasing category to be used later when creating purchasing documents.
Expectations
- Replace XX with your terminal number or initials.
- Logon to the system using the XXUSERNAME you created earlier.
- Prior activities are completed. Activities build on earlier activities.
- You must have access to an Oracle Application Vision database or comparable training or test instance at your site on which to complete this activity.
Tasks
- Add Key Values for Purchasing Category Combinations
- Create Purchasing Categories
- Assign the Categories to a Category Set
Solution
Add Key Values for Purchasing Category Combinations
Responsibility = Purchasing, Vision Operations
Note: In most cases creating a Purchasing category would only require the steps below for creating category codes and then assigning them to the Purchasing category set. Since the Flexfields in the Oracle Vision database have dependent value sets due to other product requirements, we have to do a little extra work.
1. Navigate to the Segment Values window:
- (N) Setup > Flexfields > Key > Values
2. Enter the following:
- Value Set option = Select
- Name = PO Item Category
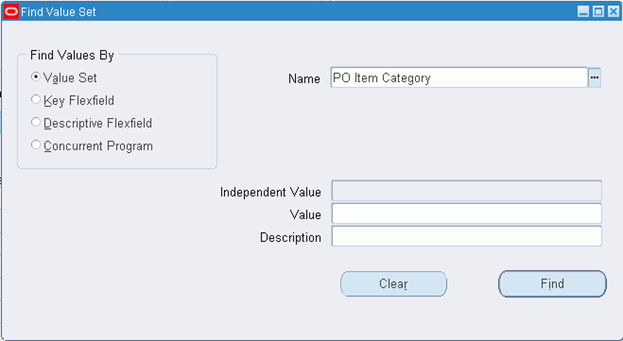
3. (B) Find
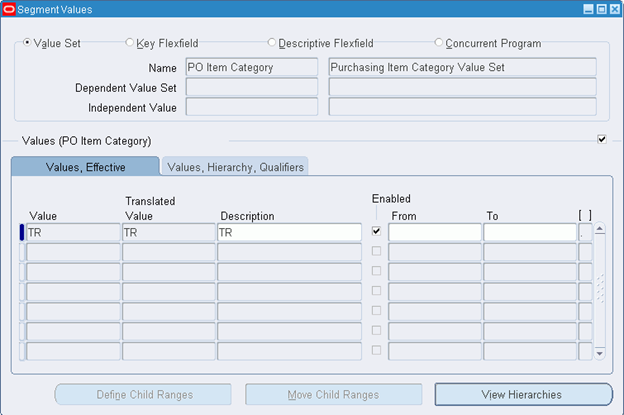
4. (T) Values, Effective
5. Place your cursor in the first open row in the Values, Effective tabbed region. If no open rows are visible, select any row and click (I) New.
6. Enter the following:
- Value = XX
- Description = XX
7. (I) Save. DO NOT exit the window.
Note: (B) OK in the Compile note when it appears if you did exit the window.
8. Add COMPUTER and SUPPLIES to the Commodity value set as dependent values to XX:
- Place your cursor in the Name field and click (I) Find.
- Enter Commodity in the Name field.
- In the Independent Value field, select your XX value.
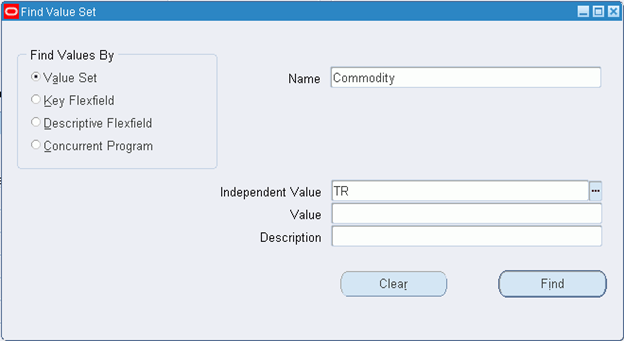
- (B) Find
- Place your cursor in the first open row in the Values, Effective tabbed region. If no open rows are visible, select any row and click (I) New.
- Enter COMPUTER in the Value field, and Computer XX in the Description field.
- Move your cursor to the next open row. If no open rows are visible, click (I) New.
- Enter SUPPLIES in the Value field, and Supplies XX in the Description field.
- (I) Save
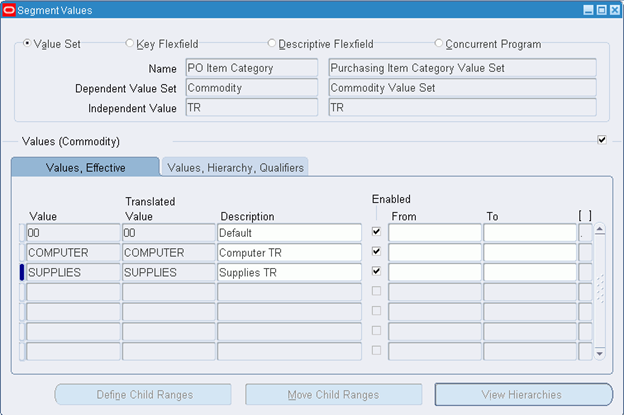
- Close the Segment Values window.
- (B) OK in the Compile note when it appears as you close the window.
Create Purchasing Categories
9. Navigate to the Categories window:
- (N) Setup > Items > Categories > Category Codes
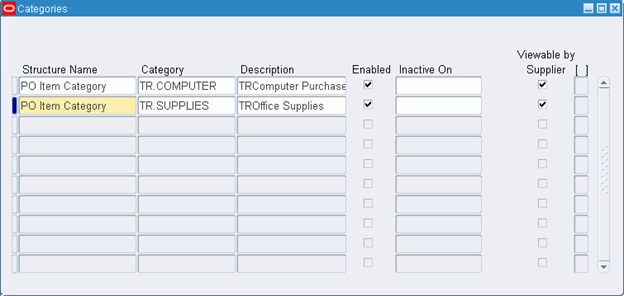
10. (B) New
11. Create categories according to the following table:
|
Structure Name |
Category |
Description |
Viewable by Supplier Check Box |
| PO Item Category | XX.COMPUTER | XXComputer Purchases | Select |
| PO Item Category | XX.SUPPLIES | XXOffice Supplies | Select |
Note: In Oracle iProcurement, these categories display by their category description to requesters. If no description is provided – it is optional – then the categories display by their category code to requesters.
12. (I) Save and close the window.
Assign the Categories to a Category Set
13. Navigate to the Category Sets window:
- (N) Setup > Items > Categories > Category Sets
- Select the V1 – Vision Operations organization if asked.
14. Query the PO Item Category Flex Structure:
- Press F11 to turn into query mode
- Place cursor in Flex Structure field (make certain you are not in data entry mode but in query mode).
- Enter PO Item Category (case matters) in the Flex Structure field.
- Press Ctrl + F11 to execute query.
15. Add your two new categories to the region called Category:
- Place your cursor in the first open row of the Category region. If no open rows are visible, select any row and click (I) New.
- Enter XX.COMPUTER and XX.SUPPLIES.
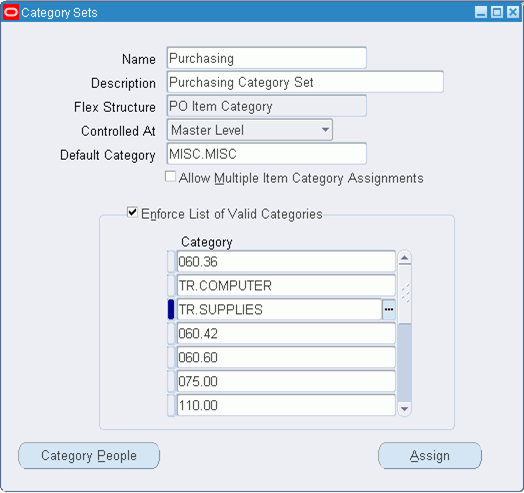
16. (I) Save
17. Close the window to return to the Navigator.
Practice – Create Purchasing Items
Summary
In this activity, you will create items that you will use in later activities. You will create purchase orders and receipts in later activities that will use these items.
Expectations
- Logon to the system using the XXUSERNAME you created earlier.
- Replace XX with your terminal number or initials.
- Prior activities are completed. Activities build on earlier activities.
- You must have access to an Oracle Application Vision database or comparable training or test instance at your site on which to complete this activity.
Tasks
- Create an Expensed Item
- Create an Inventory Item
Solution
Create an Expensed Item
Responsibility = Purchasing, Vision Operations
1. Navigate to the Master Item window:
- (N) Items > Master Items
2. Enter the following information for the expense item:
- Item = XXSoftware
- Description = XX Expensed Item
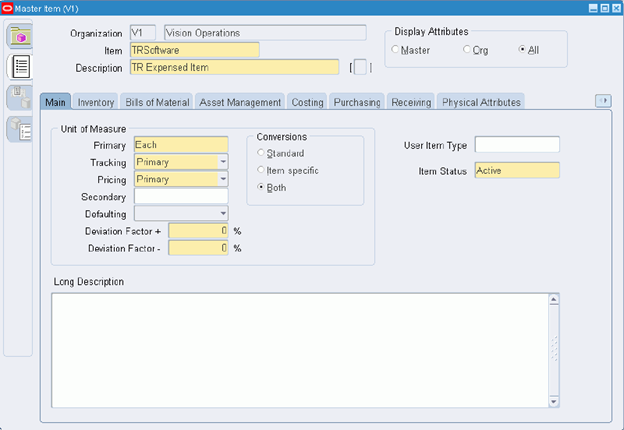
3. (T) Main
- Unit of Measure: Primary = Each
- Item Status = Active
4. (T) Inventory
- Inventory Item check box = Confirmed unchecked
- Stockable check box = Confirm unchecked
- Transactable check box = Confirm unchecked
5. (T) Purchasing
- Purchased check box = Select
- Purchasable check box = Select
- Use Approved Supplier check box = Confirm unchecked
- Default Buyer = Your Name: Last, First
- List Price = 450
- Expense Account = 01-510-7530-0000-000
- Asset Category = Blank
6. (T) Receiving
- Receipt Date Controls: Action = Warning
- Receipt Date Controls: Days Early = 5
- Receipt Date Controls: Days Late = 5
- Allow Substitute Receipts = Yes
- Receipt Routing = Standard
- Enforce Ship-To = Warning
7. (I) Save
8. (I) Organization Assignment (Third icon on the left side of window)
9. Enter the following:
|
Org |
Name |
Assigned Check Box |
| XXM | XXSan Diego | Select |
| M1 | Seattle Manufacturing | Select |
10. (I) Save
11. Navigate to the Category Assignment window:
- (M) Tools > Categories
12. Change the following for the Purchasing Category Set:
- Category = Change from MISC.MISC to XX.COMPUTER
13. (I) Save
14. Close the Category Assignment window.
Create an Inventory Item
15. (I) New or (M) File > New
16. Enter the following information for the Inventory Item:
- Item = XXMonitor
- Description = XX Inventory Item
17. (T) Main
- Unit of Measure: Primary = Each
- Item Status = Active
18. (T) Inventory
- Inventory Item check box = Select
- Stockable check box = Select
- Transactable check box = Select
19. (T) Purchasing
- Purchased check box = Select
- Purchasable check box = Select
- Use Approved Supplier check box = Confirm unchecked
- Default Buyer = Your Name: Last, First
- List Price = 250
- Expense Account = 01-510-7530-0000-000
- Asset Category = Blank
20. (T) Receiving
- Receipt Date Controls: Action = Warning
- Receipt Date Controls: Days Early = 5
- Receipt Date Controls: Days Late = 5
- Allow Substitute Receipts = Yes
- Receipt Routing = Standard
- Enforce Ship-To = Warning
21. (I) Save
22. (I) Organization Assignment (Third icon on the left side of window)
23. Enter the following:
|
Org |
Name |
Assigned Check Box |
| XXM | XXSan Diego | Select |
| M1 | Seattle Manufacturing | Select |
24. (I) Save
25. Navigate to the Category Assignment window:
- (M) Tools > Categories
26. Change the following for the Purchasing Category Set:
- Category = Change from MISC.MISC to XX.COMPUTER
27. (I) Save
28. Close the Category Assignment window and Master Item window to return to the Navigator.
Practice – Create a Supplier List
Summary
In this activity, you will add two suppliers and the supplier you created in a previous activity to a supplier list. Reference activity: Create a Supplier with Two Sites.
Expectations
- Logon to the system using the XXUSERNAME you created earlier.
- Replace XX with your terminal number or initials.
- Prior activities are completed. Activities build on earlier activities.
- You must have access to an Oracle Application Vision database or comparable training or test instance at your site on which to complete this activity.
Tasks
- Create a Supplier List
Solution
Create a Supplier List
Responsibility = Purchasing, Vision Operations
1. Navigate to the Supplier Lists window:
-
(N) Supply Base > Supplier Lists
- Operating Unit = Vision Operations
- List Name = XXComputer Hardware
- Description = Computer Hardware
- Operating Unit = Vision Operations
2. Add the following suppliers to your list (use the list of values from the toolbar to select vendors and sites):
|
Name |
Site |
| XXIBM Corporation | NEW YORK |
| Advanced Network Devices | SANTA CLARA-ERS |
| Star Gate Ltd | STARGATE-BUY |
3. (I) Save

-
Close the window and return to the Navigator.
Practice – Create a Catalog RFQ
Summary
In this activity, you will add items that you created in the Create Purchasing Items activity to a Catalog RFQ. You will use the supplier list you created in the Create a Supplier List activity to copy suppliers on to the RFQ.
Expectations
- Logon to the system using the XXUSERNAME you created earlier.
- Replace XX with your terminal number or initials.
- Prior activities are completed. Activities build on earlier activities.
- You must have access to an Oracle Application Vision database or comparable training or test instance at your site on which to complete this activity.
Tasks
- Create a Catalog RFQ
- Complete the Requested Terms
- Add Items to the RFQ
- Add Requested Price Breaks to Each Line
- Add Suppliers
- Print the RFQ
Solution
Create a Catalog RFQ
Responsibility = Purchasing, Vision Operations
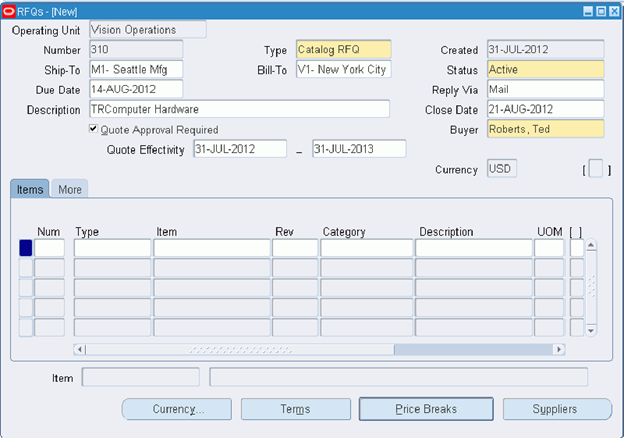
- Navigate to the RFQs window:
- (N) RFQ’s and Quotations > RFQ’s
- Enter the following:
- Operating Unit = Vision Operations
- Type = Catalog RFQ
- Status = Active
-
Due Date = Two weeks from today
Note: The due date will print on the RFQ
- Reply Via = Mail
- Description = XXComputer Hardware
-
Close Date = Three weeks from today
Note: Purchasing warns you if a new quote is entered into the system that references this RFQ after the close date.
- Quote Approval Required check box = Select
- Quote Effectivity = Today’s date to one year from today
-
(I) Save
Note: You can override the name in the Buyer field. The person specified in the Buyer field will receive notifications associated with this RFQ.
Complete the Requested Terms
- (B) Terms
- Payment Terms = 45 Net (terms date + 45)
- Carrier = UPS
- Note to Supplier = Please expedite your response!
-
(I) Save
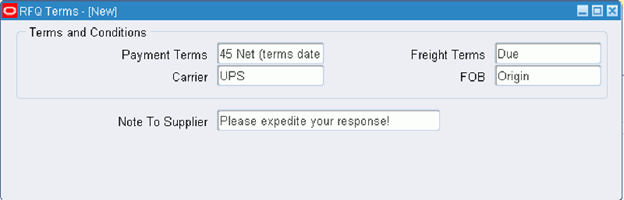
- Close the RFQ Terms window.
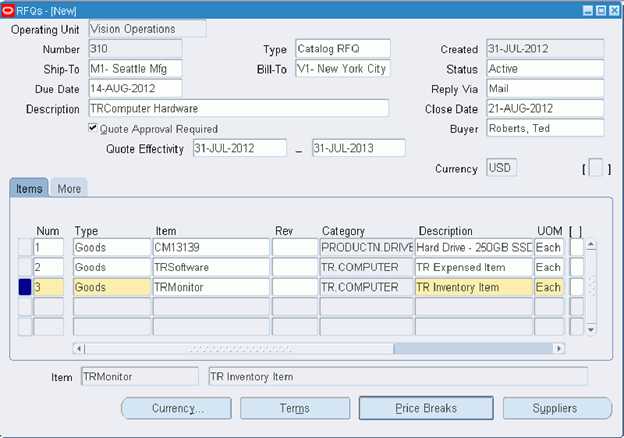
Add Items to the RFQ
- (T) Items
- Enter items according to the table:
|
Number |
Item |
Category |
UOM |
Target Price |
| 1 | CM13139 | PRODUCTN.DRIVES | Each | Blank |
| 2 | XXSoftware | XX.COMPUTER | Each | Blank |
| 3 | XXMonitor | XX.COMPUTER | Each | Blank |
Note: The supplier will reply with pricing information.
Add Requested Price Breaks to Each Line
9. Place your cursor on the first line of the RFQ.
- (B) Price Breaks
- Enter the following price breaks:
|
Num |
UOM |
Quantity |
Price |
Org |
Ship-To |
Discount % |
| 1 | Each | 10 | Blank | M1 | M1-Seattle Mfg | 10 |
| 2 | Each | 25 | Blank | M1 | M1-Seattle Mfg | 15 |
| 3 | Each | 50 | Blank | M1 | M1-Seattle Mfg | 20 |
-
(I) Save
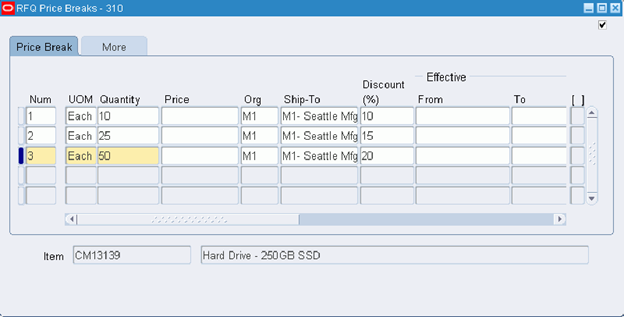
- Close the RFQ Price Breaks window.
- Repeat steps 10 – 13 for the other two lines on the RFQ. All of your line items on the RFQ should have the same price breaks.
Add Suppliers
- (B) Suppliers
- (B) Add From List
- Select the check box next to the XXComputer Hardware list
-
(B) Apply
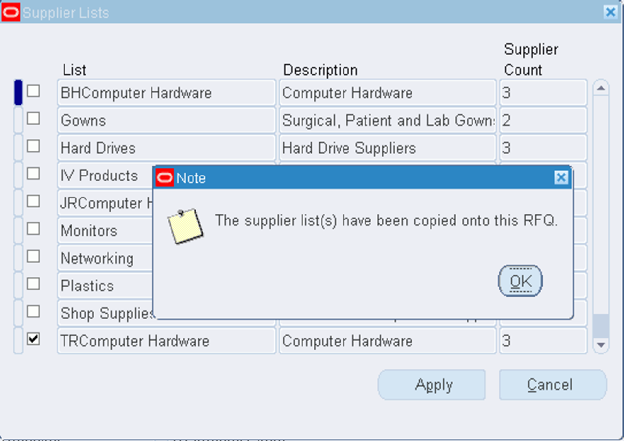
-
(B) OK
Note: The suppliers from your supplier list were added to your RFQ. Also, note the Printed field is blank and the print Count field is 0.
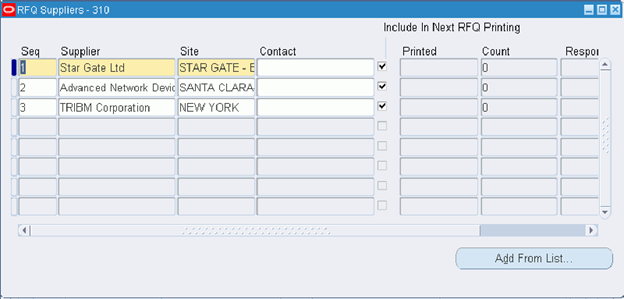
- (I) Save your work and close the RFQ Suppliers window.
- Record your RFQ Number: _______________________.
- Close the RFQs window.
Print the RFQ
- Navigate to the Submit Request window:
- (N) Reports > Run
- Select the Single Request option and (B) OK.
- Enter the following:
- Name = Printed RFQ Report (Landscape)
Parameters window appears.
- Enter the following:
|
Parameter |
Value |
| Report Type | All |
| RFQ Numbers From | Your RFQ |
| To | Your RFQ |
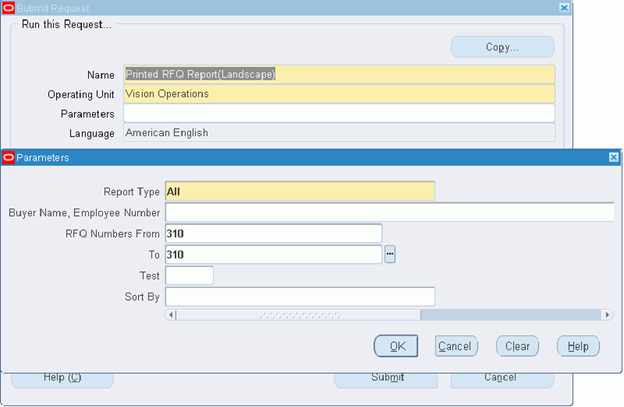
- (B) OK
- Enter the following:
- Operating Unit = Vision Operations
- (B) Submit
- (B) No – Do not submit another request
- (M) View > Requests
- (B) Find
- (B) Refresh Data until your request completes successfully (Phase = Completed, Status = Normal).
- (B) View Output
-
Close window and return to Navigator.
Note: After the RFQ is printed; the status changes from Active to Printed. If you want to reprint your RFQ, re-query your RFQ, change the status to Active. Click the Suppliers button and select the “Include in Next RFQ Printing” check box. Save your changes then re-run the Printed RFQ report.
Practice – Create a Catalog Quote from an RFQ
Summary
In this activity, you will record a catalog quote from your supplier. You will copy details from the RFQ directly on to the catalog quote using the Copy Document functionality.
Expectations
- Logon to the system using the XXUSERNAME you created earlier.
- Replace XX with your terminal number or initials.
- Prior activities are completed. Activities build on earlier activities.
- You must have access to an Oracle Application Vision database or comparable training or test instance at your site on which to complete this activity.
Tasks
- Automatically Create a Quotation from an RFQ
- Record Pricing
- Approve the Entire Quotation
Solution
Automatically Create a Quotation from an RFQ
Responsibility = Purchasing, Vision Operations
1. Navigate to the RFQs window:
- (N) RFQ’s and Quotations > RFQ’s
2. (M) View > Find
3. In the Find field, enter the number of your RFQ you created in the Create a Catalog RFQ activity.
4. (B) Find
5. Click on your RFQ
6. (B) OK
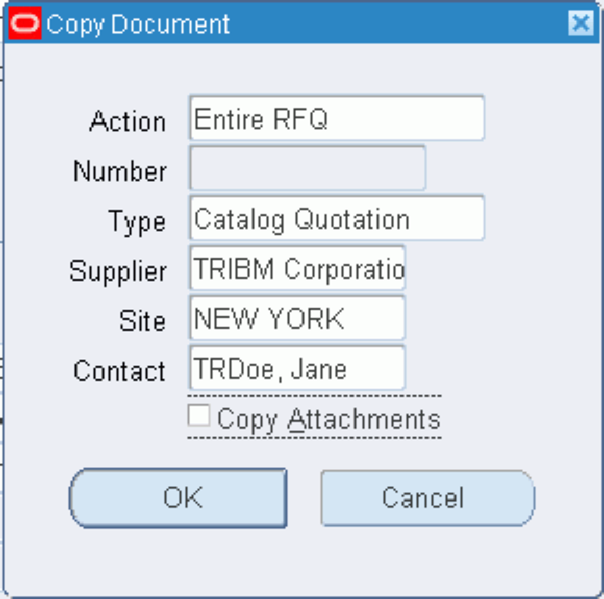
7. Navigate to the Copy Document window:
- (M) Tools > Copy Document.
8. Use the list of values to select the following parameters:
|
Parameter |
Value |
| Action | Entire RFQ |
| Number | N/A for automatic numbering |
| Type | Catalog Quotation |
| Supplier | XXIBM Corporation |
| Site | NEW YORK |
| Contact | XXDoe, Jane |
Note: Enter a quotation number if you are using manual quotation numbering. If your setup is for automatic quotation numbers, Oracle Purchasing will assign a number when you save your work.
Note: The PO: Display AutoCreated Quotation profile option determines if the quotations window is displayed after the RFQ is copied to the quotation.
9. (B) OK to copy the RFQ.
10. A note appears. Record your Quotation number: _____________________.

11. (B) OK to close the note window
12. Change the following:
- Status = Active
13. (I) Save
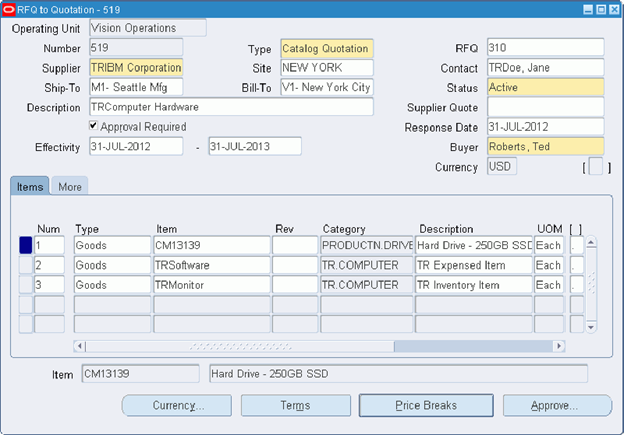
Record Pricing
14. Record pricing according to the following table:
|
Item |
Price |
| CM13139 | 100 |
| XXSoftware | 450 |
| XXMonitor | 250 |
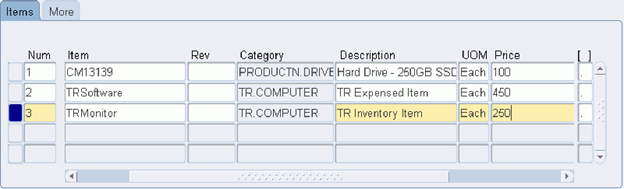
15. (I) Save
16. Update price breaks for all three quotation lines according to the following table:
- Select Line
- (B) Price Breaks
|
Num |
UOM |
Quantity |
Price |
Org |
Ship-To |
Discount |
| 1 | Each | 10 | Calculates | M1 | M1-Seattle | 10 |
| 2 | Each | 25 | Calculates | M1 | M1-Seattle | 15 |
| 3 | Each | 50 | Calculates | M1 | M1-Seattle | 20 |
17. (I) Save
18. Close the Quotation Price Breaks window.
Approve the Entire Quotation
19. Click in the header Description field.
20. (B) Approve
21. In the Approve Entire Quotation window enter the following parameters:
|
Parameter |
Value |
| Type | All Orders |
| Reason | Best Design |
| Approver | Your name (Last, first) |
| Effective | Today’s date to one year from today |
| Comments | Design approved by Engineering |
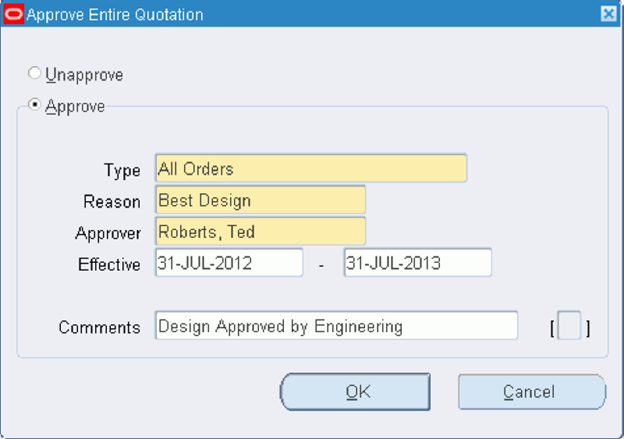
22. (B) OK
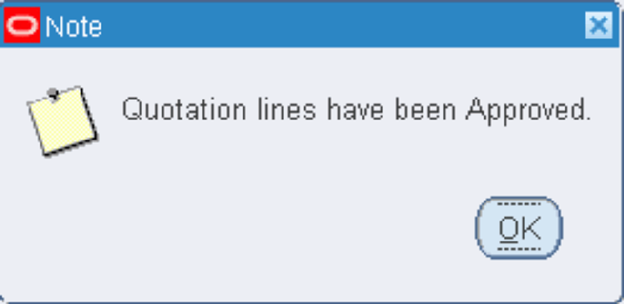
23. (B) OK to close the note window.
24. Close the RFQ to Quotation window.
25. From the RFQs window:
- Press F11 to enter Query mode.
- Place your cursor in the Number field and enter your RFQ#
- Press Ctrl+F11 to requery your RFQ.
- (B) Suppliers to view that your supplier has responded.
Note: The RFQ number used to generate this quote is saved with the quotation. Multiple quotations may be generated from the same RFQ.
26. Close the windows and return to the Navigator.
Practice – Create an Approved Supplier List Status
Summary
In this activity, you will create an approved supplier list status.
Expectations
- Logon to the system using the XXUSERNAME you created earlier.
- Replace XX with your terminal number or initials.
- Prior activities are completed. Activities build on earlier activities.
- You must have access to an Oracle Application Vision database or comparable training or test instance at your site on which to complete this activity.
Tasks
- Create a Supplier Status
- Assign Business Rules
Solution
Create a Supplier Status
Responsibility = Purchasing, Vision Operations
- Navigate to the Approved Supplier List Statuses window:
- (N) Supply Base > Supplier Statuses
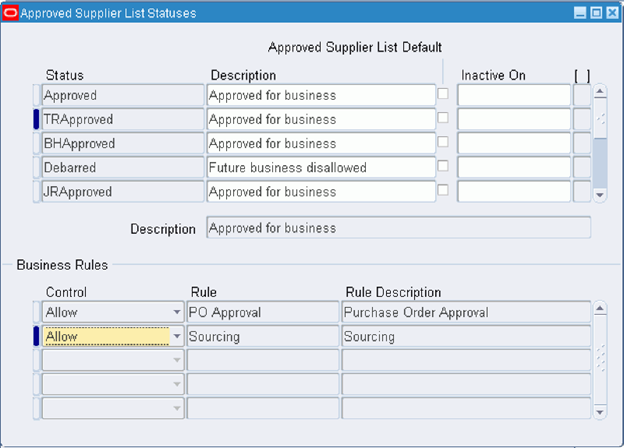
- (M) File > New
- Status = XXApproved
- Description = Approved for Business
- Approved Supplier List Default check box = Clear
Assign Business Rules
- In the Business Rules region, create business rules for the status according to the following information:
|
Control |
Rule |
Rule Description |
| Allow | PO Approval | Purchase Order Approval |
| Allow | Sourcing | Sourcing |
-
(I) Save
-
Close the window and return to the Navigator.
Practice – Require an Approved Supplier for an Item
Summary
In this activity, you will set the Use Approved Supplier attribute for an item.
Expectations
- Logon to the system using the XXUSERNAME you created earlier.
- Replace XX with your terminal number or initials.
- Prior activities are completed. Activities build on earlier activities.
- You must have access to an Oracle Application Vision database or comparable training or test instance at your site on which to complete this activity.
Tasks
- Set the Use Approved Supplier Flag for an Item
- Attempt to Enter a Purchase Order for the Item
Solution
Set the Use Approved Supplier Flag for an Item
Responsibility = Purchasing, Vision Operations
- Navigate to the Organization Item window:
-
(N) Items > Organization Items
- Organization = M1-Seattle Manufacturing
- Organization = M1-Seattle Manufacturing
- Enter the following:
- Item = XXMonitor
- (B) Find
- (T) Purchasing
- Enter the following:
- Use Approved Supplier check box = Select
- (I) Save
- Close the Organization Item window.
Attempt to Enter a Purchase Order for the Item
- Navigate to the Purchase Orders window:
- (N) Purchase Orders > Purchase Orders
- Enter the following:
- Operating Unit = Vision Operations
- Supplier = Advanced Network Devices
- Site = SANTA CLARA-ERS
- Ship-To = M1-Seattle Mfg
- Bill-To = V1-New York City
- (T) Lines
- Enter the following:
- Item = XXMonitor
- Quantity = 10
- Price = 250
- Need-By = Tomorrow’s date
- (I) Save and note the Purchase Order Number: _______________________.
-
(B) Approve
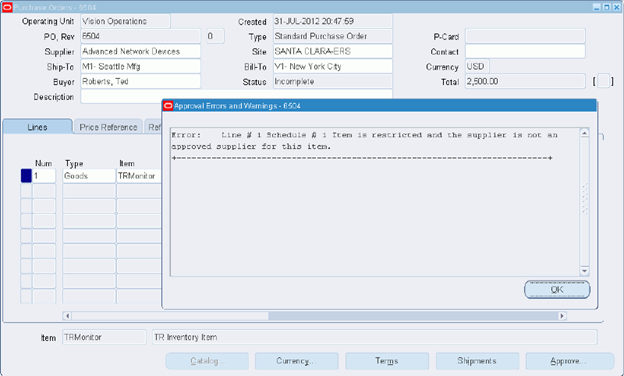
The Approval Errors and Warnings dialog box appears displaying the message that the supplier is not an approved supplier for this item.
- (B) OK
-
Close the window and return to the Navigator.
Practice – Create an Approved Supplier List
Summary
In this activity, you will enter a supplier and add it to a supplier list.
Expectations
- Logon to the system using the XXUSERNAME you created earlier.
- Replace XX with your terminal number or initials.
- Prior activities are completed. Activities build on earlier activities.
- You must have access to an Oracle Application Vision database or comparable training or test instance at your site on which to complete this activity.
Tasks
- Create a Catalog Quote
- Add an Approved Supplier for Your Item
- Make the Approved Supplier List a Global Approved Supplier List
- Define the Attributes of the Approved Supplier List Entry
Solution
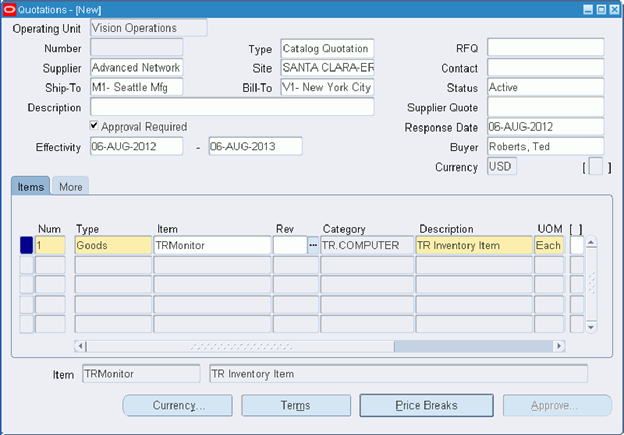
Create a Catalog Quote
Responsibility = Purchasing, Vision Operations
- Navigate to the Quotations window:
- (N) RFQ’s and Quotations > Quotations
- Enter the following:
- Operating Unit = Vision Operations
- Type = Catalog Quotation
- Supplier = Advanced Network Devices
- Site = SANTA CLARA-ERS
- Ship-To = M1-Seattle Mfg
- Status = Active
- Approval Required check box = Select
- Effectivity = Today’s date to a year from today
4. (T) Items
5. Enter item information according to the following table:
|
Num |
Item |
Category |
Description |
UOM |
| 1 | XXMonitor | XX.COMPUTER | XX Inventory Item | Each |
6. Specify price breaks according to the following table:
- (B) Price Breaks
|
Num |
UOM |
Quantity |
Price |
Org |
Ship-To |
Discount % |
| 1 | Each | 10 | Calculates | M1 | M1-Seattle | 10 |
| 2 | Each | 25 | Calculates | M1 | M1-Seattle | 15 |
| 3 | Each | 50 | Calculates | M1 | M1-Seattle | 20 |
Note: The Price field will automatically calculate after you enter the discount percent for the line.
- (I) Save
- Close the Quotation Price Breaks window.
- (B) Approve
- In the Approve Entire Quotation window enter the following parameters:
|
Parameter |
Value |
| Type | All Orders |
| Reason | Best Design |
| Approver | Your name (Last, first) |
| Effective | Today’s date to one year from today |
| Comments | Design approved by Engineering |
- (B) OK
- (B) OK to close the note window.
- Record your quotation number: _______________________.
- Close the Quotations window.
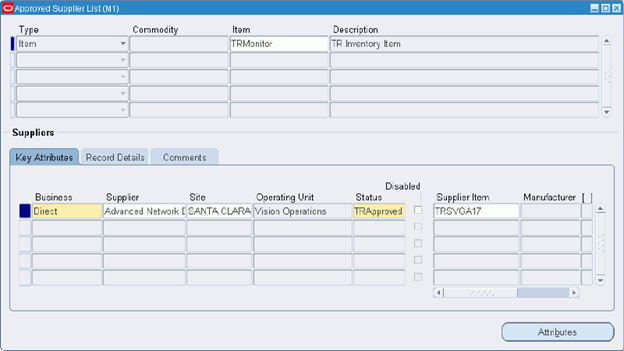
Add an Approved Supplier for Your Item
- Navigate to the Approved Supplier List window:
- (N) Supply Base > Approved Supplier List (M1 Seattle Manufacturing)
- Enter the following:
- Type = Item
- Item = XXMonitor
- (T) Key Attributes
- Business = Direct
- Supplier = Advanced Network Devices
- Site = SANTA CLARA-ERS
- Operating Unit = Vision Operations
- Status = XXApproved
- Supplier Item = XXSVGA17
-
Optionally specify a review-by date. (Scroll to the right)
DO NOT SAVE YET!
Note
-
You can use this date to determine when a proactive business review should be performed for the supplier. There are no standard reports, alerts or notifications associated with this field. To have advance notification, create an alert.
-
You can search suppliers requiring a review using the Approved Supplier List Summary window.
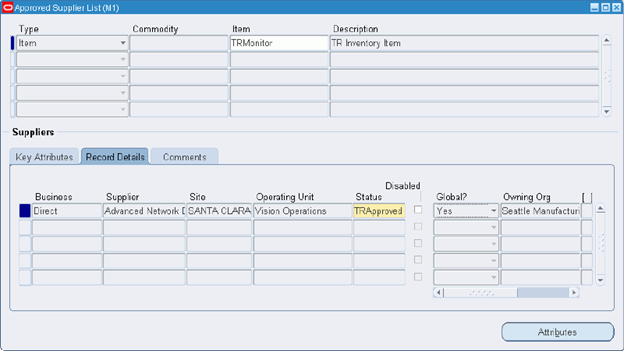
Make the Approved Supplier List a Global Approved Supplier List
- (T) Record Details
- Global? = Yes from the pop-up list to indicate this item and supplier site combination should be available to all organizations. A local ASL entry will override a global ASL entry.
-
(I) Save
Define the Attributes of the Approved Supplier List Entry
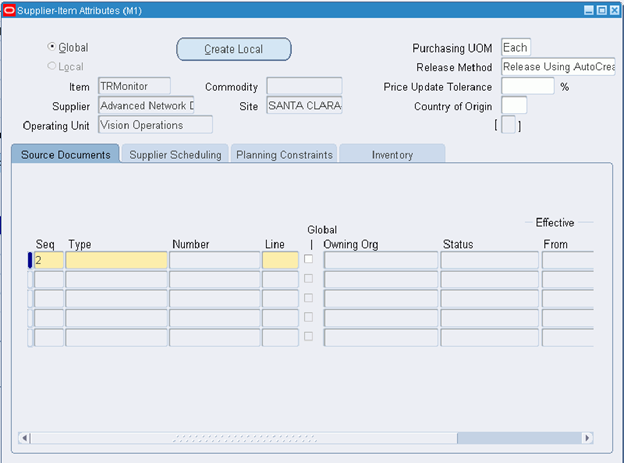
18. (B) Attributes
- Release Method = Release Using AutoCreate
19. (T) Source Documents
- Type = Quotation
- Number = Your quotation number you previously created in this activity
Note: If your quotation does not appear on the list of values check to ensure the status is active and the quote is approved. Recall that we selected the Quote Approval Required option on the RFQ that is associated with this quotation.
20. In the Line field enter the line number of your inventory item (Line = 1).
Note: Item number will default from quotation.

- (I) Save.
-
Close the Supplier-Item Attributes and Approved Supplier List windows to return to the Navigator.
Note: Blanket purchase orders and quotations are not required to create an Approved Supplier List. In addition, it is not even necessary to associate a blanket purchase agreement or quotation in the Source Details window if you set the PO: Automatic Document Sourcing profile option to “Yes”.
Practice – Enable Automatic Document Sourcing
Summary
In this activity, you will enable and use Automatic Document Sourcing.
Expectations
- Logon to the system using the XXUSERNAME you created earlier.
- Replace XX with your terminal number or initials.
- Prior activities are completed. Activities build on earlier activities.
- You must have access to an Oracle Application Vision database or comparable training or test instance at your site on which to complete this activity.
- Note: Before you begin, the instructor must turn on Automatic Document Sourcing by setting the PO: Automatic Document Sourcing profile option to Yes.
Tasks
- Verify Automatic Document Sourcing is Enabled
- Create a New Requisition Line/Verify Sourcing Information Defaults
Solution
Verify Automatic Document Sourcing is Enabled
Responsibility = Purchasing, Vision Operations
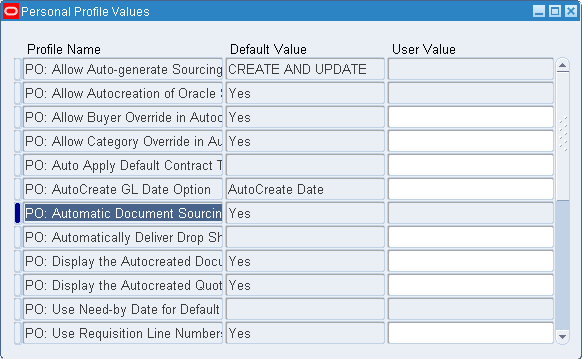
1. Navigate to the Personal Profile Values window:
- (N) Personal Profiles
2. Query “PO%Auto%” in the Personal Profile Values window.
3. Verify that the profile PO: Automatic Document Sourcing is set to Yes. If it is not set to Yes, please have the instructor change it to Yes at the Site level.
- Close the window and return to the Navigator.
Create a New Requisition Line/Verify Sourcing Information Defaults
- Navigate to the Requisitions window:
- (N) Requisitions > Requisitions
- Enter the following:
- Operating Unit = Vision Operations
- (T) Lines
- Item = XXMonitor
- Quantity = 11
- (T) Source Details
- Verify that quotation information has defaulted in to the Document and Type fields.
- Verify the supplier information that appears below the lines region.
-
Close the window without saving your work and return to the Navigator.
Note: When using automatic document sourcing, documents are searched for and defaulted onto the requisition or purchase order based on the following rules:
Blanket purchase agreements are always defaulted before quotations, even if the quotation is more recent.
If only blanket purchase agreements and quotations exist, the most recent one (create dates are compared) is used.
Practice – Create a Sourcing Rule and a Sourcing Rule Assignment
Summary
In this activity, you will create sourcing rules and sourcing rule assignments.
Expectations
- Logon to the system using the XXUSERNAME you created earlier.
- Replace XX with your terminal number or initials.
- Prior activities are completed. Activities build on earlier activities.
- You must have access to an Oracle Application Vision database or comparable training or test instance at your site on which to complete this activity.
- Note: Before you begin this activity, the instructor must set the PO: Automatic Document Sourcing profile option to No.
Tasks
- Create a Sourcing Rule
- Verify the Default Assignment Set
- Create a Sourcing Rule Assignment
- Create a Requisition/View Sourcing Information
- Create a Purchase Order/View Sourcing Information
- Remove the Source Document From the ASL
- Verify Source Document Information Does Not Default
Solution
Create a Sourcing Rule
Responsibility = Purchasing, Vision Operations
1. Navigate to the Sourcing Rule window:
- (N) Supply Base > Sourcing Rules (M1-Seattle Manufacturing)
2. Enter the following:
- Rule Name = XXComputer Sourcing Rule
- All Orgs radio button = Select
- From Date = Today’s date
- Type = Buy From
- Supplier = Advanced Network Devices
- Supplier Site = SANTA CLARA-ERS (Vision Operations)
- Allocation % = 100
- Rank = 1
3. (I) Save

4. Close the Sourcing Rule window.
Verify the Default Assignment Set
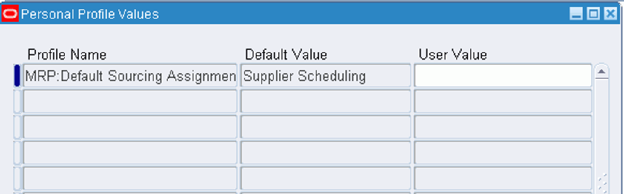
5. Navigate to the Personal Profile Values window:
- (N) Personal Profiles
6. (M) View > Find
- Profile = MRP:Default Sourcing Assignment Set
7. Verify that the default value for the profile option = Supplier Scheduling
Note: Purchasing only uses sourcing rules assigned to the value in the MRP:Default Sourcing Assignment Set. It is essential that this is clearly understood.
8. Close the Personal Profile Values window.
Create a Sourcing Rule Assignment
9. Navigate to the Sourcing Rule/Bill of Distribution Assignments window:
- (N) Supply Base > Assign Sourcing Rules
10. (M) View > Find
11. Select Supplier Scheduling from the list of values.
12. In the Assignments region, click in the Customer field.
13. (M) File > New
- Assigned To = Item
- Item/Category = XXMonitor
- Type = Sourcing Rule
- Sourcing Rule/BoD = XXComputer Sourcing Rule
14. (I) Save
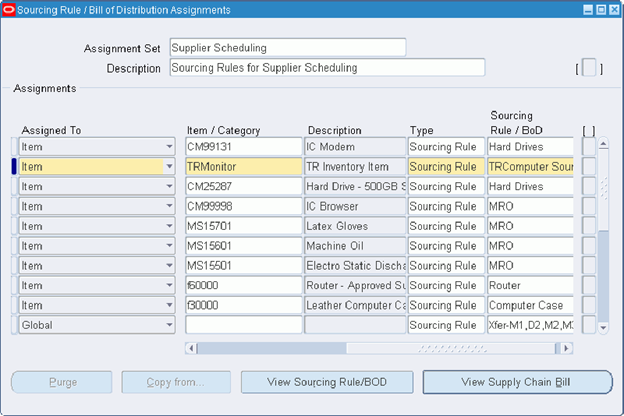
15. Close the Sourcing Rule/Bill of Distribution Assignments window.
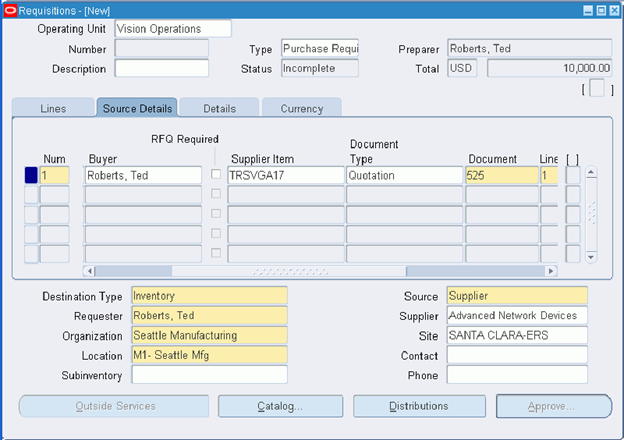
Create a Requisition/View Sourcing Information
16. Navigate to the Requisitions window:
- (N) Requisitions > Requisitions
17. Navigate to the Requisition Preferences window:
- (M) Tools > Preferences
18. Enter the following:
- Organization = Seattle Manufacturing
- Location = M1-Seattle Mfg
19. (B) Apply
20. Close the Requisition Preferences window.
21. Enter the following:
- Operating Unit = Vision Operations
- Item = XXMonitor
22. Tab out of the Item field.
24. Verify the supplier information that appears to the right below the lines region.
25. Navigate to the Quantity field and enter 50. Tab out of the field and verify that price breaks are defaulting in from your quotation.
Notice that when you add a different quantity the value in the Price column defaults according to the Price Breaks for the quantity.
26. (T) Source Details
27. Verify source document information appears by default from the ASL.
28. Close window and return to the Navigator without saving record.
Create Purchase Order/View Sourcing Information
29. Navigate to the Purchase Orders window:
- (N) Purchase Orders > Purchase Orders
30. Enter the following:
- Operating Unit = Vision Operations
- Supplier = Advanced Network Devices
- Site = SANTA CLARA-ERS
- Ship-To = M1-Seattle Mfg
- (T) Lines
- Item = XXMonitor
- Quantity = 11
31. Verify price breaks are in effect.
Notice that when you add a different quantity the value in the Price column defaults according to the Price Breaks for the quantity.
32. (T) Reference Documents
33. Verify quotation references have defaulted into the window.
34. Close window and return to the Navigator without saving record.
Remove the Source Document from the ASL
35. Navigate to the Approved Supplier List window:
- (N) Supply Base > Approved Supplier List
36. (M) View > Find
- Item = XXMonitor
37. (B) OK
38. (T) Key Attributes
39. Place cursor in the Supplier field.
40. (B) Attributes
41. (I) Delete the quotation
42. (I) Save
43. Close the windows and return to the Navigator.
Verify Source Document Information does not Default
44. Navigate to the Requisitions window.
- (N) Requisitions > Requisitions
45. Enter the following:
- Operating Unit = Vision Operations
46. (T) Lines
- Item = XXMonitor
47. Tab out of the Item field.
48. Verify the destination information in the lower region of the page:
- Organization = Seattle Manufacturing
- Location = M1-Seattle Mfg
49. Verify the supplier information that appears to the right below the lines region.
50. Enter the following:
- Quantity = 11
51. Tab out of the field and verify that price breaks are no longer defaulting in from your quote.
52. (T) Source Details
53. Verify there is no quotation information.
Note: If source document information still defaults, use the System Administrator responsibility to verify the PO: Automatic Document Sourcing profile option is set to No at the Site level.
54. The reason supplier information STILL defaults is:
__________________________________________________________________
55. Close the window without saving your work and return to the Navigator.
Practice – Create a Purchase Requisition
Summary
In this activity, you will create a purchase requisition.
Expectations
- Logon to the system using the XXUSERNAME you created earlier.
- Replace XX with your terminal number or initials.
- Prior activities are completed. Activities build on earlier activities.
- You must have access to an Oracle Application Vision database or comparable training or test instance at your site on which to complete this activity.
- Note: The PO: Automatic Document Sourcing profile option is still set at Yes.
Tasks
- Create a Purchase Requisition for Your Item
Solution
Create a Purchase Requisition for Your Item
Responsibility = Purchasing, Vision Operations
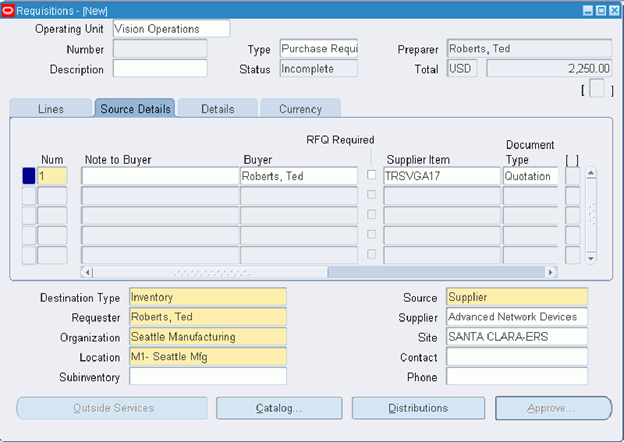
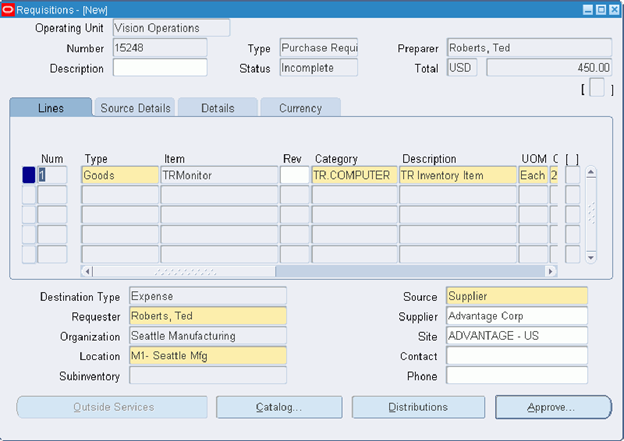
- Navigate to the Requisitions window:
- (N) Requisitions > Requisitions
- Enter the following:
- Operating Unit = Visions Operations
- (T) Lines
- Item = XXMonitor
- Quantity = 10
- Need-By = Tomorrow’s Date
- Destination Type = Inventory
- Organization = Seattle Manufacturing
- Location = M1-Seattle Mfg
Note: After you enter the Need-By date, the Source Details tab is displayed automatically.
- (T) Details
- Note to Receiver = Be sure to inspect this item
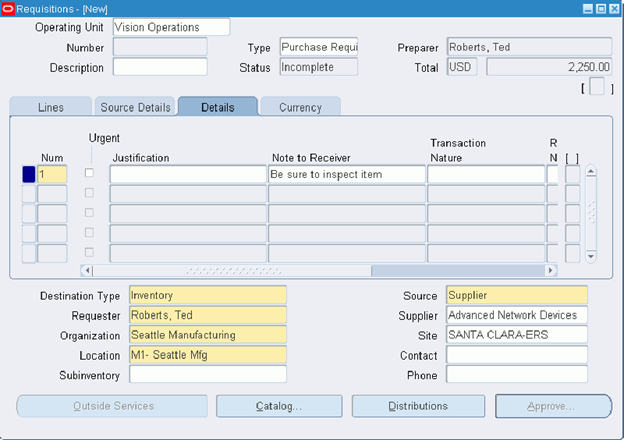
- (I) Save
- Make a note of your requisition number: _____________________________.
- (B) Approve to approve the requisition.
- Submit for Approval check box = Select
- Clear all other options
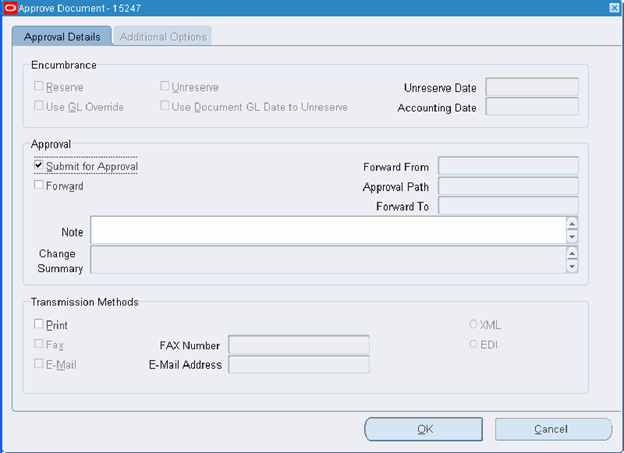
- (B) OK
-
Close the window to return to the Navigator.
Practice – Create a Requisition Template
Summary
In this activity, you will create a purchase requisition template.
Expectations
- Logon to the system using the XXUSERNAME you created earlier.
- Replace XX with your terminal number or initials.
- Prior activities are completed. Activities build on earlier activities.
- You must have access to an Oracle Application Vision database or comparable training or test instance at your site on which to complete this activity.
Tasks
- Create a Requisition Template
- Copy From Base Document
Solution
Create a Requisition Template
Responsibility = Purchasing, Vision Operations
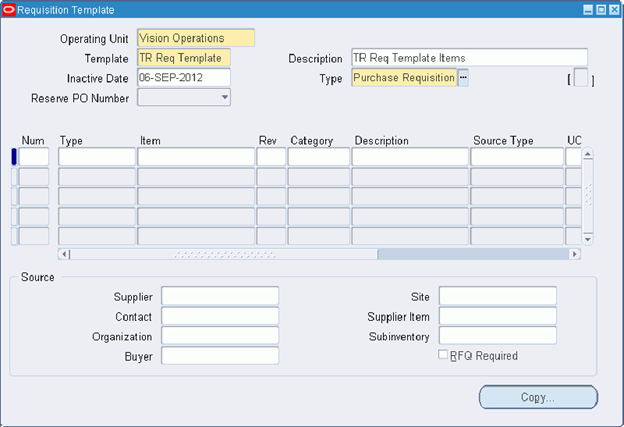
- Navigate to the Requisition Template window:
- (N) Setup > Purchasing > Requisition Templates
- Enter the following:
- Operating Unit = Vision Operations
- Template = XX ReqTemplate
- Description = XX ReqTemplate Items
- Inactive Date = One month from today
- Type = Purchase Requisition
-
(I) Save
Copy From Base Document
- (B) Copy to navigate to the Base Document window.
- Enter the following:
- Type = Requisition
- Number field = Your purchase requisition that you created in the Create a Purchase Requisition activity
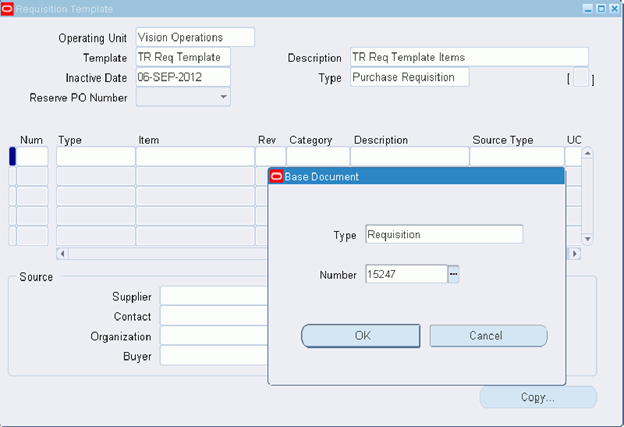
6. (B) OK to copy all lines of the base document onto the template.
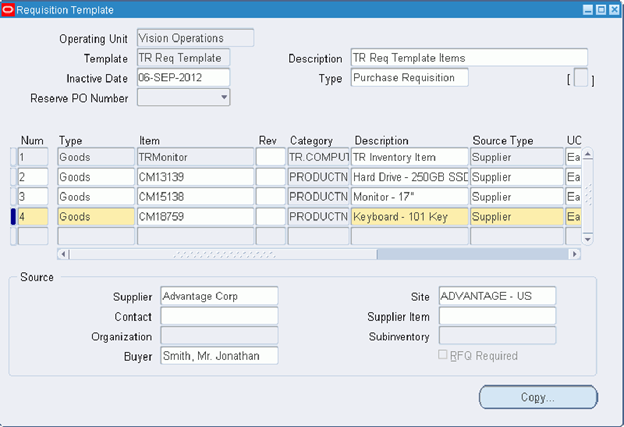
7. (I) Save
8. Manually and lines 2-4 to the requisition template by entering the following information:
|
Num |
Item |
Category |
Description |
Source |
| 1 | XXMonitor | XX.COMPUTER | XX Inventory Item | Supplier |
| 2 | CM13139 | PRODUCTN.DRIVES | Hard Drive 250 GB SSD | Supplier |
| 3 | CM15138 | PRODUCTN.MONITOR | Monitor – 17″ | Supplier |
| 4 | CM18759 | PRODUCTN.ELECTRICAL | Keyboard – 101 Key | Supplier |
Note: For supplier-sourced lines, you can enter the unit price, and this price is used in the Requisitions window. For inventory source lines, the cursor does not enter this field, and the price in the Requisitions window is the actual cost from inventory. You can enter sourcing information for the current line in the lower part of the screen.
9. (I) Save
-
Close the window to return to the Navigator.
Practice – Use the Supplier Item Catalog to Create a Requisition
Summary
In this activity, you will create a purchase requisition using your requisition template.
Expectations
- Logon to the system using the XXUSERNAME you created earlier.
- Replace XX with your terminal number or initials.
- Prior activities are completed. Activities build on earlier activities.
- You must have access to an Oracle Application Vision database or comparable training or test instance at your site on which to complete this activity.
Tasks
- Create a Purchase Requisition Using Your Template
Solution
Create a Purchase Requisition using your Requisition Template
Responsibility = Purchasing, Vision Operations
- Navigate to the Requisitions window:
- (N) Requisitions > Requisitions
- Enter the following:
- Operating Unit = Vision Operations
- (T) Lines.
- Click in the Num field.
- (B) Catalog
- (B) Clear
- Enter the following:
- Requisition Template = XX ReqTemplate (the template you created in the Create a Requisition Template activity)
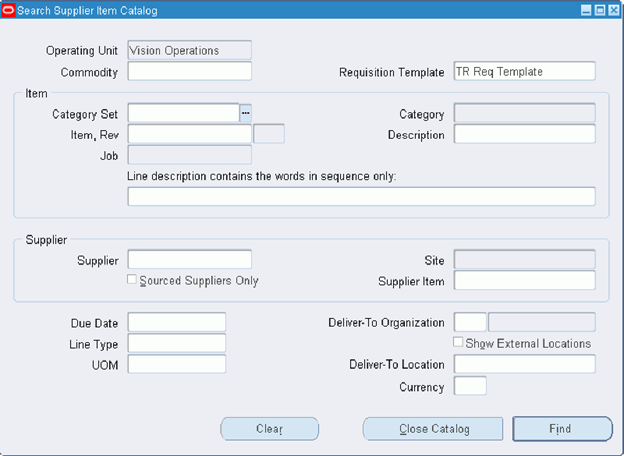
- (B) Find
- (T) Requisition Templates
- Place the cursor on the line containing your XXMonitor.
-
(B) Add
Note: The item you select will be copied down to the Order Pad region with a default Quantity of 1.
- Enter the following:
- Quantity = 2
- Need-By = One week from today
- Deliver-To Org = M1
- Deliver-To Location = M1-Seattle Mfg
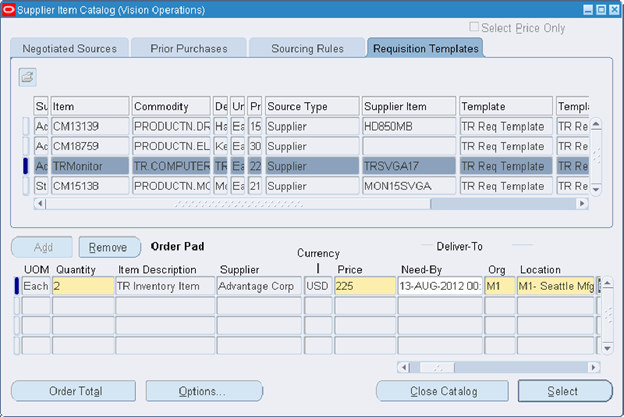
13. (B) Select
Note: Your lines in the Order Pad region will now be moved to your requisition.
14. (I) Save
15. Note your requisition number: ____________________________.
16. (B) Approve to approve your requisition.
- Submit for Approval check box = Select
- Clear all other options
17. (B) OK
18. Close the window to return to the Navigator.
Note: Have the instructor set the PO: Automatic Document Sourcing profile option to No. The rest of the activities will not have automatic document sourcing.
Practice – Create a Standard Purchase Order
Summary
In this activity, you will:
- Create a standard purchase order for two defined items – one expense item and one inventory item.
- Create multiple shipment lines and multiple distribution lines for one or both of the items.
- Run select reports relevant to standard purchase orders.
Expectations
- Logon to the system using the XXUSERNAME you created earlier.
- Replace XX with your terminal number or initials.
- Prior activities are completed. Activities build on earlier activities.
- You must have access to an Oracle Application Vision database or comparable training or test instance at your site on which to complete this activity.
Tasks
- Create a Standard Purchase Order Header
- Set Purchase Order Preferences
- Enter an Expense Item That You Need to Order
- Enter Shipments for the First Purchase Order Line
- Enter Distributions for the First Shipment
- Enter Distributions for the Second Shipment
- Enter an Inventory Item That You Need to Order
- Enter Shipments for the Second Purchase Order Line
- Enter Distributions for the First Shipment
- Enter Distributions for the Second Shipment
- Submit Your Purchase Order for Approval
- Run the Printed Purchase Order Report (Landscape)
- Run the Purchasing Activity Register
Solution
Create a Standard Purchase Order Header
Responsibility = Purchasing, Vision Operations
1. Navigate to the Purchase Orders window:
- (N) Purchase Orders > Purchase Orders
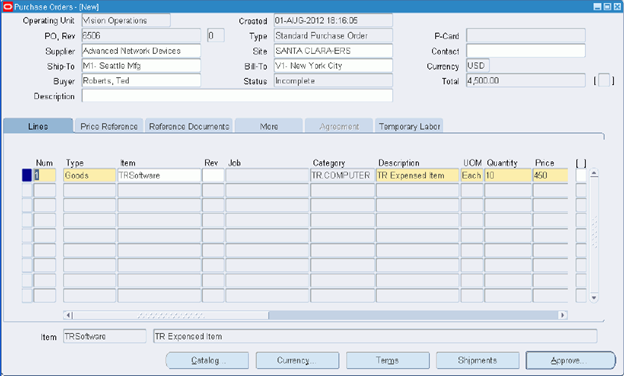
2. Enter the following:
- Operating Unit = Vision Operations
- Type = Standard Purchase Order
- Supplier = Advanced Network Devices
- Site = SANTA CLARA-ERS
- Ship-To = M1-Seattle Mfg
- Bill-To = V1-New York City
3. Navigate to the Terms and Conditions window:
- (B) Terms
4. Enter the following:
- Payment = 45 Net (terms date + 45)
- Confirming Order check box = Select
- Acceptance Required = Document
- By = One week from today
- Supplier Note = Please call if there are any problems
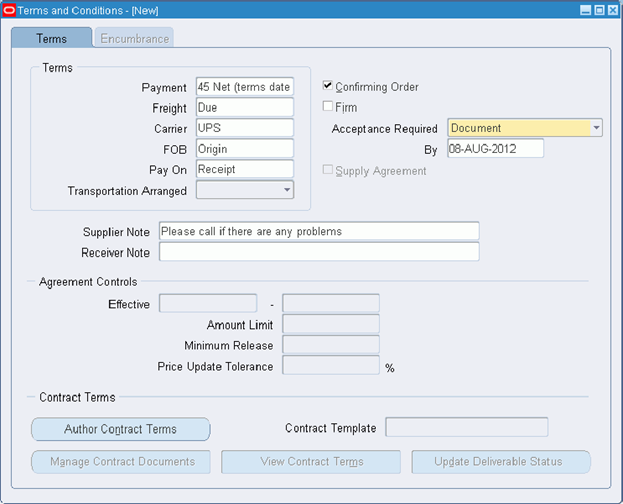
5. Close the Terms and Conditions window.
6. (I) Save
- Note the purchase order number: ___________________________.
Set Purchase Order Preferences
8. Navigate to the Purchase Order Preferences window:
- (M) Tools > Preferences
9. Enter the following:
- Requester = Adams, Mr. Brian
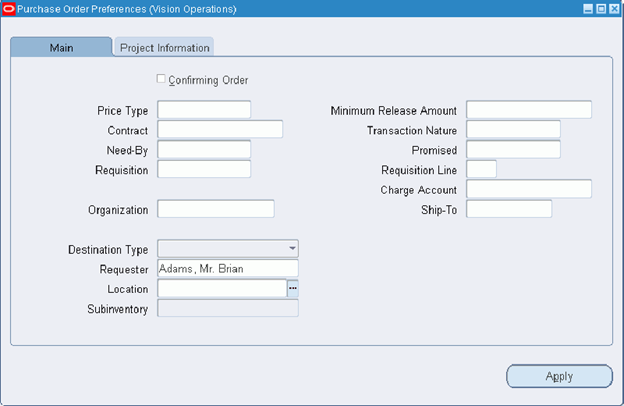
10. (B) Apply
11. Close the Purchase Order Preferences window.
Enter an Expense Item That You Need to Order
12. (T) Lines
13. Enter the following:
- Num = 1
- Item = XXSoftware
14. Enter the following:
- Quantity = 10
Enter Shipments for the First Purchase Order Line
15. Navigate to the Shipments window:
- (B) Shipments
16. Enter the following shipments for this item:
|
Num |
Org |
Ship-To |
UOM |
Quantity |
Need-By |
| 1 | M1 | M1-Seattle Mfg | Each | 4 | In 1 week |
| 2 | M1 | M1-Seattle Mfg | Each | 6 (appears by default) | In 2 weeks |
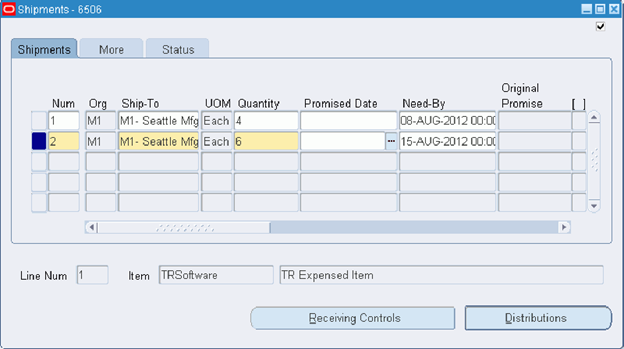
17. (I) Save
Enter Distributions for the First Shipment
18. Place cursor on the first shipment line.
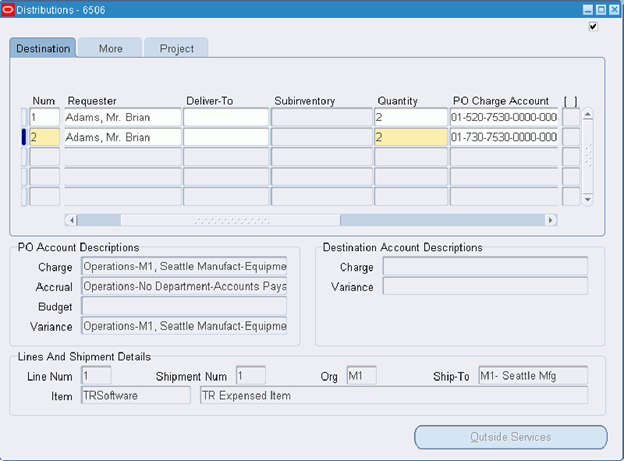
19. Navigate to the Distributions window:
- (B) Distributions
20. Enter the following:
- Num = 1
- Quantity = 2
- PO Charge Account = Leave the value that appears by default
21. Add another distribution by entering the following:
- Num = 2
- Quantity = 2 (appears by default)
- PO Charge Account = Leave the value that appears by default, then override the department value to 730 (01-730-7530-0000-000)
22. (I) Save and close the Distributions window.
Enter Distributions for the Second Shipment
23. Place cursor on the second shipment line.
24. Navigate to the Distributions window
- (B) Distributions
25. Enter the following:
- Num = 1 (appears by default)
- Quantity = 6 (appears by default)
- PO Charge Account = Leave the value that appears by default
26. Close the Distributions window and then the Shipments window.
27. Return to the Purchase Orders window.
Enter an Inventory Item That You Need to Order
28. (T) Lines
29. Enter the following:
- Num = 2
- Item = XXMonitor
- Quantity = 10
- Price = $1,400
Enter Shipments for the Second Purchase Order Line
30. Navigate to the Shipments window:
- (B) Shipments
31. Enter the following shipments for this item:
|
Num |
Org |
Ship-To |
UOM |
Quantity |
Need-By |
| 1 | M1 | M1-Seattle Mfg | Each | 4 | In 1 week |
| 2 | M1 | M1-Seattle Mfg | Each | 6 (appears by default) | In 2 weeks |
32. (I) Save
Enter Distributions for the First Shipment
33. Place cursor on the first shipment line.
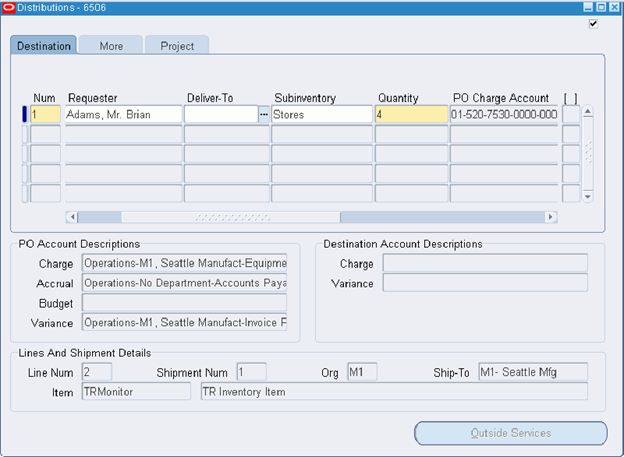
34. Navigate to the Distributions window
- (B) Distributions
35. Enter the following:
- Num = 1
- Subinventory = Stores
- Quantity = 4
- PO Charge Account = Leave that value that appears by default then try to override the value. Why can’t you override?
36. (I) Save
37. Close the Distributions window.
Enter Distributions for the Second Shipment
38. Place cursor on the second shipment line.
39. Navigate to the Distributions window:
- (B) Distributions
40. Enter the following:
- Num = 1
- Subinventory = Stores
- Quantity = 6
41. (I) Save
42. Close the Distributions window, then the Shipments window (returning to the Purchase Orders window)
Submit Your Purchase Order for Approval
43. Navigate to the Approve Document window:
- (B) Approve
44. Enter the following:
- Submit for Approval check box = Select
- Clear all other options
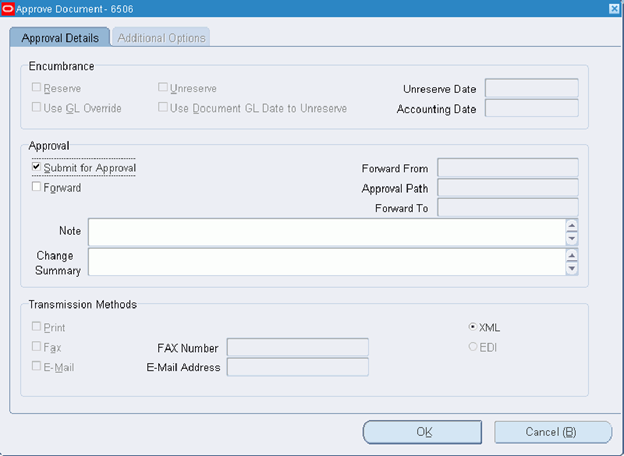
45. (B) OK
46. Ensure that the status on the purchase order header is Approved.
47. Close window to return to the Navigator.
Run the Printed Purchase Order Report (Landscape)
48. Navigate to the Submit Request window:
- (N) Reports > Run
49. Select the Single Request option.
50. (B) OK
51. Enter the following:
- Name = Printed Purchase Order Report (Landscape)
52. Enter the following parameters:
- Print Selection = All
- Purchase Order Numbers From = Your standard purchase order number
- Purchase Order Numbers To = Your standard purchase order number
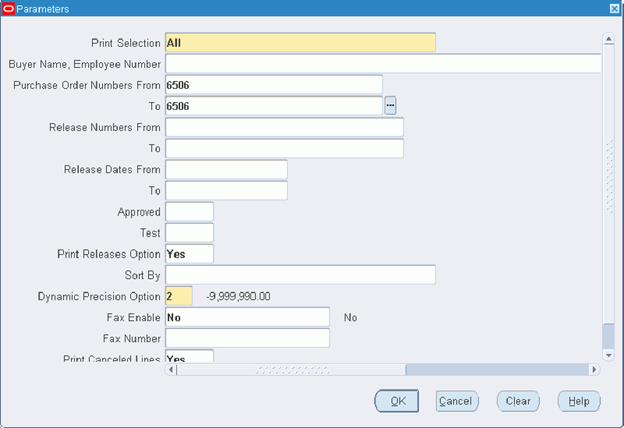
53. (B) OK
54. Enter the following:
- Operating Unit = Vision Operations
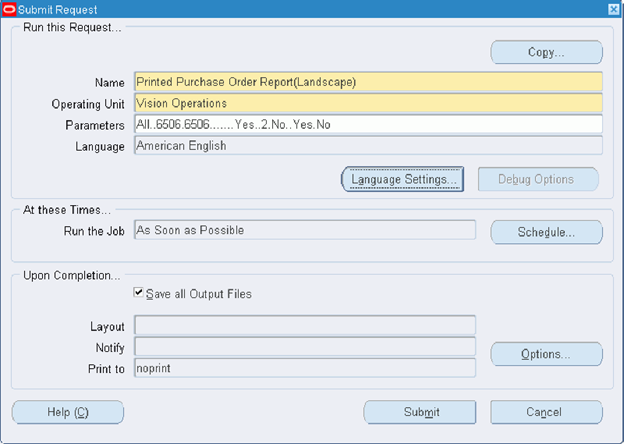
55. (B) Submit
56. (B) No to submit another request.
57. Monitor progress of the report:
- (M) View > Requests
- (B) Find
- Verify request completed successfully (Phase = Completed, Status = Normal)
58. View output of the report process:
- (B) View Output
59. Close the Requests window.
Run the Purchasing Activity Register
60. Navigate to the Submit Request window:
- (N) Reports > Run
61. Select the Single Request option.
62. (B) OK
63. Enter the following:
- Name = Purchasing Activity Register
64. Enter the following parameters:
- Creation Dates From and To = Today’s date (format dd-mmm-yyyy)
- Supplier = Advanced Network Devices
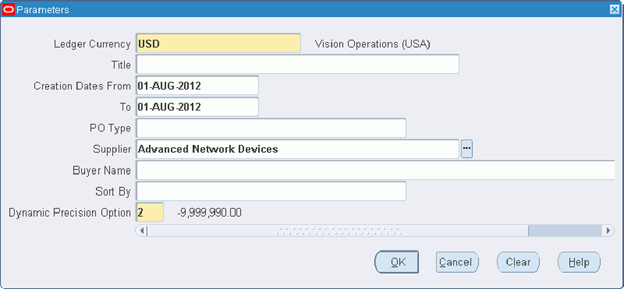
65. (B) OK
66. Enter the following:
- Operating Unit = Vision Operations

67. (B) Submit
68. (B) No to submit another request.
69. Monitor progress of the process:
- (M) View > Requests
- (B) Find
- Verify the request completes successfully (Phase = Completed, Status = Normal)
70. View output of the process:
- (B) View Output
71. Close windows to return to the Navigator.
Practice – Create a Blanket Purchase Agreement and Blanket Release
Summary
In this activity, you will:
- Create a blanket purchase agreement for two items, which will establish pricing for the items, although the quantity and delivery dates/locations are not known.
- Create a blanket release against the agreement for the first order of these items.
Expectations
- Logon to the system using the XXUSERNAME you created earlier.
- Replace XX with your terminal number or initials.
- Prior activities are completed. Activities build on earlier activities.
- You must have access to an Oracle Application Vision database or comparable training or test instance at your site on which to complete this activity.
- Note: Before you begin this activity, have the instructor change the Ship-To Location for the Southern Office Supplies supplier to M1-Seattle Mfg (Supply Base > Suppliers).
Tasks
- Create a Blanket Purchase Agreement
- Enter the First Item – Paper
- Enter Price Breaks for Volume Purchases
- Enter the Second Item – Desk
- Enter Price Breaks for Volume Purchases
- Enter Notification Controls for the Blanket Purchase Agreement
- Submit the Purchase Agreement for Approval
- Issue a Blanket Release to Place the First Order Against the Agreement
- Submit the Blanket Release for Approval
- Increase the Quantity Ordered So That the Release Will Be Above the Minimum Release Amount
- Submit the Blanket Release for Approval
- Review the Blanket Purchase Agreement to View How It Was Updated As a Result of the Release
- Run the Purchase Order and Releases Detail Report
Solution
Create a Blanket Purchase Agreement
Responsibility = Purchasing, Vision Operations
1. Navigate to the Purchase Orders window:
- (N) Purchase Orders > Purchase Orders
2. Enter the following:
- Operating Unit = Vision Operations
- Type = Blanket Purchase Agreement
- Supplier = Southern Office Supplies
- Site = SOS MAIN
- Ship-To = M1- Seattle Mfg
- Bill-To = V1-New York City
- Amt Agreed = 20,000.00
3. Navigate to the Terms and Conditions window
- (B) Terms
4. Enter the following:
- Payment = 45 Net (terms date + 45)
- Pay On = Blank
- Agreement Controls/Effective Dates = Start date = Today’s date; End Date = One year from today
- Amount Limit = 21,000.00
- Minimum Release = 50.00
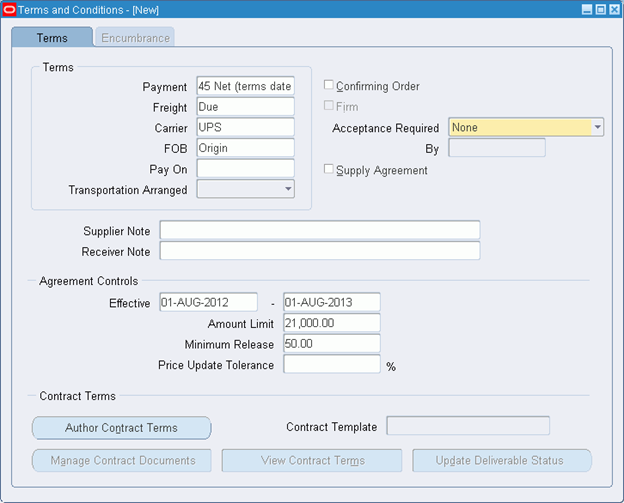
5. Close Terms and Conditions window.
6. (I) Save
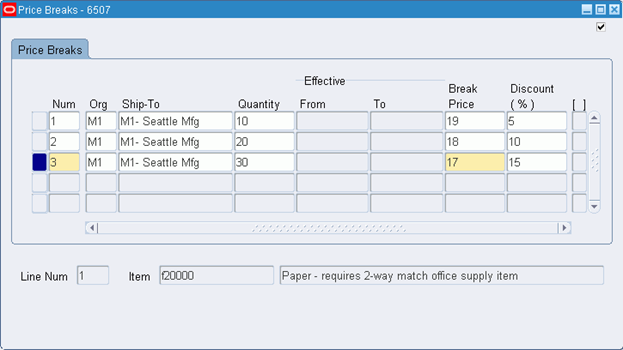
Enter the First item – Paper
7. (T) Lines
8. Enter the following:
- Num = 1
- Item = f20000
- Price = 20
Enter Price breaks for Volume Purchases
9. Navigate to the Price Breaks window:
- (B) Price Breaks
10. Enter the following price breaks for this item:
|
Num |
Org |
Ship-To |
Quantity |
Break Price |
| 1 | M1 | M1-Seattle Mfg | 10 | 19 |
| 2 | M1 | M1-Seattle Mfg | 20 | 18 |
| 3 | M1 | M1-Seattle Mfg | 30 | 17 |
11. (I) Save
12. Close the Price Breaks window.
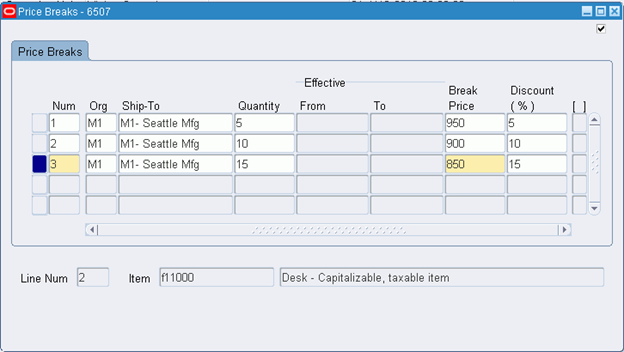
Enter the Second Item – Desk
13. (T) Lines
14. Enter the following:
- Num = 2
- Item = f11000
- Price = 1000
Enter Price Breaks for Volume Purchases
15. Navigate to the Price Breaks window:
- (B) Price Breaks
16. Enter the following price breaks for this item:
|
Num |
Org |
Ship-to |
Quantity |
Break Price |
| 1 | M1 | M1-Seattle Mfg | 5 | 950 |
| 2 | M1 | M1-Seattle Mfg | 10 | 900 |
| 3 | M1 | M1-Seattle Mfg | 15 | 850 |
17. (I) Save
18. Close the Price Breaks window:
Enter Notification Controls for the Blanket Purchase Agreement
19. Navigate to the Notification Controls window:
- (M) Tools > Notification Control
20. Enter controls to warn you of the upcoming expiration of the agreement 120 days prior and 60 days prior to the effective end date:
|
Condition |
Warning Delay |
From |
To |
% |
Amount |
| Expiration | 120 | Defaults | Defaults | N/A | N/A |
| Expiration | 60 | Defaults | Defaults | N/A | N/A |
21. Enter controls to warn you if by six months into the agreement, you haven’t released at least 50% of the amount agreed.
|
Condition |
Warning Delay |
From |
To |
% |
Amount |
| Amount Not Released | N/A | Today | Six Months from Today | 50 | Defaults |
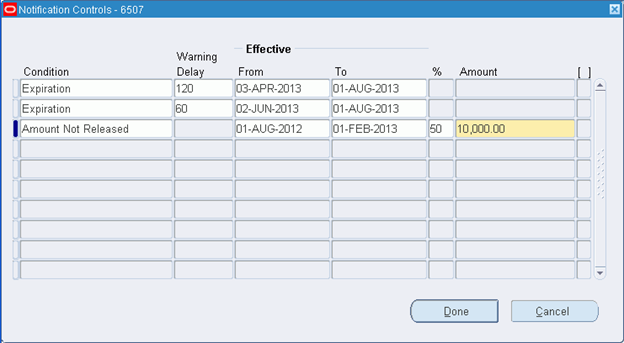
22. (B) Done
23. (B) OK
Submit the Purchase Agreement for Approval
24. Navigate to the Approve Document window:
- (B) Approve
25. Enter the following:
- Submit for Approval check box = Select
- Clear all other options
26. (B) OK
27. Verify that the status on the purchase order header is Approved and record the blanket order number: _______________________.
28. Close the window to return to the Navigator.
Issue a Blanket Release to Place the First Order Against the Agreement
29. Navigate to the Releases window:
- (N) Purchase Orders > Releases
30. Enter the following:
- Operating Unit = Vision Operations
- PO, Rev = The PO number from the blanket agreement
31. (T) Shipments
32. Click in the Line field and open the List of Values, then search for 1 (Line 1 – f20000) and (B) Find. Select item f20000.
33. Enter the following:
- Quantity = 2
- Need-By = One week from today
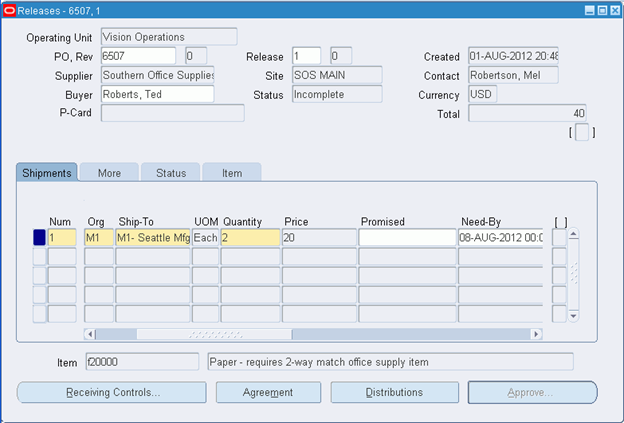
34. (I) Save
Submit the Blanket Release for Approval
35. Navigate to the Submit for Approval window:
- (B) Approve
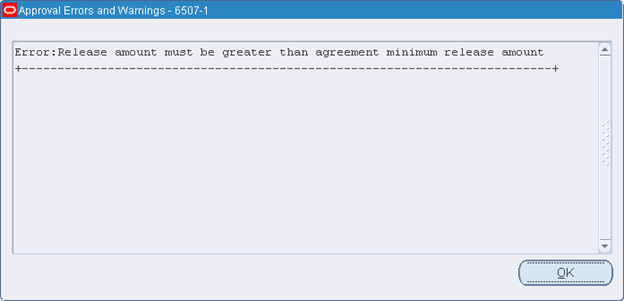
36. Why can’t it be approved?
37. (B) OK
Increase the Quantity Ordered So That the Release Will Be Above the Minimum Release Amount
38. Place the cursor in Quantity field and increase to 3.
39. (I) Save
Submit the Blanket Release for Approval
40. Navigate to the Submit for Approval window:
- (B) Approve
41. Enter the following:
- Submit for Approval check box = Select
- Clear all other options
42. (B) OK
43. Close the window to return to the Navigator.
Review the Blanket Purchase Agreement to View How It Was Updated As a Result of the Release
44. Navigate to the Purchase Orders window:
- (N) Purchase Orders > Purchase Orders
45. Using either find or query functionality, locate the blanket purchase agreement.
46. Notice the value in the Released field is 60.00 – the amount of the first release.
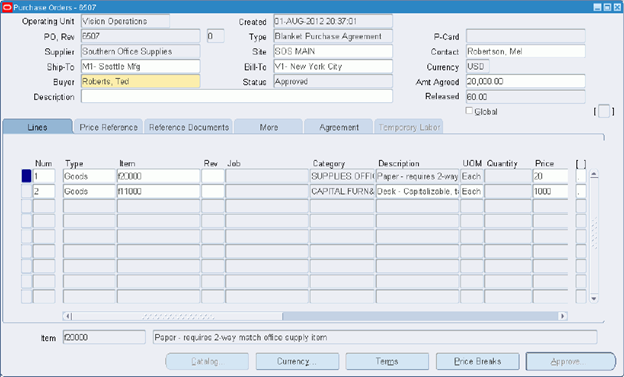
47. What would happen to the Released value if you issue another release with a value of $1,800?
The Released value would increase by $1800.00. Making the new Released value $1860.00.
48. Close the window to return to the Navigator.
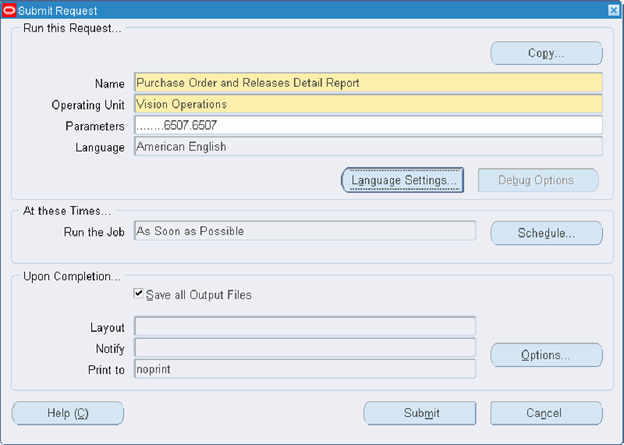
Run the Purchase Order and Releases Detail Report
49. Navigate to the Submit Request window:
- (N) Reports > Run
50. Select the Single Request option.
51. (B) OK
52. Enter the following:
- Name = Purchase Order and Releases Detail Report
53. Enter the following parameters:
- PO Numbers From = Your blanket purchase agreement number
- PO Numbers To = Your blanket purchase agreement number
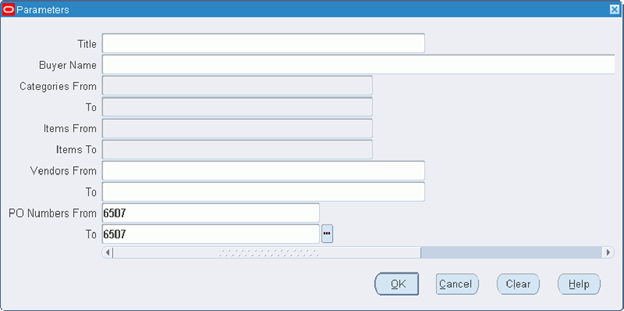
54. (B) OK
55. Enter the following:
- Operating Unit = Vision Operations
56. (B) Submit
57. (B) No to submit another request
58. Monitor progress of the report:
- (M) View > Requests
- (B) Find
- Verify the request completes successfully (Phase = Completed, Status = Normal)
59. View output of the request:
- (B) View Output
60. Close window to return to the Navigator.
Practice – Create a Contract Purchase Agreement
Summary
In this activity, you will:
- Create a contract purchase agreement to establish general terms and conditions with this supplier. Items, quantities and delivery dates/locations are not known.
- Create a standard purchase order referencing the contract.
Expectations
- Logon to the system using the XXUSERNAME you created earlier.
- Replace XX with your terminal number or initials.
- Prior activities are completed. Activities build on earlier activities.
- You must have access to an Oracle Application Vision database or comparable training or test instance at your site on which to complete this activity.
Tasks
- Create a Contract Purchase Agreement
- Submit the Contract Agreement for Approval
- Create a Standard Purchase Order Referencing the Contract
- Enter an Expense Item That You Need to Order
- Submit the Standard Purchase Order for Approval
- Review the Contract Purchase Agreement to View How It Was Updated As a Result of the Release
- Run the Contract Status Report
Solution
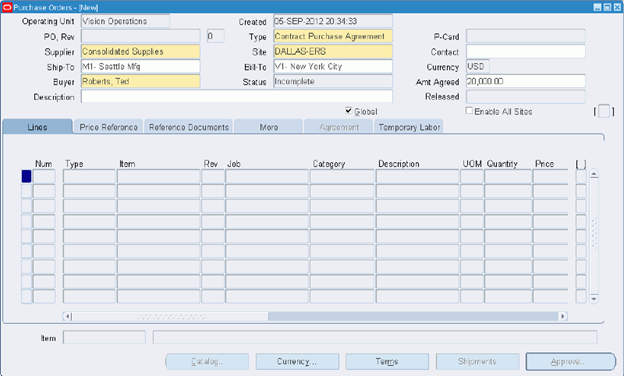
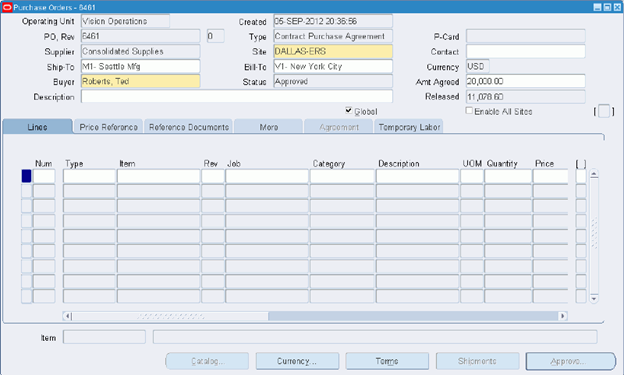
Create a Contract Purchase Agreement
Responsibility = Purchasing, Vision Operations
- Navigate to the Purchase Orders window:
- (N) Purchase Orders > Purchase Orders
- Enter the following:
- Operating Unit = Vision Operations
- Type = Contract Purchase Agreement
- Supplier = Consolidated Supplies
- Site = DALLAS-ERS
- Ship-To = M1-Seattle Mfg
- Bill-To = V1-New York City
- Amt Agreed = 20,000.00
- Navigate to the Terms and Conditions window:
- (B) Terms
- Enter the following:
- Payment = Immediate
- Agreement Controls/Effective Dates = Start date = Today’s date; End date = 6 months from today
- Amount Limit = 20,000.00
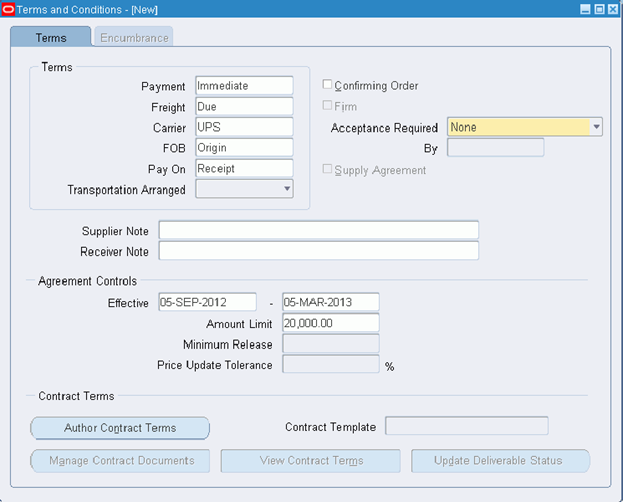
5. Close the Terms and Conditions window.
6. (I) Save
Submit the Contract Agreement for Approval
7. Navigate to the Approve Document window:
- (B) Approve
- Enter the following:
- Submit for Approval check box = Select
- Clear all other options
- (B) OK
- Verify that the status on the purchase order header is Approved and record your contract purchase agreement order number: ___________________________.
- Close the window to return to the Navigator.
Issue a Standard Purchase Order Referencing the Contract
- Navigate to the Purchase Orders window:
- (N) Purchase Orders > Purchase Orders
- Enter the following:
- Operating Unit = Vision Operations
- Type = Standard Purchase Order
- Supplier = Consolidated Supplies
- Site = DALLAS-ERS
- Ship-To = M1- Seattle Mfg
- Bill-To = V1-New York City
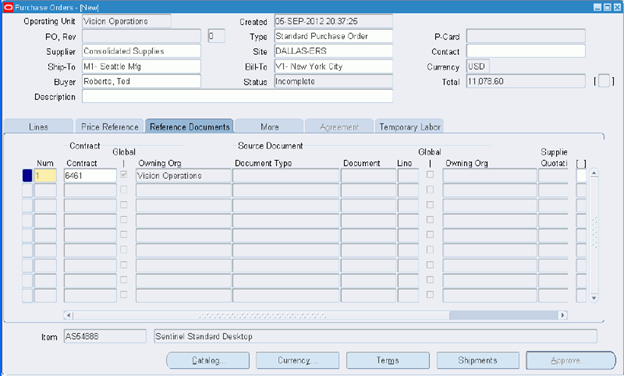
Enter an Expense Item That You Need to Order
- (T) Lines
- Enter the following:
- Num = 1
- Item = AS54888
- Quantity = 10
- Price = Appears by default
- Need-By = Two weeks from today
- (T) Reference Documents
- Enter the following:
- Contract = Enter the CPA# (contract purchase agreement number that you created earlier) that this Standard Purchase Order is being issued against.
- Enter shipments for this item:
-
(B) Shipments
- Org = M1
- Ship-To = M1-Seattle Mfg
- Quantity = 10
- Org = M1
- Enter distributions for this shipment:
-
(B) Distributions
- Subinventory = Stores
- Subinventory = Stores
- (I) Save
- Close the Distributions window and the Shipments window.
Submit the Standard Purchase Order for Approval
- Navigate to the Approve Document window:
- (B) Approve
- Enter the following:
- Submit for Approval check box = Select
- Clear all other options
- (B) OK
- Verify that the status on the purchase order header is Approved and record your standard purchase order number: _____________________. Also notice the amount in the Total field.
- Close the window to return to the Navigator.
Review the Contract Purchase Agreement to View How It Was Updated As a Result of the Release
- Navigate to the Purchase Orders window:
- (N) Purchase Orders > Purchase Orders
- Using either find or query functionality, locate your contract purchase agreement.
-
Notice the value in the Released field is the total amount from your standard purchase order that referenced this contract purchase agreement – the amount of your first release.
- Close the window to return to the Navigator.
Run the Contract Status Report
- Navigate to the Submit Request window:
- (N) Reports > Run
- Select the Single Request option.
- (B) OK
- Enter the following:
- Name = Contract Status Report
- Enter the following parameters:
- PO Numbers From and To = Your contract purchase agreement order number
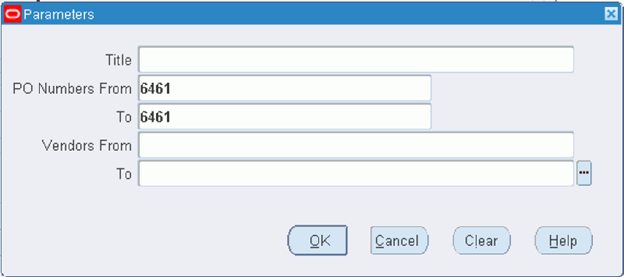
- (B) OK
- Enter the following:
- Operating Unit = Vision Operations
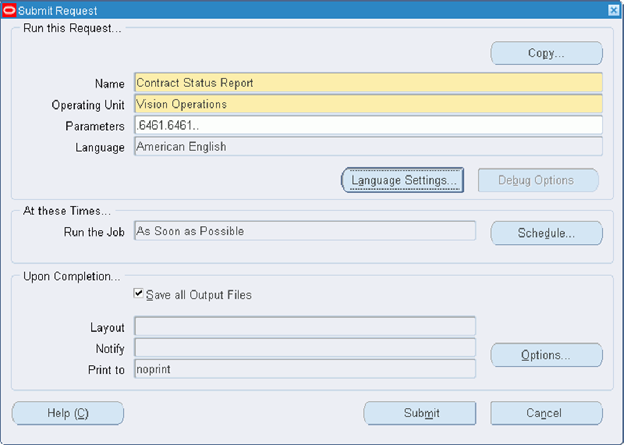
- (B) Submit
- (B) No to submit another request.
- Monitor progress of the report:
- (M) View > Requests
- (B) Find
- Verify the request completes successfully (Phase = Completed, Status = Normal)
- View output of the request:
- (B) View Output
-
Close window to return to the Navigator.
Practice – Return a Requisition
Summary
In this activity, you will use the AutoCreate window to return a requisition.
Expectations
- Logon to the system using the XXUSERNAME you created earlier.
- Replace XX with your terminal number or initials.
- Prior activities are completed. Activities build on earlier activities.
- You must have access to an Oracle Application Vision database or comparable training or test instance at your site on which to complete this activity.
Tasks
- Requisition Your Expensed Item
- Requisition Your Inventory Item
- Approve the Requisition
- Return the Requisition
- Reapprove the Requisition
Solution
Requisition Your Expensed Item
Responsibility = Purchasing, Vision Operations
1. Navigate to the Requisitions window:
- (N) Requisitions > Requisitions
2. Enter the following:
- Operating Unit = Vision Operations
- Description = XXPurchases
3. (T) Lines
- Item = XXSoftware
- Quantity = 10
- Need-By = One week from today
4. In the lower region of window, enter the following:
- Destination Type = Expense
- Organization = Seattle Manufacturing
- Location = M1- Seattle Mfg
- Supplier = Blank
- Site = Blank
5. (I) Save
Requisition Your Inventory Item
6. (T) Lines
7. (M) File > New, (I) New, or place your cursor on the second line
- Item field on line 2 = XXMonitor
- Quantity = 5
- Need-By = One week from today
8. In the lower region of window, enter the following:
- Destination Type = Inventory
- Organization = Seattle Manufacturing
- Location = M1-Seattle Mfg
- Subinventory = Stores
- Supplier = Advanced Network Devices
- Site = SANTA CLARA-ERS
9. (I) Save
10. Record your requisition number: ___________________________.
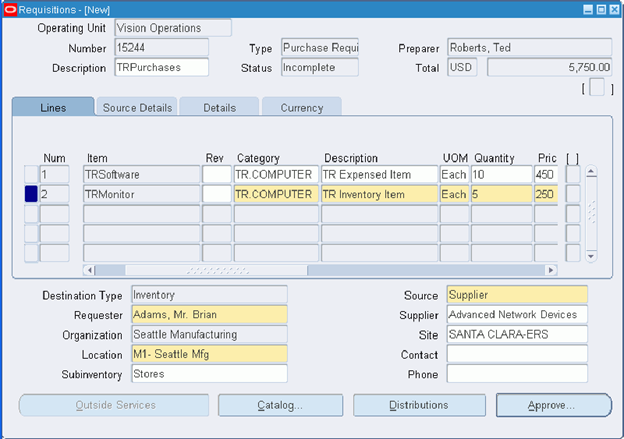
Approve the Requisition
11. (B) Approve
12. Enter the following:
- Submit for Approval check box = Select
- Clear all other options
13. (B) OK
14. Close the Requisitions window.
Return the Requisition
15. Navigate to the AutoCreate Documents window:
- (N) AutoCreate
16. (B) Clear to clear existing query criteria.
17. Enter the following:
- Operating Unit = Vision Operations
- Requisition = The purchase requisition you created earlier in this activity
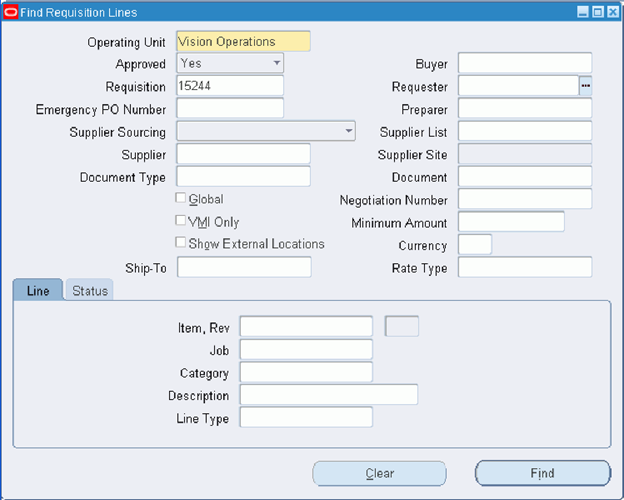
18. (B) Find
The AutoCreate Document window appears displaying the requisition lines for the requisition that was entered.
19. Select the two requisition lines by selecting the check box next to each line.
20. Navigate to the Return Requisitions window:
- (M) Tools > Return Requisition.
21. Enter the following:
- Reason = Enter a reason for returning the requisition.
Note: The return reason can be viewed in the Action History window.
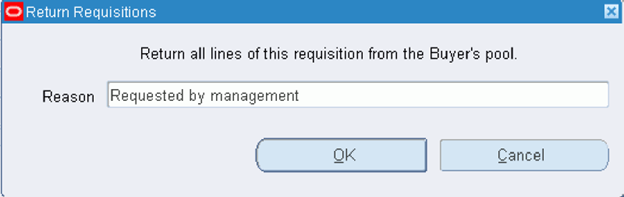
22. (B) OK
Note: This action returns ALL requisition lines associated with this requisition unless they have been placed on a purchase document.
23. Close the windows to return to the Navigator.
Reapprove the Requisition
24. Navigate to the Requisitions Headers Summary window:
- (N) Requisitions > Requisition Summary
25. Enter the following:
- Operating Unit = Vision Operations
- Requisition Number = The requisition you created earlier in the activity
26. (B) Find
27. Note the Approval Status of Returned.
28. Navigate to the Purchase Requisition window (action history):
- (M) Tools > View Action History
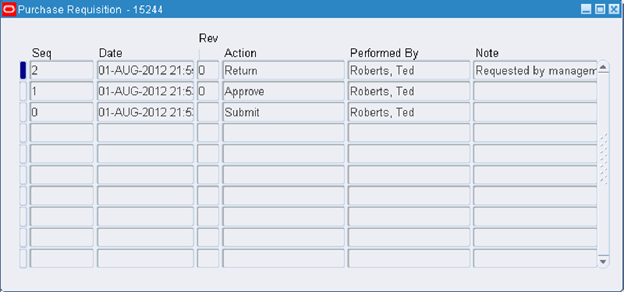
29. Notice the sequence of actions.
30. Close the Purchase Requisition window (action history).
31. (B) Open from the Requisition Headers Summary window.
32. (B) Approve
33. Enter the following:
- Submit for Approval check box = Select
- Clear all other options
34. (B) OK
35. Close windows to return to the Navigator.
Practice – AutoCreate a Purchase Order
Summary
In this activity, you will use the AutoCreate window to create a purchase order.
Expectations
- Logon to the system using the XXUSERNAME you created earlier.
- Replace XX with your terminal number or initials.
- Prior activities are completed. Activities build on earlier activities.
- You must have access to an Oracle Application Vision database or comparable training or test instance at your site on which to complete this activity.
Tasks
- AutoCreate a Standard Purchase Order
Solution
AutoCreate a Standard Purchase Order
Responsibility = Purchasing, Vision Operations
1. Navigate to the AutoCreate Documents window:
- (N) AutoCreate
2. (B) Clear
3. Enter the following:
- Requisition = Enter the number of the purchase requisition that you created in the Return a Requisition activity
4. (B) Find
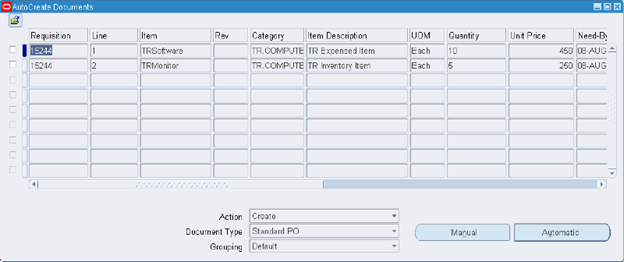
5. Enter the following:
- Action = Create
- Document Type = Standard PO
- Grouping = Default
6. (M) Edit > Select All to select all lines
7. (B) Automatic to create a standard purchase order.
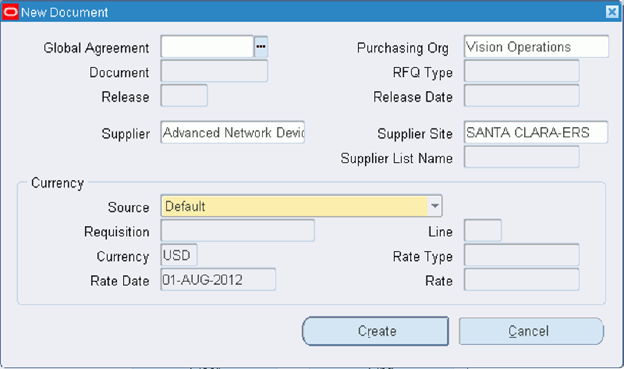
8. Enter the following:
- Supplier = Advanced Network Devices
- Site = SANTA CLARA-ERS
9. (B) Create
10. Record the purchase order number: _______________________.
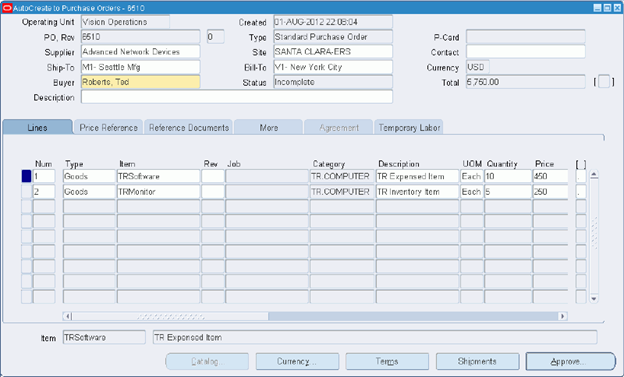
11. (B) Approve
12. Enter the following:
- Submit for Approval check box = Select
- Clear all other options
13. (B) OK
14. Close window to return to the Navigator.
Practice – Create Releases Using the Create Releases Program
Summary
In this activity, you will create a release using the Create Releases Program.
Expectations
- Logon to the system using the XXUSERNAME you created earlier.
- Replace XX with your terminal number or initials.
- Prior activities are completed. Activities build on earlier activities.
- You must have access to an Oracle Application Vision database or comparable training or test instance at your site on which to complete this activity.
Tasks
- Create a Blanket Purchase Agreement
- Specify Price Breaks
- Create a Sourcing Rule
- Create a Sourcing Rule Assignment
- Create an ASL Entry/Specify the Blanket Agreement as the Source Document
- Make the Approved Supplier List a Global Approved Supplier List
- Define the Attributes of the Approved Supplier List Entry
- Submit a Requisition
- Run the Create Releases Program
- View the Release
Solution
Create a Blanket Purchase Agreement
Responsibility = Purchasing, Vision Operations
1. Navigate to the Purchase Orders window:
- (N) Purchase Orders > Purchase Orders
2. Enter the following:
- Operating Unit = Vision Operations
- Type = Blanket Purchase Agreement
- Supplier = Advanced Network Devices
- Site = SANTA CLARA-ERS
- Ship-To = M1-Seattle Mfg
- Bill-To = V1-New York City
- Amount Agreed = 10000
- Description = XXSupplies
3. (T) Lines
4. Enter items according to the following table:
|
Num |
Item |
Category |
Description |
UOM |
| 1 | XXSoftware | XX.COMPUTER | XX Expensed Item | Each |
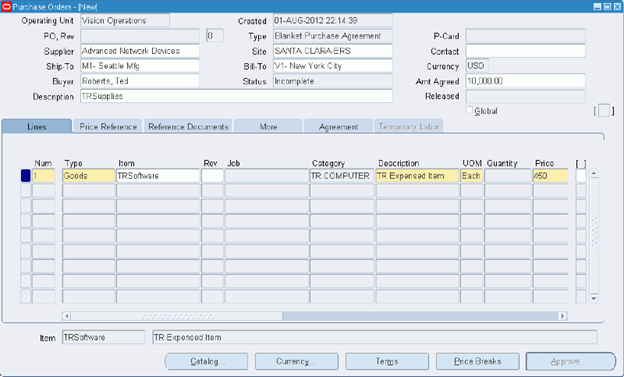
Specify Price Breaks
5. (B) Price Breaks
6. Enter the following:
|
Num |
Org |
Ship-To |
Quantity |
Break Price |
Discount % |
| 1 | M1 | M1-Seattle Mfg | 10 | Defaults | 10 |
| 2 | M1 | M1-Seattle Mfg | 25 | Defaults | 15 |
| 2 | M1 | M1-Seattle Mfg | 50 | Defaults | 20 |
7. (I) Save
8. Close the Price Breaks window.
9. Record your Blanket Purchase Agreement number: __________________________.
10. (B) Approve
11. Enter the following:
- Submit for Approval check box = Select
- Clear all other options
12. (B) OK
13. Close the window to return to the Navigator.
Create a Sourcing Rule
14. Navigate to the Sourcing Rule window (if prompted enter organization M1-Seattle Mfg):
- (N) Supply Base > Sourcing Rules
15. Enter the following:
- Name = XXComputer Purchases
- All Orgs option = Select
- Effective Date: From Date = Today’s date
- Effective Date: To Date = Today’s date
- Type = Buy From
- Supplier = Advanced Network Devices
- Supplier Site = SANTA CLARA-ERS
- Allocation = 100
- Rank = 1
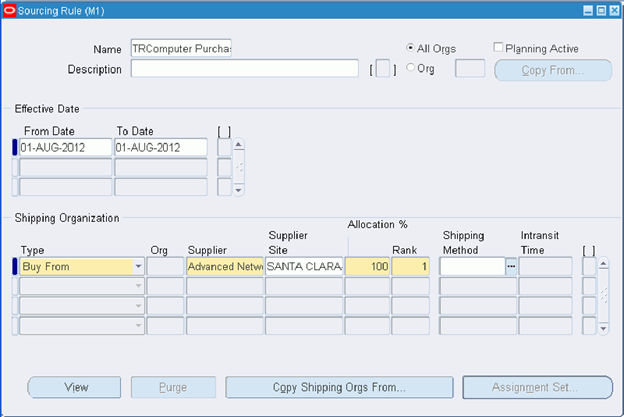
16. (I) Save
17. Close the window to return to the Navigator.
Create a Sourcing Rule Assignment
18. Navigate to the Sourcing Rule / Bill of Distribution Assignments window:
- (N) Supply Base > Assign Sourcing Rules
19. (M) View > Find
20. Select Supplier Scheduling Assignment Set from the list of values.
21. In the Assignments region, click in the Customer field.
22. (M) File > New or (I) New
- Assigned To = Item
- Item/Category = XXSoftware
- Type = Sourcing Rule
- Sourcing Rule / BoD = XXComputer Purchases
23. (I) Save
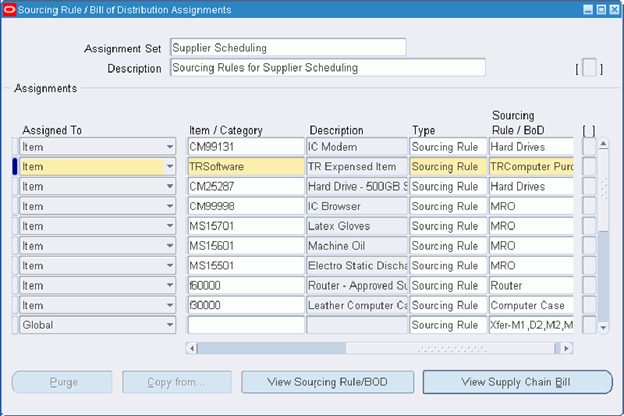
24. Close the window to return to the Navigator.
Create an ASL Entry/Specify the Blanket Agreement as the Source Document
25. Navigated to the Approved Supplier List window:
- (N) Supply Base > Approved Supplier List
26. Enter the following:
- Type = Item
- Item = XXSoftware
27. (T) Key Attributes
- Business = Direct
- Supplier = Advanced Network Devices
- Site = SANTA CLARA-ERS
- Status = Approved
- Supplier Item = XXOAPR11i
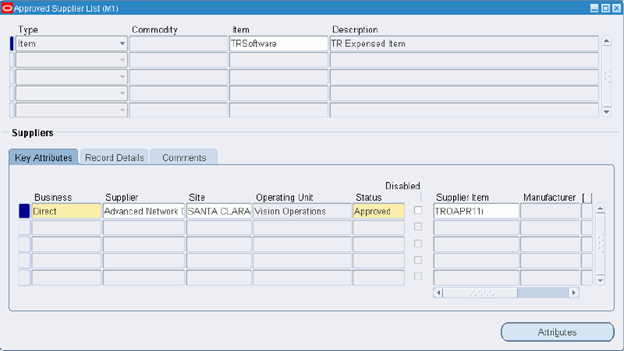
Make the Approved Supplier List a Global Approved Supplier List
28. (T) Record Details
- Global? = Yes
29. (I) Save
Define the Attributes of the Approved Supplier List Entry
30. (B) Attributes
- Release Method = Automatic Release
31. (T) Source Documents
- Type = Blanket Purchase Agreement
- Number = Your blanket purchase agreement number you created earlier in the activity
- Line = 1
32. (I) Save

33. Close the Supplier-Item Attributes and Approved Supplier List windows to return to the Navigator.
Submit a Requisition
34. Navigate to the Requisitions window:
- (N) Requisitions > Requisitions
35. Enter the following:
- Operating Unit = Vision Operations
36. (T) Lines
- Item = XXSoftware
- Quantity = 10
37. (B) OK for the note that appears.
38. Enter the following in the lower region of the window:
- Organization = Seattle Manufacturing
- Location = M1- Seattle Mfg
39. (T) Source Details
Note: Notice that the source document information appears by default.
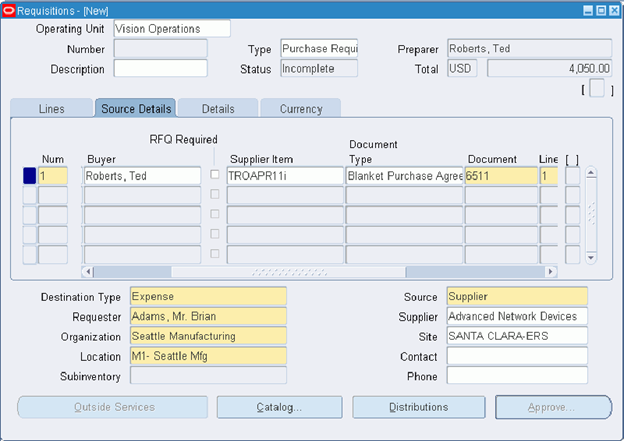
40. (I) Save and note the Requisition Number: _______________________.
41. (B) Approve
42. Enter the following:
- Submit for Approval check box = Select
- Clear all other options
43. (B) OK
44. Close the window to return to the Navigator.
Run the Create Releases Program
45. Navigate to the Submit Request window:
- (N) Reports > Run
46. Select the Single Request option.
47. (B) OK
48. Enter the following:
- Name = Create Releases
- Operating Unit = Vision Operations (appears by default)
49. (B) Submit
50. (B) No
51. (M) View > Requests
52. (B) Find
53. (B) Refresh Data until the request completes successfully (Phase = Completed, Status = Normal)
54. Close the window to return to the Navigator.
View the Release
55. Navigate to the Purchase Order Summary window:
- (N) Purchase Orders > Purchase Order Summary
56. (T) Related Documents
- View Releases check box = Select
- Requisition = Your requisition number that you just created
57. (B) Find
58. (B) Open
59. Close the windows to return to the Navigator.
Practice – Automatically Create a Standard Purchase Order Based on a Quotation
Summary
In this activity, you will create a standard purchase order based on a quotation.
Expectations
- Logon to the system using the XXUSERNAME you created earlier.
- Replace XX with your terminal number or initials.
- Prior activities are completed. Activities build on earlier activities.
- You must have access to an Oracle Application Vision database or comparable training or test instance at your site on which to complete this activity.
Tasks
- Create a Catalog Quote
- Specify Price Breaks
- Submit a Requisition
- Verify a Standard Purchase Order Was Created
Solution
Create a Catalog Quote
Responsibility = Purchasing, Vision Operations
1. Navigate to the Quotations window:
- (N) RFQ’s and Quotations > Quotations
2. Enter the following:
- Operating Unit = Vision Operations
- Type = Catalog Quotation
- Supplier = Advanced Network Devices
- Site = SANTA CLARA-ERS
- Ship-To = M1-Seattle Mfg
- Bill-To = V1-New York City
- Status = Active
- Effectivity = Today to a year from today
3. (T) Items
4. Enter item information according to the following table:
|
Num |
Item |
Category |
Description |
UOM |
| 1 | XXMonitor | XX.COMPUTER | XX Inventory Item | Each |
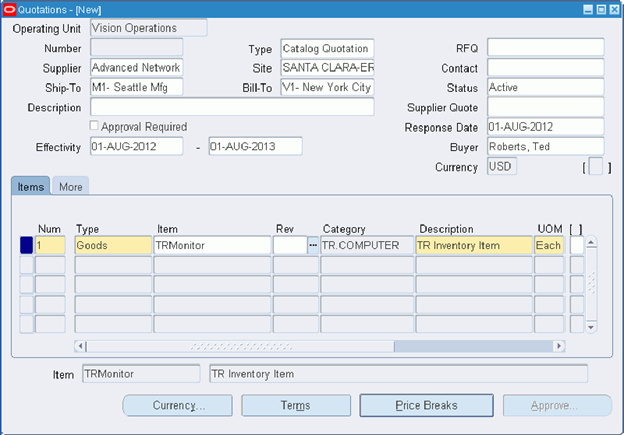
Specify Price Breaks
5. (B) Price Breaks
6. Enter price breaks according to the following table:
|
Num |
UOM |
Quantity |
Price |
Org |
Ship-To |
Discount % |
| 1 | Each | 10 | Calculates | M1 | M1-Seattle Mfg | 10 |
| 2 | Each | 25 | Calculates | M1 | M1-Seattle Mfg | 15 |
| 3 | Each | 50 | Calculates | M1 | M1-Seattle Mfg | 20 |
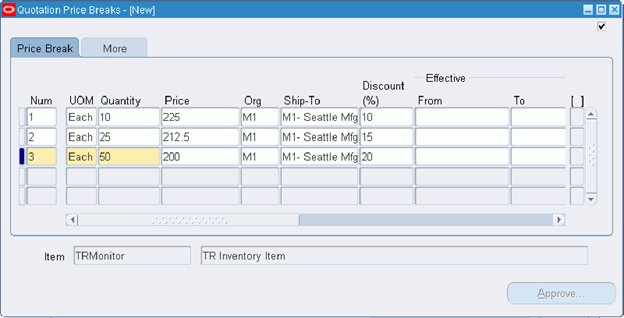
7. Exit the Price Breaks window.
8. (I) Save
9. Record the number of your quotation: _______________________.
10. (B) Approve
11. Enter the following:
- Type = All Orders
- Reason = Best Design
12. (B) OK
13. (B) OK to the note that the quotation lines have been approved.
14. Close the window to return to the Navigator.
Submit a Requisition
15. Navigate to the Requisitions window:
- (N) Requisitions > Requisitions
16. Enter the following:
- Operating Unit = Vision Operations
17. (T) Lines
- Item = XXMonitor
- Quantity = 5
- Need-By = Tomorrow’s Date
18. In the lower region of the window, enter the following:
- Organization = Seattle Manufacturing
- Location = M1-Seattle Mfg
- Supplier = Advanced Network Devices (Use the list of values)
- Site = SANTA CLARA-ERS (Use the list of values)
Note: Sourcing rules automate the defaulting of a supplier and site.
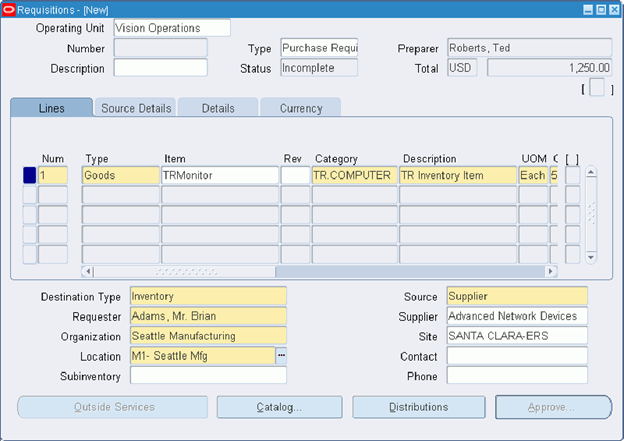
19. (T) Source Details
- Supplier Item = XXSVGA17
- Document Type = Quotation
- Document = Your quotation number you created earlier in the activity
- Line = 1
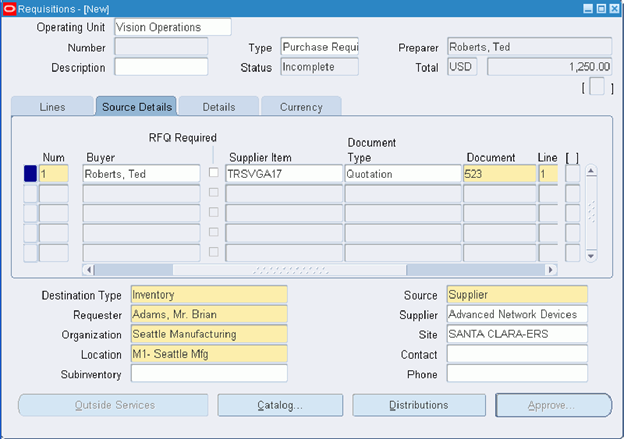
20. (I) Save
21. Record the requisition number: _______________________________.
22. (B) Approve
23. Enter the following:
- Submit for Approval check box = Select
- Clear all other options
24. (B) OK
25. Close the window to return to the Navigator.
Verify a Standard Purchase Order Was Created
26. Navigate to the Purchase Order Summary window:
- (N) Purchase Orders > Purchase Order Summary
27. (T) Related Documents
- Requisition = Your requisition that you created earlier in the activity
28. (B) Find
29. (B) Open
30. Close the windows to return to the Navigator.
Practice – Create a Standard Receipt
Summary
In this activity, you will create a standard receipt against the purchase order you created in the AutoCreate a Purchase Order activity.
Expectations
- Logon to the system using the XXUSERNAME you created earlier.
- Replace XX with your terminal number or initials.
- Prior activities are completed. Activities build on earlier activities.
- You must have access to an Oracle Application Vision database or comparable training or test instance at your site on which to complete this activity.
Tasks
- Find Expected Receipts
- Record Receipt Header Details
- Process a Standard Receipt
Solution
Find Expected Receipts
Responsibility = Purchasing, Vision Operations
1. Navigate to the Receipts window:
- (N) Receiving > Receipts (M1 – Seattle Manufacturing)
2. Enter the following:
- Operating Unit = Vision Operations
- Purchase Order = Your purchase order from the AutoCreate a Purchase Order activity
- Supplier = Advanced Network Devices
- Item = XXSoftware
3. (B) Find
Record Receipt Header Details
4. Enter the following:
- Packing Slip = PS-XX
- Freight Carrier = UPS
Process a Standard Receipt
5. Click in the Receipts window.
Note: The Receipt Header window appears on top of the Receipts window. When you have completed the Receipt Header window, click in the Receipts window, which is located behind the Receipt Header window or (M) Window > Receipts (M1).
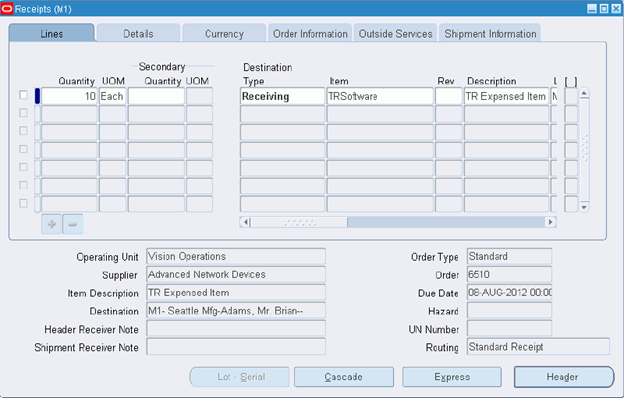
6. Select the check box to the left of the Quantity field.
7. (B) OK to the note – Purchase order receipt date tolerance exceeded.
Note: M1-Seattle Manufacturing has receiving options set to give a warning message if items are received 5 days early. (Setup > Organizations > Receiving Options).
8. Enter the following:
- Quantity = 2
- Destination Type = Expense
- Location = M1-Seattle Mfg
- Requester = Appears by default
9. (I) Save

10. (B) Header
11. Record your receipt number: ___________________________.
Note:
- You can only override the default destination type if the profile option RCV: Allow Routing Override is set to Yes.
- You can use iSupplier Portal to enable your suppliers to record ASNs. Deliveries must still be processed using this window, but much of the information will already be recorded and as a result, receipt processing cost and time will be lower.
- The RCV: Processing Mode profile option determines how receipts are processed:
|
Setting |
Meaning |
| Online | The user will not be able to perform any other application activities until the process completes. |
| Immediate | The window will start running the Receiving Transaction Processor as a background process. The system will not hold the screen and the user can do something else. |
| Batch | Control is returned to the User immediately so other application activities may be performed. The transaction will be processed by running the Concurrent Program Receiving Transaction Processor (RVCTP). Typically, customers will run this program periodically based on their processing and system requirements. |
-
Close the windows to return to the Navigator.
Practice – Create an Express Receipt
Summary
In this activity, you will create an express receipt against the purchase order you created in the AutoCreate a Purchase Order activity.
Expectations
- Logon to the system using the XXUSERNAME you created earlier.
- Replace XX with your terminal number or initials.
- Prior activities are completed. Activities build on earlier activities.
- You must have access to an Oracle Application Vision database or comparable training or test instance at your site on which to complete this activity.
Tasks
- Find Expected Receipts
- Record Receipt Header Details
- Create the Express Receipt
- Review Receiving Transactions
Solution
Find Expected Receipts
Responsibility = Purchasing, Vision Operations
1. Navigate to the Receipts window:
- (N) Receiving > Receipts (M1 – Seattle Manufacturing)
2. Enter the following:
- Purchase Order = Your purchase order from the AutoCreate a Purchase Order activity
- Supplier = Advanced Network Devices
3. (B) Find
Note: To process an express receipt, all expected receipts queried must be from the same supplier.
Record Receipt Header Details
4. Enter the following:
- Packing Slip = PS-XX
- Freight Carrier = UPS
Create the Express Receipt
5. Click in the Receipts window.
Note: The Receipt Header window appears on top of the Receipts window. When you have completed the Receipt Header window, click in the Receipts window, which is located behind the Receipt Header window or (M) Window > Receipts (M1).
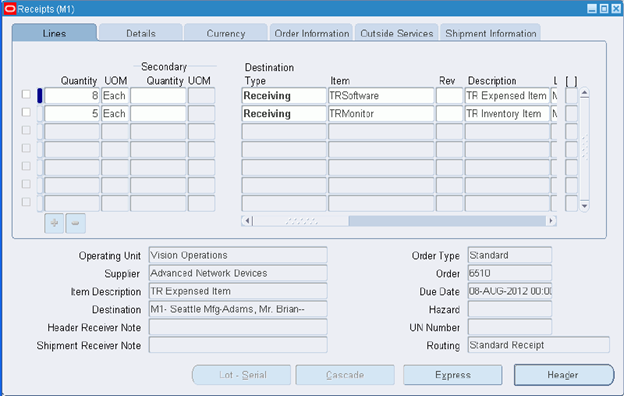
6. (B) Express to create an express receipt.
7. Enter the following:
- Destination Type = Final Destination

8. (B) OK
9. (I) Save
10. (B) OK to the note – Total express transaction created.
11. (B) Header
12. Record your receipt number: _____________________________.
Important Note: If the Destination Type is Final Destination, to process the receipt as an express receipt, the Requester field must have been filled out on the purchase order or release.
13. Close windows to return to the Navigator.
Review Receiving Transactions
14. Navigate to the Receipt Headers Summary window:
- (N) Receiving > Receiving Transactions Summary (M1-Seattle Manufacturing)
15. Enter the following:
- Receipt = Receipt number that you previously created in the activity
16. (B) Find
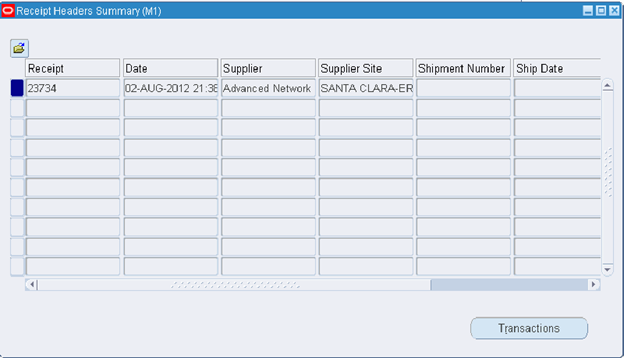
17. (B) Transactions to open the Receipt Transaction Summary window.
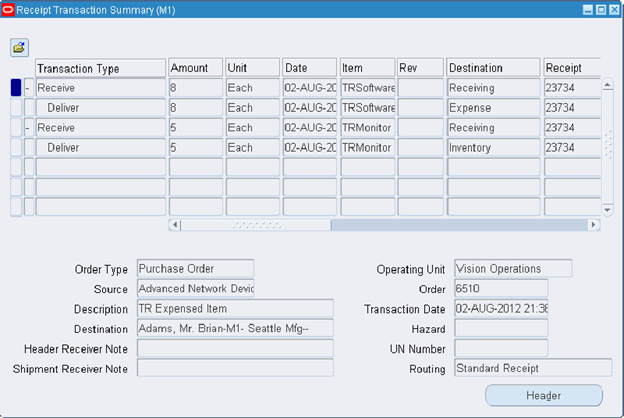
18. Review the receipt details.
19. Close the windows to return to the Navigator.
Practice – Create a Cascade Receipt
Summary
In this activity, you will create a cascade receipt against a couple of the purchase orders you already created in the Create a Standard Purchase Order activity and the Automatically Create a Standard Purchase Order Based on a Quotation activity.
Expectations
- Logon to the system using the XXUSERNAME you created earlier.
- Replace XX with your terminal number or initials.
- Prior activities are completed. Activities build on earlier activities.
- You must have access to an Oracle Application Vision database or comparable training or test instance at your site on which to complete this activity.
Tasks
- Find Expected Receipts
- Record Receipt Header Details
- Create the Cascade Receipt
- Complete the Delivery for a Line of the Cascade Receipt (we will inspect the other later)
- Review Receiving Transactions
Solution
Find Expected Receipts
Responsibility = Purchasing, Vision Operations
1. Navigate to the Receipts window:
- (N) Receiving > Receipts (M1 – Seattle Manufacturing)
2. Enter the following:
- Supplier = Advanced Network Devices
- Item = XXMonitor
3. (B) Find
Note: To process a cascade receipt, you must query expected receipts for a specific supplier and item.
Record Receipt Header Details
4. Enter the following:
- Packing Slip = PS-XX
- Freight Carrier = UPS
Create the Cascade Receipt
5. Click in the Receipts window.
Note: The Receipt Header window appears on top of the Receipts window. When you have completed the Receipt Header window, click in the Receipts window, which is located behind the Receipt Header window or (M) Window > Receipts (M1).
6. Notice the quantity on each receipt line.
Note: You should have three receipt lines
- Quantity of 5 for the purchase order you created in the Automatically Create a Standard Purchase Based on a Quotation activity
- Quantity of 4 for the purchase order you created in the Create a Standard Purchase Order activity
- Quantity of 6 for the purchase order you created in the Create a Standard Purchase Order activity
7. (B) Cascade to create a cascade receipt.
8. Enter the following:
- Cascade Quantity = 6
- Unit of Measure = Each
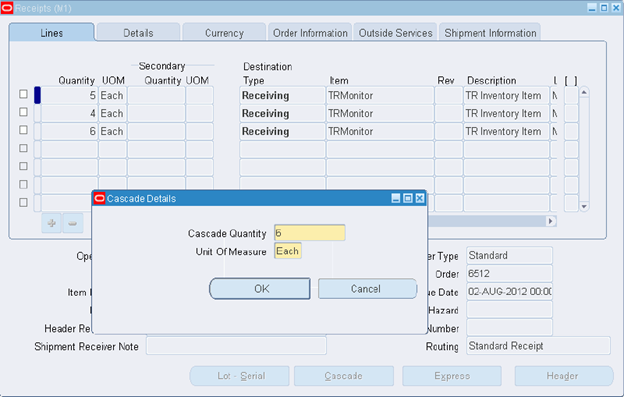
9. (B) OK
10. (B) OK to note – Purchase order receipt tolerance exceeded
11. Notice how the 6 items are applied to the expected receipt.
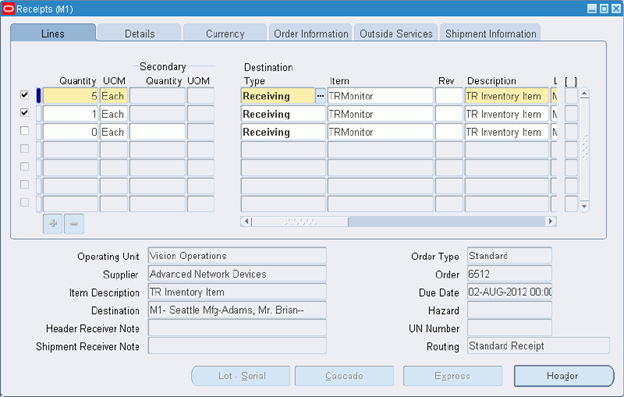
Note: Review the quantity for each receipt line. Quantity of 5 for line 1 and quantity of 1 for line 2.
12. (I) Save
13. (B) Header
14. Record your receipt number: _________________________.
Note: Because the routing type was Standard Routing, these inventory items will display a destination type of Receiving. The items are delivered to inventory in a subsequent step.
15. Close the windows to return to the Navigator.
Complete the Delivery for a Line of the Cascade Receipt (we will inspect the other later)
16. Navigate to the Receiving Transactions window:
- (N) Receiving > Receiving Transactions (M1 – Seattle Manufacturing)
17. Enter the following:
- Receipt = Receipt number of the cascade receipt.
18. (B) Find
19. (T) Order Information

20. Select the check box to the left of the quantity field related to the purchase order you created in the Automatically Create a Standard Purchase Order Based on a Quotation activity (line with a quantity of 5).
21. Change the Qty from 5 to 1.
We will inspect the other four items in a later activity.
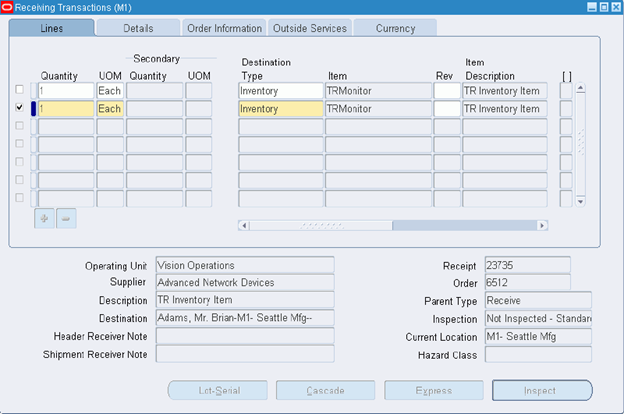
22. (T) Lines
23. Enter the following:
- Subinventory = Stores
24. (I) Save
25. Close the Receiving Transactions window to return to the Navigator.
Review Receiving Transactions
26. Navigate to the Receipt Headers Summary window:
- (N) Receiving > Receiving Transactions Summary (M1-Seattle Manufacturing)
27. Enter the following:
- Receipt = Receipt number you previously created in this activity.
28. (B) Find
29. (B) Transactions to open the Receipt Transaction Summary window.
30. Review the receipt detail information.
Notice the “Deliver” transaction type for an amount of 1, Destination = Inventory.
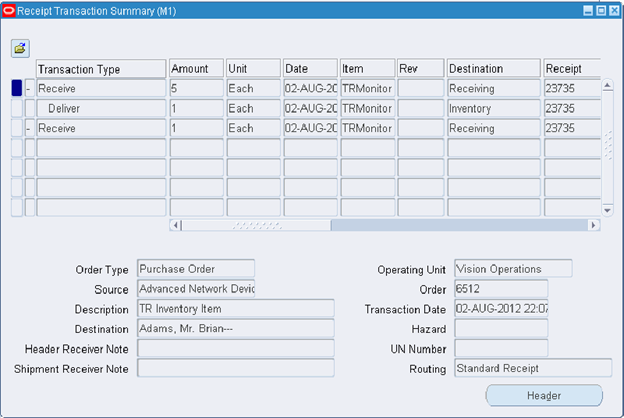
31. Close the windows to return to the Navigator.
Practice – Inspect and Deliver a Receipt
Summary
In this activity you will inspect and deliver a receipt. You will find that some of the items are defective. You will deliver three of the items to their final destination and the other two you will return.
Expectations
- Logon to the system using the XXUSERNAME you created earlier.
- Replace XX with your terminal number or initials.
- Prior activities are completed. Activities build on earlier activities.
- You must have access to an Oracle Application Vision database or comparable training or test instance at your site on which to complete this activity.
Tasks
- Perform a Quality Inspection
- Deliver Goods to a Final Destination
- Review Receiving Transactions
Solution
Perform a Quality Inspection
Responsibility = Purchasing, Vision Operations
1. Navigate to the Receiving Transactions window:
- (N) Receiving > Receiving Transactions (M1-Seattle Manufacturing)
2. Enter the following:
- Receipt = Your receipt number that you created in the Create a Cascade Receipt activity
3. (B) Find
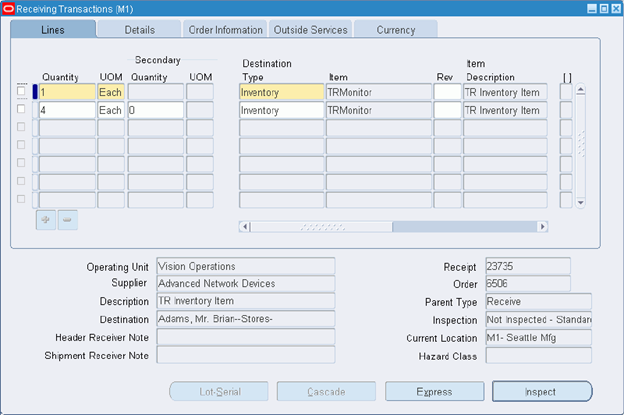
4. Place your cursor on the first receipt line.
5. (B) Inspect
Note: If Oracle Quality is installed and at least one inspection plan exists for the transaction, both the Enter Quality Results option in the Tools menu and the Quality button on the menu bar will be enabled. If the QA: PO Inspection Profile option is set to Quality, when you click the Inspect button, it opens the Quality Inspection window that you defined, instead of the Purchasing Inspection window. If the quality window is displayed instead of the Purchasing Inspection window, ask the instructor to change the QA:PO Inspection Profile option to Oracle Purchasing.
6. Enter inspection results according to the table:
|
Item |
Status |
Quantity |
Quality Code |
Reason Code |
Comment |
| XXMonitor | Accept | 1 | Above Average | Blank | Passed inspection |
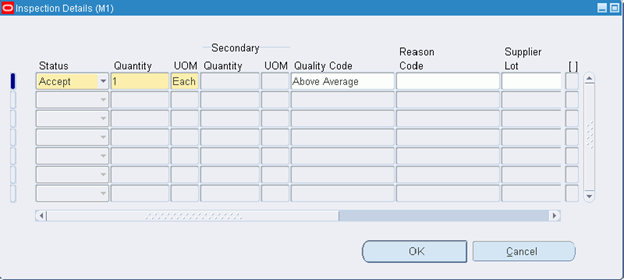
7. (B) OK
8. Place your cursor on the second receipt line.
9. (B) Inspect
10. Enter inspection results according to the table:
|
Item |
Status |
Quantity |
Quality Code |
Reason Code |
Comment |
| XXMonitor | Accept | 2 | Above Average | Blank | Passed inspection |
| XXMonitor | Reject | 2 | Below Average | CompDefect | Failed inspection |
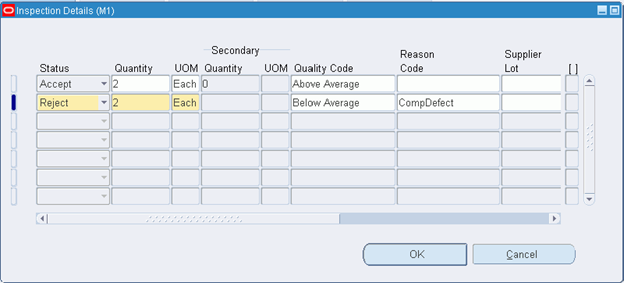
11. (B) OK
12. (I) Save
13. Close the Receiving Transactions window to return to the Navigator.
Deliver Goods to a Final Destination
14. Navigate to the Receiving Transactions window:
- (N) Receiving > Receiving Transactions
15. Enter the following:
- Receipt = Your receipt number that you created in the Create a Cascade Receipt activity
16. (B) Find
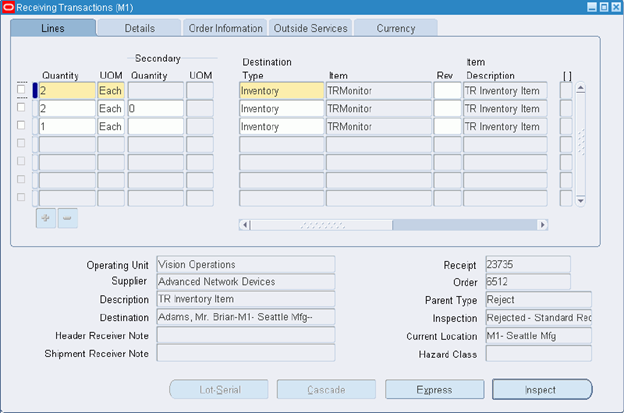
17. Place your cursor on the first receipt line that has a Parent Type = Reject (field appears in lower right side of window).
Note: You’ll need to use this window carefully. Determine which records were for the accepted items and which record was for the rejected items. Use the Parent Type field in the lower right of window to assist you.
18. Enter the following:
- Quantity = 2 (Appears by default)
- UOM = Each
- Destination Type = Receiving
- Item = XXMonitor
- Location = M1-Seattle Mfg
- Subinventory = Blank
19. Place your cursor on the second receipt line that has a Parent Type = Accept (field appears in lower right side of window).
20. Enter the following:
- Quantity = 2 (Appears by default)
- UOM = Each
- Destination Type = Inventory
- Item = XXMonitor
- Location = M1-Seattle Mfg
- Subinventory = Stores
21. Place your cursor on the third receipt line that has a Parent Type = Accept (field appears in lower right side of window).
22. Enter the following:
- Quantity = 1 (Appears by default)
- UOM = Each
- Destination Type = Inventory
- Item = XXMonitor
- Location = M1-Seattle Mfg
- Subinventory = Stores
23. (I) Save
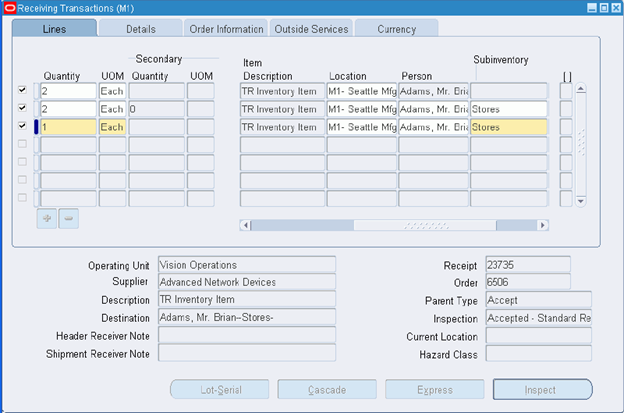
24. Close the window to return to the Navigator.
Review Receiving Transactions
25. Navigate to the Receipt Headers Summary window:
- (N) Receiving > Receiving Transactions Summary (M1-Seattle Manufacturing)
26. Enter the following:
- Receipt = Your receipt number
27. (B) Find
28. (B) Transactions to open the Receipt Transaction Summary window.
29. Review your receipt.
Notice the Reject and Accept Transaction Types.
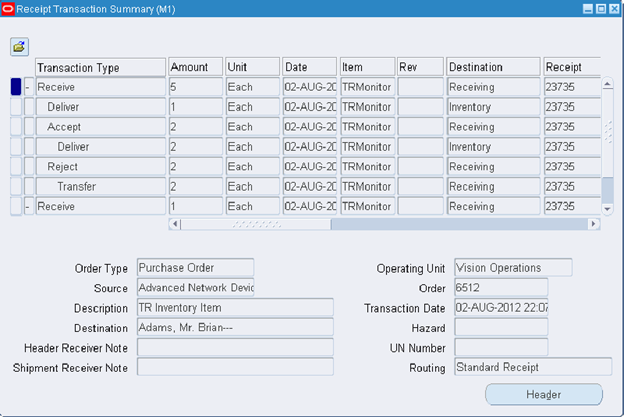
30. Close the window to return to the Navigator.
Create a Position
Create a New Position
Responsibility = Human Resources, Vision Enterprises (operations/welcome)
1. Navigate to the Position window:
- (N) Work Structure > Position > Description
- (B) New
- Name = MMXX.MATERIALS MANAGER
- Type = None
- Organization = Vision Operations
- Job = MGR500.Manager
- Hiring Status = Active
- Location = M1 – Seattle
-
(I) Save
Add the Position to the Hierarchy
Add the Position to the Hierarchy
Responsibility = Human Resources, Vision Enterprises (operations/welcome)
1. Navigate to the Position Hierarchy window:
- (N) Work Structures > Position > Hierarchy
- Query for the Materials position hierarchy:
- Place cursor in the Name field.
- Press F11
- Enter Materials in the Name field.
- Press Ctrl + F11
- Query for position name:
- Place cursor in Position Name field.
- Press F11
- Exists in Hierarchy check box = Select
- Press Ctrl + F11
- Scroll down until you reach the BUY501.BUYER 1 position name.
- Place cursor in the Subordinates Name field.
- (I) New
- Name = MMXX.MATERIALS MANAGER
- (I) Save
-
Close window and return back to Navigator.
Create Approval Groups
Create Approval Groups
Responsibility = Purchasing, Vision Operations (operations/welcome)
You can approve standard purchase orders up to 25000 for all purchases; however, you only have a 1000-dollar limit for requisitions you submit.
1. Navigate to the Approval Groups window:
- (N) Setup > Approvals > Approval Groups
- (B) Cancel on the Find Approval Groups window.
- Enter the following:
- Operating Unit = Vision Operations
- Name = XX-25K
- Description = 25K Approval; All accounts
|
Object |
Type |
Amount Limit |
Low Value |
High Value |
| Document Total | Include | 25000 | ||
| Account Range | Include | 25000 | 00-000-0000-0000-000 | 99-999-9999-9999-000 |
Note: If you do not enter a rule for an account, the default is to exclude the account. If you enter only an Exclude Type rule, Purchasing does not automatically include everything else.
4. (I) Save
5. Place cursor in Name field.
6. (I) New
- Name = XX-1K
- Description = 1K Approval, All Accounts
|
Object |
Type |
Amount Limit |
Low Value |
High Value |
| Document Total | Include | 1000 | ||
| Account Range | Include | 1000 | 00-000-0000-0000-000 | 99-999-9999-9999-000 |
- (I) Save
-
Close the window and return to the Navigator.
Create Approval Group Assignments
Create Approval Group Assignments
Responsibility = Purchasing, Vision Operations (operations/welcome)
In a position hierarchy, approval groups are attached to POSITIONS. In an employee/supervisor hierarchy, approval groups are attached to JOBS.
1. Navigate to the Assign Approval Groups window:
- (N) Setup > Approvals > Approval Assignments
- Enter the following:
- Operating Unit = Vision Operations
- Position = MMXX.MATERIALS MANAGER
- Add approval assignments according to the following table:
|
Document Type |
Approval Group |
| Approve Purchase Requisitions | XX-1K |
| Approve Standard Purchase Orders | XX-25K |
| Approve Blanket Purchase Agreements | XX-25K |
| Approve Blanket Releases | XX-25K |
| Approve Contract Purchase Orders | XX-25K |
- (I) Save
-
Close the window and return to the Navigator.
Run the Fill Employee Hierarchy Process
Run the Fill Employee Hierarchy Process
Responsibility = Purchasing, Vision Operations (operations/welcome)
- Navigate to the Submit Request window:
- (N) Reports > Run
- Select the Single Request option
- (B) OK
- Name = Fill Employee Hierarchy
- (B) Submit
- (B) No – Do not submit another request.
Note: The Fill Employee Hierarchy adds our position and people assigned to the position to the position hierarchy. This process is not necessary for an Employee/Supervisor hierarchy. Both types will be discussed during this course.
Monitor the Request Until It Completes
- Navigate to the Requests window:
- (M) View > Requests
- (B) Find
- (B) Refresh Data until the request completes successfully (Phase = Completed, Status = Normal)
- Close the Requests window.
Practice – Set Up Document Routing and Approval
Summary
This activity is designed to walk you through the most common aspects of setting up document routing and approval for an Oracle Purchasing buyer. You will add a new position to the hierarchy and link it to your employee record created previously. Then you will create an approval group and test all of your set up with a very simple purchase order.
Note: The instructor must run the Fill Employee Hierarchy process during this activity. Refer to the guided demonstration for assistance.
Expectations
- Logon to the system using the XXUSERNAME you created earlier.
- Replace XX with your terminal number or initials.
- Prior activities are completed. Activities build on earlier activities.
- You must have access to an Oracle Application Vision database or comparable training or test instance at your site on which to complete this activity.
- Note: Before you begin this activity, have the instructor change the Ship-To location for the SANTA CLARA-ERS site for the Advanced Network Devices supplier to M1- Seattle Mfg (Supply Base > Suppliers).
Tasks
- Create a New Position
- Confirm the Default Hierarchy for Standard Purchase Orders
- Add the Position to the Existing Materials Hierarchy
- Create a New Approval Group
- Assign the New Approval Group to Your Position
- Assign Yourself to the New Position
- Verify Your Inclusion in the Position to the Existing Materials Hierarchy
- Create a Purchase Order and Submit for Approval
- View Purchase Order Summary to Determine Status Assigned and View Action History to Determine Who the Purchase Order was Forwarded to for Approval
- Determine Why the Document Went to the Above Person Rather than Your Supervisor, Casey Brown
- Change Your Employee Record for Later Activities
Solution
Create a New Position
Responsibility = Human Resources, Vision Enterprises
1. Navigate to the Positions window:
- (N) Work Structures > Position > Description
2. (B) New
- Date Effective Name = MMXX.MATERIALS MANAGER
- Type = None
- Permanent check box = Select
- Organization = Vision Operations
- Job = MGR500.Manager
- Hiring Status: Status = Active
- Location = M1-Seattle Mfg
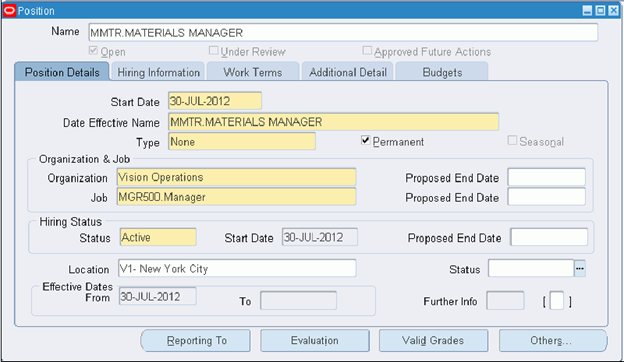
3. (I) Save and close the window.
Confirm the Default Hierarchy for Standard Purchase Orders
Responsibility = Purchasing, Vision Operations
4. Navigate to the Document Types page:
- (N) Setup > Purchasing > Document Types
5. Select Vision Operations as the Operating Unit.
6. (B) Go
The page appears displaying all of the existing document types for the Vision Operations operating unit.
7. (I) Update for the Purchase Order Standard document type.
8. Confirm that the name of the Default Hierarchy associated with standard purchase orders is Materials.
9. Close the page.
Add the Position to the Existing Materials Hierarchy
Responsibility = Human Resources, Vision Enterprises
10. Navigate to the Position Hierarchy window:
- (N) Work Structures > Position > Hierarchy
11. Query the Materials position hierarchy:
- Place cursor in Name field.
- Press F11 to enter query mode.
- Enter Materials in the Name field.
- Press Ctrl+ F11 to execute the query.
12. Query for position name:
- Place cursor in Position Name field.
- Press F11 to enter query mode.
- Enter BUY501.Buyer 1 in Name field.
- Press Ctrl + F11 to execute the query.
13. Place cursor in the Subordinates Name field.
14. (I) New
- Position = MMXX.MATERIALS MANAGER
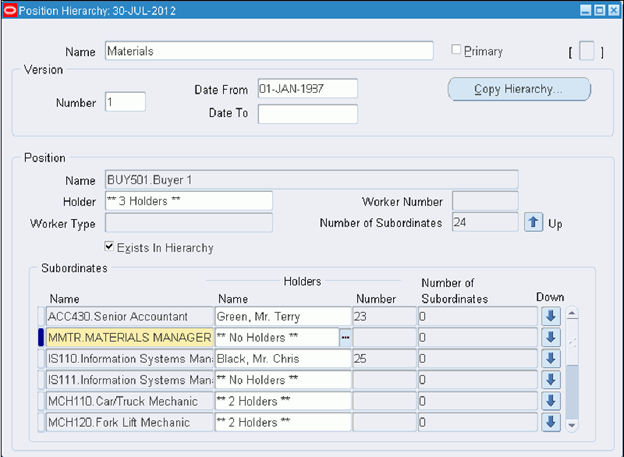
15. (I) Save
16. Close the window to return to the Navigator.
Create a New Approval Group
Responsibility = Purchasing, Vision Operations
17. Navigate to the Approval Groups window:
- (N) Setup > Approvals > Approval Groups
18. (B) Cancel on the Find Approval Groups window.
19. Enter the approval group:
- Operating Unit = Vision Operations
- Name = XX JR Buyer
- Description = $10,000 limit, all accounts
- Object = Account Range
- Type = Include
- Amount Limit = 10000
- Low Value 00-000-0000-0000-000
- High Value 99-999-9999-9999-999
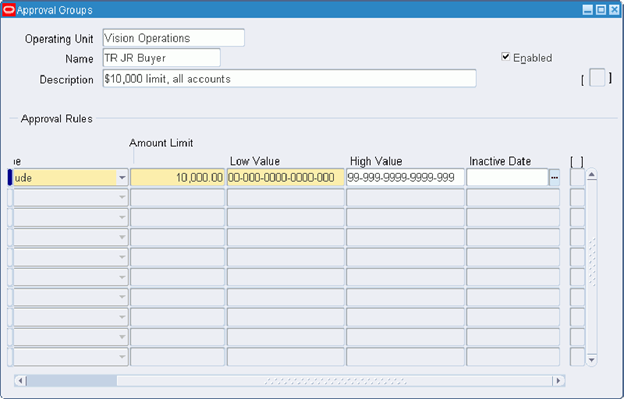
20. (I) Save
21. Close the window to return to the Navigator.
Assign the New Approval Group to Your Position
Responsibility = Purchasing, Vision Operations
22. Navigate to the Assign Approval Groups window:
- (N) Setup > Approvals > Approval Assignments
23. Enter the approval assignment:
- Operating Unit = Vision Operations
- Position = MMXX.MATERIALS MANAGER
- Document Type = Approve Standard Purchase Orders
- Approval Group = XX JR Buyer

24. (I) Save
25. Close the window to return to the Navigator.
Assign Yourself to the New Position
Responsibility = Human Resources, Vision Enterprises
WAIT! Check with instructor to see if the Fill Employee Hierarchy process has been run. That process must complete before you proceed.
26. Navigate to the People window:
- (N) People > Enter and Maintain
27. Find your employee record:
- Full Name = Your name (Last, First)
- (B) Find
28. (B) Assignment
29. Enter changes:
- Position = MMXX.MATERIALS MANAGER
- Job = MGR500.Manager (will default after you enter the position)
30. (B) Correction
31. (B) Yes to the Decision popup regarding the new position.
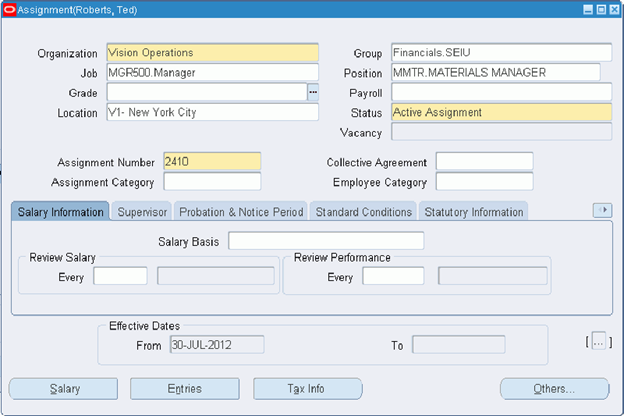
32. (I) Save
33. Close the windows to return to the Navigator.
Verify Your Inclusion in the Position to the Existing Materials Hierarchy
34. Navigate to the Position Hierarchy window:
- (N) Work Structures > Position > Hierarchy
35. Query the Materials position hierarchy:
- Place cursor in Name field.
- Press F11 to enter query mode.
- Enter Materials in the Name field.
- Press Ctrl+ F11 to execute the query.
36. Query for position name:
- Place cursor in Position Name field.
- Press F11 to enter query mode.
- Enter BUY501.Buyer 1 in the Position Name field
- Press Ctrl + F11 to execute the query.
37. Query for subordinate name:
- Place cursor in the Subordinates Name field.
- Press F11 to enter query mode.
- Enter your position name (MMXX.MATERIALS MANAGER) in the Name field.
- Press Ctrl +F11 to execute the query.
38. Verify that your name now appears as the Holder of that position in the hierarchy.
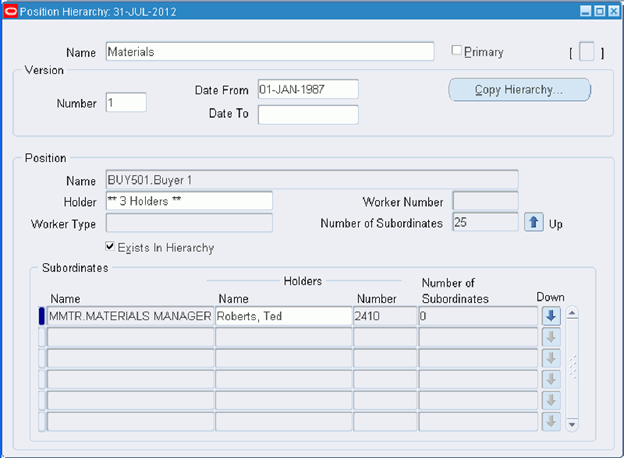
39. Close the window to return to the Navigator.
Create a Purchase Order and Submit for Approval
Responsibility = Purchasing, Vision Operations
40. Navigate to the Purchase Orders window:
-
(N) Purchase Orders > Purchase Orders
- Operating Unit = Vision Operations
- Type = Standard Purchase Order
- Supplier = Advanced Network Devices
- Site = SANTA CLARA-ERS
- Ship-To = M1 – Seattle Mfg
- Bill-To = V1- New York City
- Description = Document Approval Activity
- Operating Unit = Vision Operations
41. (T) Lines
- Num = 1
- Type = Inventory Item
- Item = f40000 (Modem – Serial Control)
- Quantity = 250
- Need-By = One week from today
42. (B) Shipments
- Num = 1
- Org = M1
- Ship To = M1-Seattle Mfg
- Quantity = 250
43. Close the Shipments window.
44. (I) Save and note your purchase order number: ___________________.
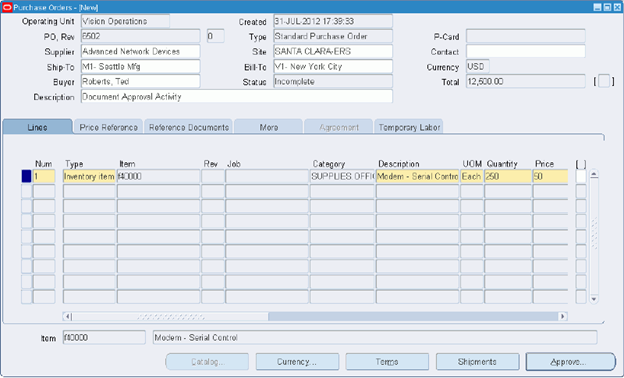
45. (B) Approve
- Submit for Approval check box = Select
- Clear all other options

46. (B) OK
47. Close the window to return to the Navigator.
View Purchase Order Summary to Determine Status Assigned and View Action History to Determine Who the Purchase Order was Forwarded to for Approval
48. Navigate to the Purchase Order Headers window:
-
(N) Purchase Orders > Purchase Order Summary
- Operating Unit = Vision Operations
- Number = Purchase order number that you just created in this activity
- Buyer = Your employee name (Last, first)
- Operating Unit = Vision Operations
49. (B) Find
50. What is the approval status? _______ Why weren’t you able to approve your own document?
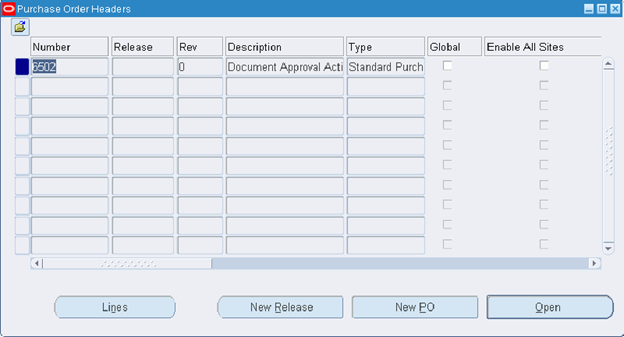
51. Determine who the document was forwarded to for approval:
- (M) Inquire > View Action History
- Who was it forwarded to? ____________________________
52. Close the windows to return to the Navigator.
Determine Why the Document Went to the Above Person Rather than Your Supervisor, Casey Brown
Responsibility = Human Resources, Vision Enterprises
53. Navigate to the Position Hierarchy window:
- (N) Work Structures > Position > Hierarchy
54. Query the Materials position hierarchy:
- Place cursor in Name field.
- Press F11 to enter query mode.
- Enter Materials in the Name field.
- Press Ctrl+ F11 to execute the query.
55. Query for position name:
- Place cursor in Position Name field.
- Press F11 to enter query mode.
- Enter BUY501.Buyer 1 in the Position Name field
- Press Ctrl + F11 to execute the query.
56. Look at the list of values that identifies all the employees holding this position:
- Holder = look at the list of values (click LOV next to field)
The answer:
- Because standard purchase orders are routed according to the Materials Hierarchy.
- Your position is attached to BUY501.BUYER 1 in this hierarchy.
- Baker, Catherine is the first holder of this position.
Note: When multiple holders of the same position exist, the system will ALWAYS direct the document to the FIRST person alphabetically by last name.
You can select a different individual to approve the document by selecting to forward the approval (select Forward check box) and selecting the individual to approve the document in the Forward To field on the Approve Document window.
57. Close the hierarchy windows and return to the navigator.
Change Your Employee Record for Later Activities
Responsibility = Human Resources, Vision Enterprises
58. Navigate to the People window:
- (N) People > Enter and Maintain
59. Find your employee record:
- Full Name = Your name (Last, First)
- (B) Find
60. (B) Assignment
61. Enter changes:
- Position = MM400.MATERIALS MANAGER
- Location = V1 – New York City (appears by default)
62. (B) Correction
63. (B) Yes to the decision about the position.
64. (I) Save
Why do you think we changed it back to the original position?
65. Close the windows and return back to the Navigator.
Practice – Create Internal Requisitions
Summary
To use internal requisitions you must have Oracle Inventory, Oracle Order Management, and Oracle Purchasing installed. Order Management is used to track internal sales orders. To enter an internal sales order, you must start with a requisition in Purchasing. Steps for this activity:
- Create an internal requisition in Oracle Purchasing
- Instructor will run processes in Oracle Order Management
- Verify the shipment of your internal order in Oracle Purchasing
Expectations
- Oracle Inventory is installed and configured for internal requisitions.
- Oracle Order Management is installed and configured for internal requisitions.
- Logon to the system using the XXUSERNAME you created earlier.
- Replace XX with your terminal number or initials.
- Prior activities are completed. Activities build on earlier activities.
- You must have access to an Oracle Application Vision database or comparable training or test instance at your site on which to complete this activity.
Tasks
- Create an Internal Requisition
- Pass Information to Order Management (wait for Instructor to run the Create Internal Orders Process)
- Import Sales Order into Order Management (wait for instructor to run the Order Import Request)
- Process the Sales Order in Order Management (wait for instructor to complete these steps)
- Verify the Shipment of Your Internal Requisition
Solution
Create an Internal Requisition
Instructor Note: Verify that a quantity on hand exists (500) for item CM08830 in M3 – Dallas Manufacturing, Engineer Subinventory. Add additional quantity of the item if needed.
To view available balance of an item:
- Responsibility = Inventory, Vision Operations
- On-hand, Availability > On-hand Quantity
To add additional quantity of an item:
- Responsibility = Inventory, Vision Operations
- Transactions > Miscellaneous Transaction
Responsibility = Purchasing, Vision Operations
1. Navigate to the Requisitions window:
- (N) Requisitions > Requisitions
2. Enter the following:
- Operating Unit = Vision Operations
- Type = Internal Requisition
- Description = XXInternal
3. (T) Lines
4. Enter the following:
- Item = CM08830
- Quantity = 2
- Need-By = Tomorrow’s date
Note: Click (B) OK to all the notes you receive. The notes will be corrected when you enter the destination and source information in the step below.
Note:
The price of the item will default. This is the cost of the item in inventory.
5. Complete the rest of the requisition (lower region of window) according to the following table:
|
Field |
Value |
Field |
Value |
| Destination Type | Inventory | Source | Inventory |
| Requestor | Your name (Last, first) | ||
| Organization | Seattle Manufacturing | Organization | Dallas Manufacturing |
| Location | M1-Seattle Mfg | ||
| Sub-Inventory | Stores | Sub-Inventory | Engineer |
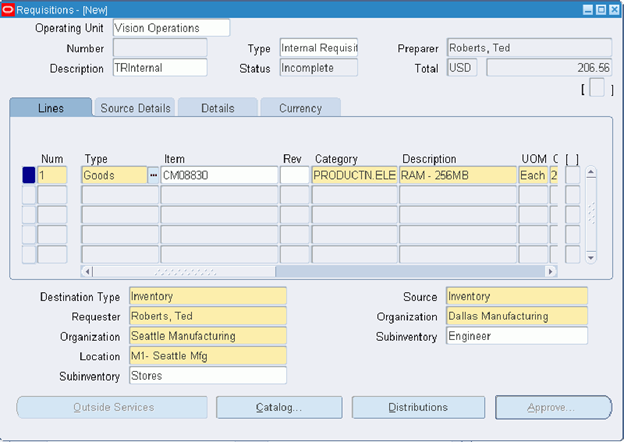
6. (I) Save
7. Record your requisition number: ________________________.
8. (B) Approve
- Submit for Approval check box = Select
- Clear all other options
9. (B) OK
10. Close the window to return to the Navigator.
STOP HERE! Your instructor must complete the following steps.
Pass Information to Order Management
Responsibility = Order Management Super User, Vision Operations
11. Navigate to the Submit Request window:
- (N) Purchasing > Reports > Run
12. Select the Single Request option.
13. (B) OK
14. Enter the following:
- Name = Create Internal Orders
- Operating Unit = Vision Operations
Note: All internal requisitions will be processed at the same time.
15. (B) Submit
16. (B) No to submit another request.
17. Verify the process completed successfully (Phase = Completed and Status = Normal):
- (M) View > Requests
- (B) Find
Note: You have completed the necessary steps to initiate the change from requisition to sales order, and populated the order entry tables. You now need to import the sales order into Order Management.
18. Close the window to return to the Navigator.
Import Sales Order into Order Management
19. Navigate to the Order Import Request window:
- (N) Orders, Returns > Import Orders > Order Import Request
20. Enter the following parameters:
- Operating Unit = Vision Operations
- Order Source = Internal
- Leave all other fields with their default values
Note: All sales orders will imported into Order Management at the same time.
21. (B) OK
22. (B) Submit
23. (B) No to submit another request.
24. Verify the process completed successfully (Phase = Completed and Status = Normal):
- (M) View > Requests
- (B) Find
25. Close the window to return to the Navigator.
26. Navigate to the Order Organizer window:
- (N) Orders, Returns > Order Organizer
27. Enter the following:
- Requisition Number = Internal requisition number that was created by the student at the beginning of this activity
28. (B) Find
29. (B) Yes to the decision that the query could take a long time.
30. Find the Sales Order:
- The sales order number that was created displays in the Order Number field. Note the Sales Order Number here: ___________________:
-
(T) Lines (bottom of the window next to Summary tab)
The Status of the Line should be Awaiting Shipping
31. Close the window to return to the Navigator.
32. Navigate to the Shipping Execution Grants window:
- (N) Shipping > Setup > Grants and Role Definitions > Grants
33. Enter the following:
- User = Oracle Applications User Name (XXUSERNAME) that the student is using in this class
- Role = Upgrade Role (select from the LOV)
34. (I) Save
35. Close the window to return to the Navigator.
Process the Sales Order in Order Management
36. Navigate to the Release Sales Order For Picking window:
- (N) Shipping > Release Sales Orders > Release Sales Orders
37. (T) Order
38. Enter the following:
- Orders = All
- Order Number = The sales order number you just created for each students requisition or leave blank to process all sales order at one time
- Destination Type = Ship-To Location
- Order Type = Mixed (appears by default after you enter the Order Number)
- Scheduled Ship Dates = Clear the From and To dates in this region
- Requested Dates = Clear the From and To dates in this region

39. (T) Inventory
- Warehouse = M3
- Subinventory = Engineer
- Document Set (upper right hand side of window) = All Pick Release Documents (appears by default after you enter the warehouse)
- Pick Slip Grouping Rule = Order Number (appears by default after you enter the warehouse)
- Allocation Method = Inventory Only (appears by default)
- Auto Allocate = Yes
-
Pick From region
- Subinventory = Engineer
- Subinventory = Engineer
-
Default Stage region
- Subinventory = Staging1
- Subinventory = Staging1
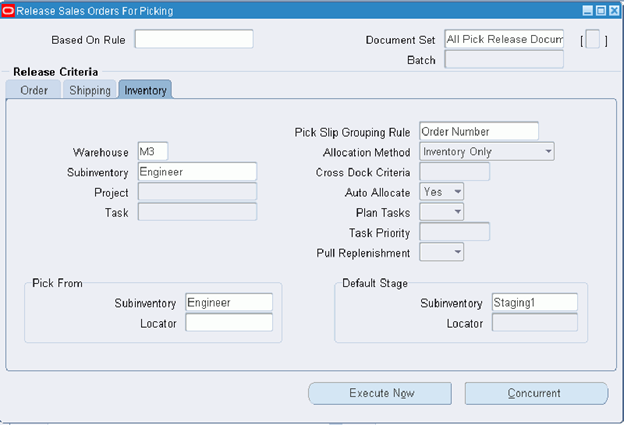
40. (T) Shipping
- Release Sequence Rule = All Standard Orders (appears by default)
- Autocreate Delivery = Yes (appears by default)
- Auto Pick Confirm = Yes (appears by default)
- Ship Confirm Rule = Auto Ship (appears by default)
- Autocreate Delivery Criteria = Across Orders (appears by default)
- Autopack Delivery = No
- Append Deliveries = No
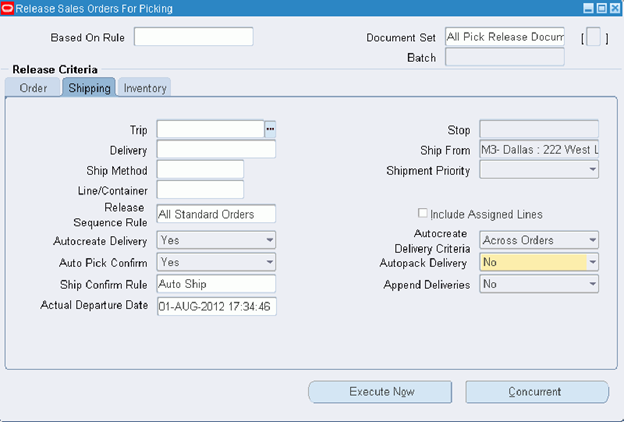
41. (B) Concurrent
- If you did not enter a specific order number on the Order tab, click (B) OK to the warning message – The absence of more detailed criteria defined for this pick release batch could result in a large number of lines being released. Do you wish to continue? Then click (B) OK.
- If you did enter a specific order number on the Order tab, click (B) OK to the note listing your concurrent request ID.
44. Verify the process completed successfully (Phase = Completed and Status = Normal):
- (M) View > Requests
- (B) Find
45. After the processes complete, on the Requests window, select the Request ID associated with the Pick Slip Report and click (B) View Output to view the Pick Slip Report.
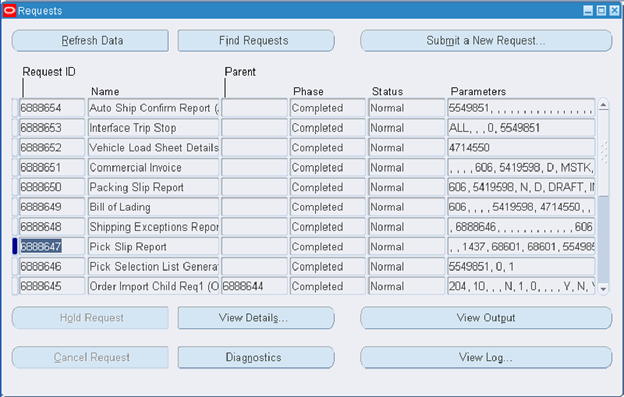
46. Close the windows to return to the Navigator.
47. Navigate to the Query Manager window:
- (N) Shipping > Transactions
48. Enter the following:
- From Order Number = Sales Order Number that you just created for each students requisition or enter a range of sales orders using the From Order Number and To Order Number fields.
- Line Status = Blank
49. (B) Find
50. Find the individual Sales Order:
-
(T) Lines/LPNs (bottom of the window next to Delivery tab)
Sales Order number displays in the Order field.
The Line Status field should be Interfaced and Next Step field should be Not Applicable.
You performed the auto ship during the pick and release of the sales order.
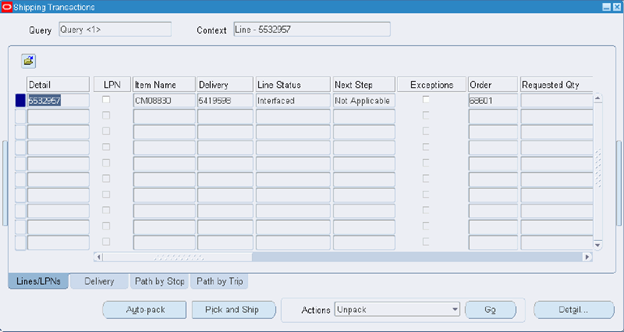
51. Close the window to return to the Navigator.
<End – Instructor Steps>
<Student Steps>
Verify the Shipment of Your Internal Requisition in Oracle Purchasing
Responsibility = Purchasing, Vision Operations
52. Navigate to Receipts window in Purchasing, Vision Operations:
- (N) Receiving > Receipts (when prompted, select M1-Seatle Manufacturing, since that was the Organization to which you shipped your Internal Requisition.)
53. Enter the following:
- Operating Unit = Vision Operations
- Source Type = Internal
- Requisition = Requisition number that you created at the beginning of this activity
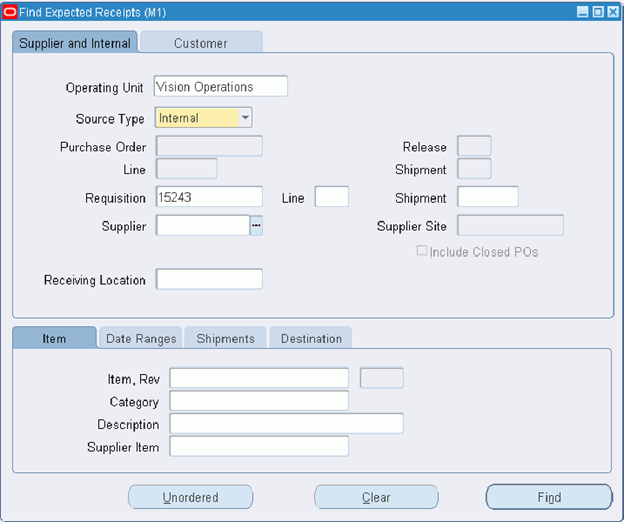
54. (B) Find
55. Click in the Receipts window (The Receipt Header window appears on top of the Receipts window).
56. Verify the quantity that was shipped.
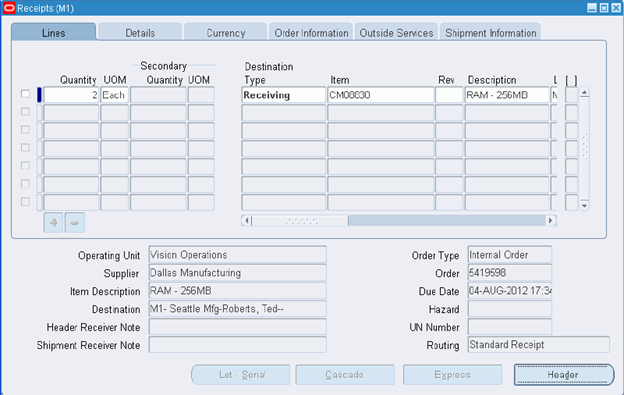
57. Close the window to return to the Navigator.
Practice – Create a Personalized Requisition View
Summary
In this activity, you will use the Personalize feature of the Buyers Work Center to create a view of just your requisitions and make that view the default.
Expectations
- Logon to the system using the XXUSERNAME you created earlier.
- Replace XX with your terminal number or initials.
- Prior activities are completed. Activities build on earlier activities.
- You must have access to an Oracle Application Vision database or comparable training or test instance at your site on which to complete this activity.
Tasks
- Create a Personalized View
Solution
Create a Personalized View
Responsibility = Purchasing, Vision Operations
1. Navigate to the Buyer Work Center window:
- (N) Buyer Work Center > Requisitions
2. (B) Personalize
The Personalize Views page appears displaying the existing views. The views that are provided by Oracle (seeded) with the product are NOT updatable as noted by the grayed out pencil icon.
3. Navigate to the Create View window:
- (B) Create View
4. Enter the following information:
- View Name = XXUSERNAME Requisitions
- Number of Rows Displayed = 15 Rows
- Set as Default check box = Select (This sets this view as the default for your user.)
Note: There can be an “Oracle-seeded” end user view and an “Admin-seeded” end user view of the same region. However, if an end user also has a personalized view of the same region that he or she marks as the default, then the end user’s personalized view takes precedence over any seeded views and is the default for that end user.
- Description = Requisitions for XXUSERNAME
- Columns Shown and Column Order = Leave as is for this activity
-
Select Sort Setting:
- First Sort: Column Name = Requisition
- Sort Order = ascending
- First Sort: Column Name = Requisition
- Select the “Show table data when any condition is met” option
-
Add another search criteria:
- Add Another = Preparer
- (B) Add
Preparer becomes available as a search criteria field.
- Add Another = Preparer
-
Enter the following:
- Buyer (is) = Your last name, first
- Preparer (is) = Your last name, first
- Buyer (is) = Your last name, first
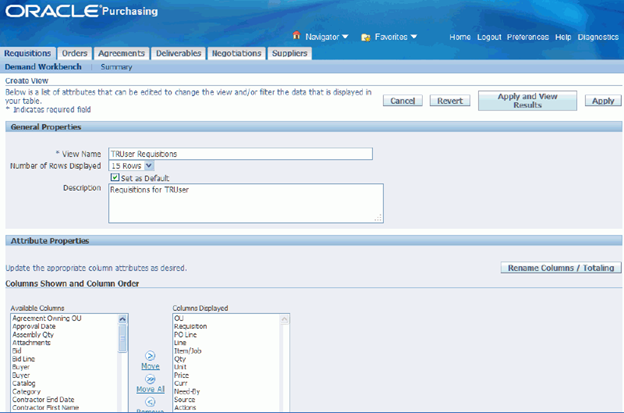
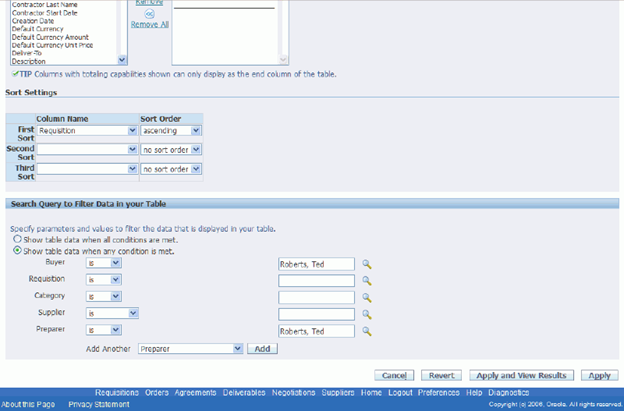
5. (B) Apply
You are returned to the Personalize Views page. Notice your new view and that it is set as the default.
6. (B) Apply
Your new view will be the default view the next time that you log in.
7. (H) Close window.
Note: These same basic steps apply when creating personalized views for orders and agreements in the Buyers Work Center. An optional activity would be to create personalized views for your user for orders and agreements.
Practice – Create a Purchase Order in the Buyer Work Center
Summary
In this activity, you will create a purchase order using the Buyer Work Center from a requisition created in Oracle iProcurement and by adding a line from the Procurement catalog.
Expectations
- Logon to the system using the XXUSERNAME you created earlier.
- Replace XX with your terminal number or initials.
- Prior activities are completed. Activities build on earlier activities.
- You must have access to an Oracle Application Vision database or comparable training or test instance at your site on which to complete this activity.
Tasks
- Create a Requisition in iProcurement
- Create a Purchase Order from a Requisition
Solution
Create a Requisition in iProcurement
Responsibility = iProcurement
- (N) iProcurement Home Page
2. Next to Search field, verify you are shopping in the Main Store.
3. Search for DVD-B100:
- Enter DVD-B100 in the search box following Main Store in the Search list
- (B) Go
4. (B) Add to Cart
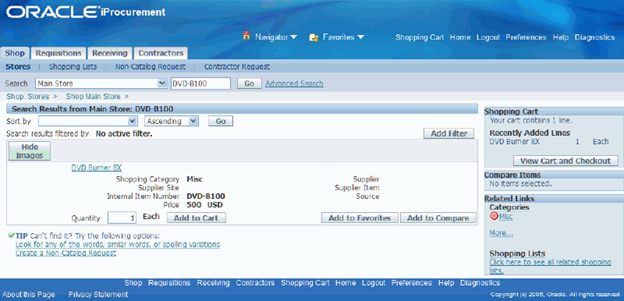
5. (B) View Cart and Checkout (in the Shopping Cart region)
Review the Shopping Cart.
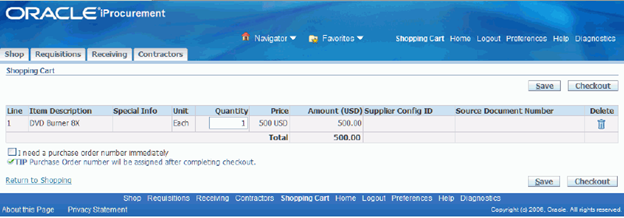
6. (B) Checkout

7. (B) Submit
You will receive a confirmation message that your requisition has been submitted. Record the requisition number: ____________________.
8. (B) Continue Shopping
At this point the requisition has been created and sent to the Buyer Work Center (Requisition Demand Workbench).
9. (H) Home to return to the main portal page.
Create a Purchase Order from a Requisition
Responsibility = Purchasing, Vision Operations
10. Navigate to the Buyer Work Center:
- (N) Buyer Work Center > Requisitions
11. In the Document Builder region:
- Type = New Order
- OU = Vision Operations
12. Select the requisition in the Requisitions table that you previously created in this activity.
- Select the Select check box next to the requisition
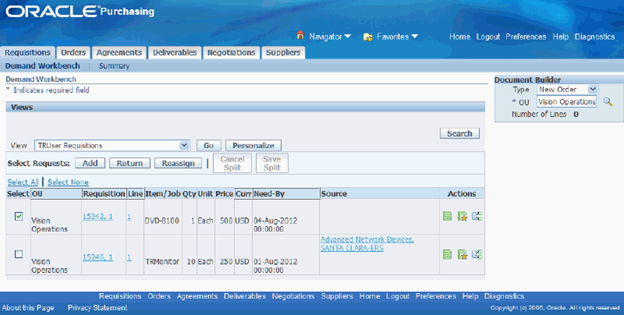
13. (B) Add
The requisition is added into Document Builder.
14. Enter a Supplier in the Document Builder region:
- (I) Magnifying Glass next to Supplier field.
- Search and select Corporate Express Office Supply
15. (B) Create (in the Document Builder).
16. (T) Lines
17. Ensure Add Lines field = From Catalog.
18. (B) Go
19. (B) Yes, when you receive message that order must be saved.
20. Record the purchase order number that was created: _____________________.
21. In Main Store, search for DVD-CR and click (B) Go.
Note: You are back in the Procurement catalog. It is shared by all Procurement products. The stores and other shopping structures are created using tools in Oracle iProcurement.
22. Change the quantity to 10.
23. (B) Add to Document
24. (B) Complete
25. Enter the end of the month for the Need-By date.
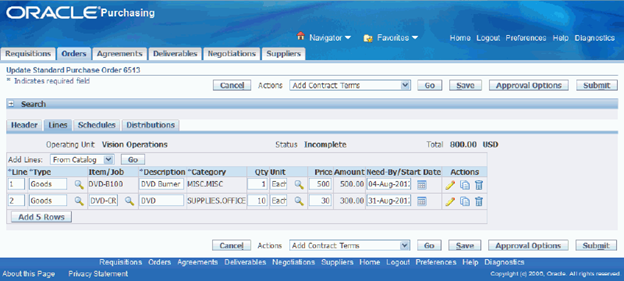
26. (B) Save
27. (B) Submit
28. (H) Home to return to main portal page.
Introduce the Buyer Work Center
Buyer Work Center Introduction
Responsibility = Purchasing, Vision Operations
1. Navigate to the Buyer Work Center:
- (N) Buyer Work Center > Requisitions
2. (T) Requisitions
Important features on this page:
- The different views available and the Personalize button to create customized views.
- The Operating Unit field in Document Builder. This shows up because Multi-Org Access Control (MOAC) is enabled.
-
Actions icons:
- Paper icon – replace with items from the catalog
- Paper icon with star – replace with items from your Favorites list
- Split icon – split requisition line
- Paper icon – replace with items from the catalog
3. (T) Orders
While on this page review the following:
- Operating Unit column. With MOAC, the same buyer could view orders from multiple operating units.
- (H) Order number. Drill down to show details of an order. Note that once on an order, the Lines, Schedules, and Distribution tabs display additional information about that order. In addition, note the Actions LOV values.
- (H) Status for an order. Drill down to show the action history of this order.
- Create a personalized view for a particular supplier (Corporate Express Office Supply is a good candidate).
- Note that the Pay Items tab is used for Oracle Services Procurement complex services.
4. (T) Agreements
While on this page point out the following:
- OU column
- Drill down on an agreement number to display details. Display the Actions LOV values for the agreement.
5. (T) Deliverables
Note that this page is used to manage deliverables for Oracle Procurement Contracts.
6. (T) Negotiations
Note that clicking the Negotiations tab takes you to the Oracle Sourcing home page from which you can create and manage Sourcing events.
7. (T) Suppliers
Note that clicking the Suppliers tab enables you to maintain the supplier base.
Create and Use Document Styles
Create Document Style
Responsibility = Purchasing, Vision Operations
1. Navigate to the Document Styles page:
- (N) Setup > Purchasing > Document Styles
2. (B) Create
3. Enter a style name and description for standard purchase orders.
4. In the Document Types region, enter a Display Name for a Standard Purchase Order.
5. In the Commodities region, clear the Goods check box and select the Services check box. This will create a document style that only allows services lines.
6. (B) Apply
Create a Purchase Order Using the Document Style
7. Navigate to the Buyer Work Center:
- (N) Buyer Work Center > Orders
8. From the Create menu, select your document style, and click (B) Go.
Note: The document style is used in the page title (Create document style name).
Note: Vision Operations appears by default as the Operating Unit.
9. (T) Lines
- Add Lines = From Catalog
10. (B) Go
11. Save your work if prompted.
12. Search for “blue pen” from the Main Store.
13. (B) Go
14. Add 100 blue pens to the purchase order.
- Quantity = 100
15. (B) Add to Document.
16. (B) Complete in upper right side of page.
You should receive an error that you’re trying to add a line that isn’t supported by the document style you are using.
Note: The document style has enforced the business rule built into the style. If you need to order the blue pens, you would have to start over and select the Standard PO document style.
Practice – Create a Purchase Agreement in the Buyer Work Center
Summary
This activity provides an opportunity for you to create a purchase agreement in Oracle Purchasing’s Buyer Work Center. Procurement professionals face a fast paced world of ever increasing technology changes for communicating and collaborating with suppliers. In this activity, you will create a purchase agreement with lines created from the Oracle Procurement catalog and see how a supplier can help the buyer by adding to that agreement.
Expectations
- Logon to the system using the XXUSERNAME you created earlier.
- Replace XX with your terminal number or initials.
- Prior activities are completed. Activities build on earlier activities.
- You must have access to an Oracle Application Vision database or comparable training or test instance at your site on which to complete this activity.
Tasks
- Buyer Creates Global Blanket Purchase Agreement
- Supplier Loads New Items
- Buyer Reviews and Approves New Supplier Items
Solution
Buyer Creates Global Blanket Purchase Agreement
Responsibility = Purchasing, Vision Operations
1. Navigate to the Agreements page in the Buyer Work Center:
- (N) Buyer Work Center > Agreements
2. Create the Global Blanket Purchase Agreement (BPA) header:
- Create = Blanket Purchase Agreement
- (B) Go
Note: The Agreements tab in the Buyer Work Center will ONLY create a global blanket purchase agreement (BPA). So you will NOT see a Global check box in the header section, as it is global by default.
3. In the Create Blanket Purchase Agreement page, enter the following information for the Header:
| Field |
Vision Operations |
| Operating Unit | Vision Operations |
| Supplier | Office Supplies, Inc. |
| Supplier Site | OFFICESUPPLIES |
| Buyer | Your last name, first name |
| Description | XX GBPA |
| Bill-To Location | V1- New York City |
| Default Ship-To Location | M1- Seattle Mfg |
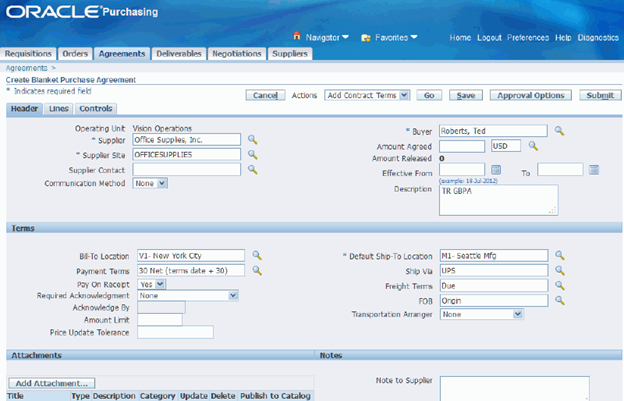
4. (B) Save
5. Note the BPA number: ___________________________.
6. Enter the following:
- Actions = Enable Supplier Authoring
- (B) Go
Note the confirmation in the upper left corner of the page that the supplier Office Supplies, Inc. can now edit this Blanket Purchase Agreement.
VERY IMPORTANT NOTE: This action is to enable the supplier user to modify the BPA and add items. The supplier user cannot create their own BPA. The supplier’s access for this is Oracle iSupplier Portal.
At this point the agreement is created (but not approved or processed) and is accessible to the supplier for uploading of items.
Note: You can either choose to have the supplier or the Oracle iProcurement catalog administrator upload items to the purchase agreement. In addition, the buyer can upload items. For this activity we will have the supplier upload the items.
Supplier Loads New Items
Responsibility = iSupplier Portal Full Access
8. Logout and log into Oracle iSupplier Portal:
- Username / password = supplier / welcome
- Responsibility = iSupplier Portal Full Access
The iSupplier Portal homepage appears. The Orders at a Glance table will only display approved purchase orders.
9. Navigate to the Update Blanket Purchase Agreement page for your agreement:
- Click the Notifications link under the Subject table on the Home tab related to your agreement number.
- After confirming the information that indicates this is the agreement that you created, click (H) Edit Agreement in the Related Applications region.
OR
- (T) Orders
- (T) Agreements
- Enter your blanket purchase agreement number in PO Number field
- (B) Go
- Open your agreement by clicking the PO Number link
- Select Edit Agreement in the Actions field and click (B) Go
10. Prepare agreement to add new line items:
- (B) Add 5 Rows
Note: The supplier can manually add items to the GBPA or could upload a file of many items using the Via Upload action. In this activity the supplier has been asked to add two specialty papers that are not part of their basic catalog.
11. Add two new lines:
Line 1Line 2TypeGoodsGoodsItemDescriptionHP Brochure Paper – Glossy 8.5×11″ 150 SheetsHP Presentation Paper – Glossy 8.5×11″ 300 SheetsCategorySUPPLIES.OFFICESUPPLIES.OFFICEUnitEachEachPrice916
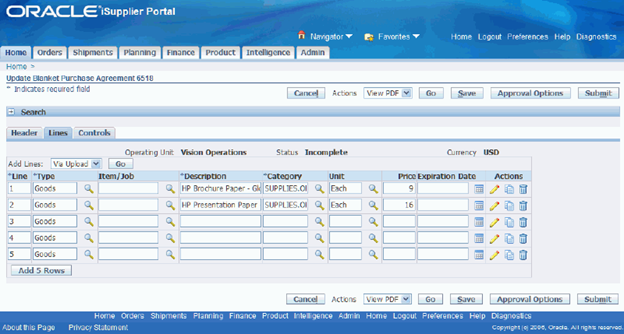
12. (B) Save
13. (B) Submit
Note the confirmation that Blanket Purchase Agreement #### has been submitted for approval. Also note that if you query the supplier’s agreements, the Status column is Supplier Change Pending.
14. Logout as supplier user.
Buyer Reviews and Approves New Supplier Items
Responsibility = Purchasing, Vision Operations
15. Logon to the system using the XXUSERNAME you created earlier.
16. Navigate to the Agreements page in the Buyer Work Center:
(N) Buyer Work Center > Agreements
17. Accept the supplier entered items:
- View = My Agreements With Pending Change Requests
- (B) Go
- Select the blanket purchase agreement with a change request by selecting the Select check box next to the blanket purchase agreement.
- Select Agreement = Respond to Change Requests
- (B) Go
The Respond to Changes page enables the buyer to decide item by item whether to accept or reject. You can also click on the Details icon to view all the attributes for each item.
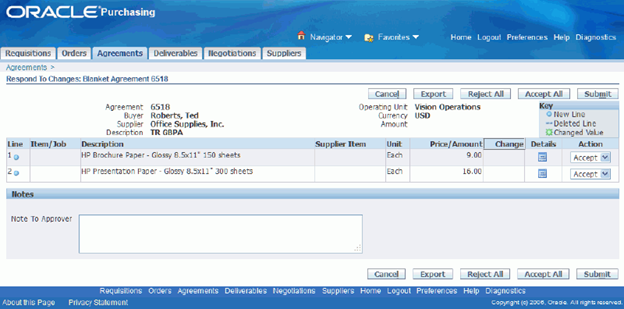
18. (B) Accept All
A confirmation messages displays stating the Response to Changes for Blanket Purchase Agreement #### has been submitted.
19. (H) Return to Agreements
20. Query your agreement:
- (T) Agreements
- (B) Search
- Select the “Show table data when any condition is met” option and enter your agreement number in the Agreement field.
-
(B) Go
Notice that the Status column for the blanket purchase agreement is “Approved”.
Practice – Create A New Employee and User
Summary
Creating a new employee and user is part of the initial set up for Oracle Purchasing employees. In this activity, you will create a new employee and a new user for yourself to be used during the remaining activity sessions of this course. Do not be too concerned at this point about what the fields mean, as we will be discussing most of them in depth during the remainder of the course.
Expectations
- Your login for this activity is: operations/welcome
- Replace XX with your terminal number or initials.
- You have prior experience using Oracle Applications or have completed an introductory Oracle Applications course.
- You must have access to an Oracle Application Vision database or comparable training or test instance at your site on which to complete this activity.
Tasks
- Define an Employee
- Add a New User
Solution
Define an Employee
Responsibility = Human Resources, Vision Enterprises
1. Navigate to the People window:
- (N) People > Enter and Maintain
2. (B) New
- Last = Your last name
- First = Your first name
- Gender = Choose a gender
- Action = Create Employment
- Person Type for Action = Employee
- Social Security = Enter any 9 digit number (xxx-xx-xxxx)
Note: If you get a message indicating that the social security number is a duplicate, select No Match and click (B) OK. For the purposes of the exercise it doesn’t matter if it is a duplicate or not.
- Birth Date = Your birthday (dd-mmm-yyyy)
3. (I) Save.
4. (B) Assignment.
5. Create an assignment using the following information:
- Organization = Change to Vision Operations (please ensure that are using Vision Operations and not Vision Corporation)
Note: Click (B) Correction, then (B) Cancel in the People Group Flexfield window that appears when leaving the Organization field.
- Group = Financials.SEIU
- Position = MM400.Materials Manager
Note: During position entry, click (B) Yes on the Decision window.
- Job = MGR500.Manager (this field will appear by default after you enter the position)
- Location = M1- Seattle Mfg
6. (T) Supervisor
- Name = Brown, Ms. Casey
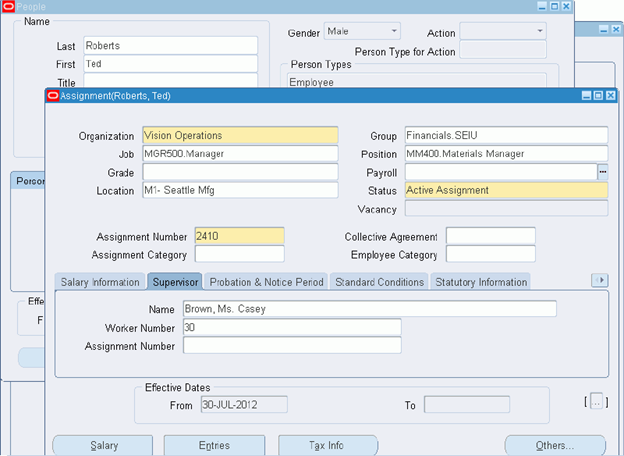
7. (T) Purchase Order Information (use the active right arrow next to the sub tabs in the middle, right of window to access this tab).
- Ledger = Vision Operations
- Default Expense Account = 01-110-7740-0000-000
Note: Click (B) Cancel in the Operations Accounting Flex window and enter the default expense account number manually.
8. (I) Save.
Note: Click (B) OK in the window that opens displaying the message – Do you want to use the location of the new position?
Click (B) Cancel to the Operations Accounting Flex window.
9. Close windows until you are back to the Navigator.
10. In the Oracle menu, select File > Switch Responsibility and then select the System Administrator responsibility. You can also click the black hat icon in the toolbar to switch the responsibility.
Add a New User
Responsibility = System Administrator
11. Navigate to the Define Users window:
-
(N) Security > User > Define
- User Name = XXUSERNAME (where XX is your unique ID)
- Password = welcome (tab, re-enter password to verify)
- Person = The employee you just created (Last name, first name)
- User Name = XXUSERNAME (where XX is your unique ID)
12. Add the following direct responsibilities to your new username:
| Responsibility |
Application |
Security Group |
| Purchasing, Vision Operations | Purchasing | Standard |
| Payables, Vision Operations | Payables | Standard |
| Human Resources, Vision Enterprises | Human Resources | Standard |
| Inventory, Vision Operations | Inventory | Standard |
| iProcurement | Oracle iProcurement | Standard |
| Integrated SOA Gateway | Application Object Library | Standard |
| Preferences SSWA | Oracle iProcurement | Standard |
| System Administrator | System Administration | Standard |
| Order Management Super User, Vision Operations | Order Management | Standard |

13. (I) Save.
14. Close the Users window and close the Application (click Red X in top right corner). Return to the Web Navigator (Oracle Applications Home Page) and click (H) Logout in top right corner.
15. Login with your XXUSERNAME and reset your password to oracle.
Practice – Set Yourself Up As a Buyer
Summary
Setting up a buyer is part of the initial set up for Purchasing employees. In this activity, you will set yourself up as a buyer in order to complete later activities.
You must be setup as a buyer to be able to access the purchase order windows.
Expectations
- Log on to the system using the XXUSERNAME you created earlier.
- Replace XX with your terminal number or initials.
- Prior activities are completed. Activities build on earlier activities.
- You must have access to an Oracle Application Vision database or comparable training or test instance at your site on which to complete this activity.
Tasks
- Set Yourself Up As a Buyer
Solution
Set Yourself Up As a Buyer
Responsibility = Purchasing, Vision Operations
1. Navigate to the Buyers window:
- (N) Setup > Personnel > Buyers
2. (B) Add Buyer
- Enter the following:
- Buyer = Your employee name (Last name, first name)
- Ship-To = M1-Seattle Mfg
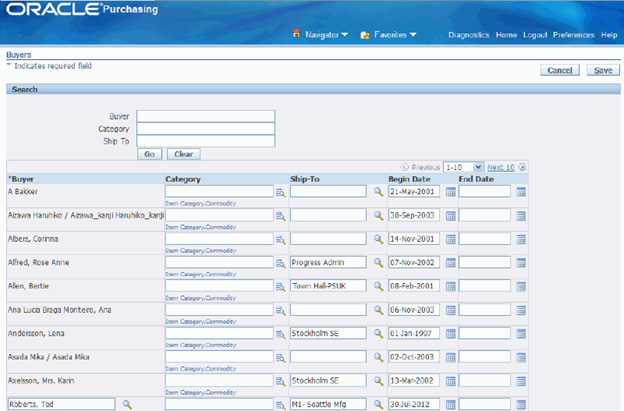
4. (B) Save
-
(H) Home (upper right corner) to return to the Navigator.
Practice – Understand ASL Precedence
Summary
Commodity level approved supplier lists (ASLs) exist primarily for the buyer to be able to exercise control over a supplier’s ability to source. In other words, the buyer can with very little effort block a supplier for an entire commodity. In this activity, you will learn to understand ASL precedence.
Expectations
- You must have access to an Oracle Application Vision database or comparable training or test instance at your site on which to complete this activity.
Tasks
- Scenario 1
- Scenario 2
- Scenario 3
- Scenario 4
Scenarios:
Consider the following scenarios:
Scenario 1
Note: In the example below, AND = Advanced Network Devices
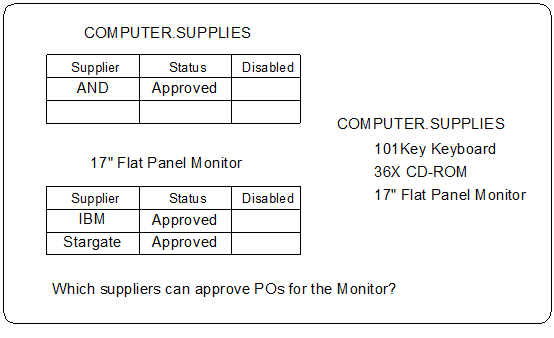
Note: In this scenario:
- IBM and Stargate may supply 17″ Flat Panel Monitors.
- AND can supply all supplies in the Computer.Supplies category.
- For approvals, as long as there are item level approved suppliers on the list, the category level suppliers are ignored.
Scenario 2
Note: In the example below, AND = Advanced Network Devices
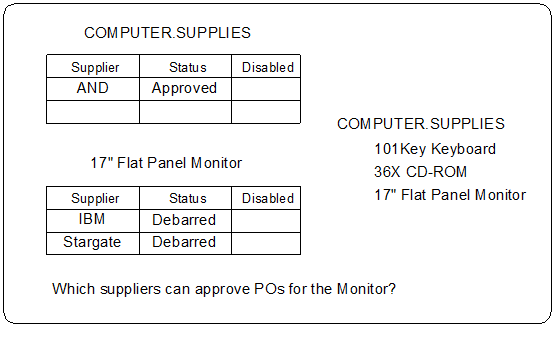
Note: In this scenario:
- Assuming that the Debarred status is set up to prevent purchase order approval and sourcing, then only AND can approve purchase orders for the monitor.
- IBM and Stargate are still on the ASL, they just can’t approve purchase orders or source.
Scenario 3
Note: In the example below, AND = Advanced Network Devices

Note: In this scenario:
- IBM and Stargate are no longer on the ASL since they are disabled. Status is irrelevant in this situation.
- AND can approve purchase orders.
Scenario 4
Note: In the example below, AND = Advanced Network Devices
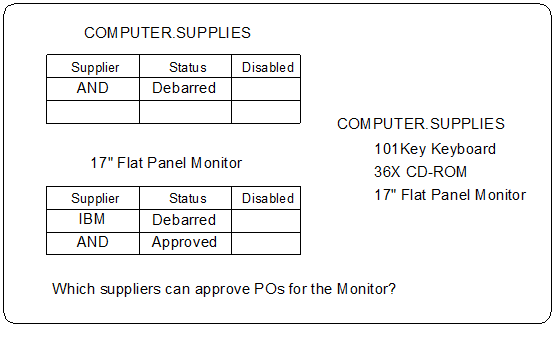
Note: In this scenario:
- No one may approve purchase orders for the monitor. If a supplier is debarred for a category of items like AND, then AND is prevented from approving purchase orders or sourcing for the entire category of items.
- Purchasing uses commodity this way to debar suppliers.
Oracle Integration Repository
Note: You will need to add the Integrated SOA Gateway responsibility to the user (operations) to view the Integration Repository. You must use the System Administrator responsibility to add Integrated SOA Gateway responsibility to the user.
Responsibility = Integrated SOA Gateway (operations/welcome)
1. Navigate to the Integration Repository:
- (N) Integration Repository
2. In the Integration Repository select Procurement, and then Purchasing.
3. Click Standard Purchase Order and note that the repository not only lists links to the Import Standard Purchase Orders open interface but also includes definitions for all APIs, XML documents, EDI documents, and Web services.
The Integration Repository is included in all installations of Oracle E-Business Applications.
4. Click (H) Home to return to the Navigator.
Dear Oracle team,
Please note that provide the 2020 version with above explanation to cover all responsibilities. You can email me so I can share to our management to implement the Oracle system in our company.
Regards,
Latifa BinBeshait