
Oracle Fusion Journeys
Journeys are the new name for checklists in the Oracle application. They have the same features as checklists, plus some new ones, and an improved user experience.
A checklist is a list of tasks that must be completed when a specific event occurs. For example, when a new employee is hired, there are many tasks that need to be completed during the onboarding process, such as setting up the employee’s work account, providing them with access to necessary resources, and training them on their new role. Similarly, there would be different tasks that need to be completed when an employee is offboarded or transferred.
Oracle Cloud Application allows you to manage these tasks using checklist templates. There are different pre-defined checklist categories available to support different types of actions, such as onboarding, offboarding, and transfer. You can also create your own custom checklist templates to meet the specific needs of your organization.
Here is a simplified example:
- Action: Hire new employee
- Checklist template: Onboarding checklist
- Tasks:
- Create new employee account
- Provide employee with access to necessary resources
- Train employee on new role
- Checklist template: Offboarding checklist
- Tasks:
- Disable employee account
- Archive employee records
- Collect employee equipment
- Checklist template: Transfer employee checklist
- Tasks:
- Update employee’s job information
- Request access to new resources
- Introduce employee to new team
By using checklist templates, you can ensure that all of the necessary tasks are completed when a specific event occurs. This can help to streamline your processes and improve efficiency.
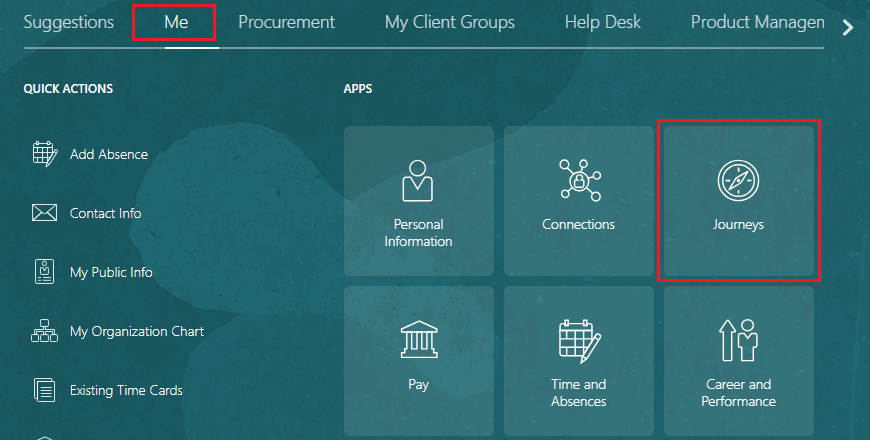
To enable Journeys in Oracle, you need to set the profile option ORA_PER_JOURNEYS_ENABLED to Y. You can quickly check if Journeys are already enabled by logging in to your Oracle application pod and navigating to Me (or My Client Groups). If you see the Journeys app, Journeys are already enabled.
Steps:
- Log in to your Oracle application pod.
- Navigate to Me (or My Client Groups).
- If you see the Journeys app, Journeys are already enabled.
- Otherwise, to enable Journeys, follow these steps:
- Navigate to Task > Setup and Maintenance.
- Search for and select Manage Administrator Profile Values.
- Search for and select ORA_PER_JOURNEYS_ENABLED.
- Set the value to Y.
- Click Save and Close.
Journeys are a powerful tool that can help you streamline and automate your HR processes. By enabling Journeys, you can provide your employees with a single, user-friendly interface to manage their tasks and checklists.
Learn Journeys With Example
Lets assume for an organization a newly hired employee has to complete following tasks on the very first day.
- Login to oracle application and confirm their personal details are capture correctly and update the record if required.
- Employees has to upload his professional photo, which will be used for access card.
- Employee has to select the laptop brand and configuration they are interested in to receive from organization.
After completing a week in the organization they can complete following tasks in the first month.
- Receive their access card from security personnel
- Share feedback on their overall onboarding process.
On the other hand line manager and HR specialist will perform following onboarding tasks.
- Give employee a tour of office premise.
- Procure computer equipment as per employees configuration choice.
Prerequisite Journey Tasks (Optional)
As there are few journeys task where employees have to provide their onbording experience and laptop brand choice. We achieve them with the help of questionnaires.
Even if you dont complete, its not a big deal as you would still be able to complete and understand journeys concept and tasks explained below, but if you are interested configure following two questionnaires of subscriber type HR Checklists
- First Questionnaire : AP Select Laptop
- A single choice questionnaire with list of values with following option
- Apple MacBook Pro
- Dell XPS 13
- HP Spectre x360
- Lenovo ThinkPad X1 Carbon
- Asus ROG Zephyrus G14
- Microsoft Surface Laptop 4
- A single choice questionnaire with list of values with following option
- Second Questionnaire : AP Onboarding Feedback
- You can be as creative as possible and club multiple questions as follows
- Rate Your Experience: On a scale of 1 to 10, how would you rate your overall onboarding experience?
- Suggestions for Improvement: What aspects of the onboarding process do you think could be improved to make it even better for new hires?
- Highlight Successes: What specific elements of the onboarding process went well and contributed positively to your initial days with the company?
- You can be as creative as possible and club multiple questions as follows
Journeys Configuration Steps
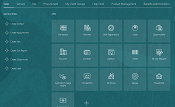
Navigation : My Client Groups » Quick Actions » Show More » Checklist Template
On the Checklist Templates page you see only active checklist templates, you can remove (delete) that Status filter to see checklist template in Draft status also. You will find few names starting with Oracle, those are delivered template. We can’t use them directly but copy (duplicate) them and start using after required modification. But for this article we will not use delivered template but create our own from scratch.
1. Configure Enterprise Onboarding Steps Checklist
The very first step in this process to configure journeys for onboarding is to configure few enterprise onboarding step checklists. We need to create two checklists of this type, one will hold all tasks which employees will perform on the first day and another checklist which will hold tasks which employees will complete after completing a week in the organization.
1.1 Create Checklist Template for First Day Activities
To create onboarding checklist for first day activities for our requirement, follow below steps
- Click on the Create button on the Checklist Templates page.
- Enter following details on the Create Checklist pop-up window.
- Name : AP First Day Activities
- Checklist Code : <Accept system generated code>
- Country : All Countries
- Category : Enterprise onboarding step
- Archive After Months : 12
- Purge After Months : 15
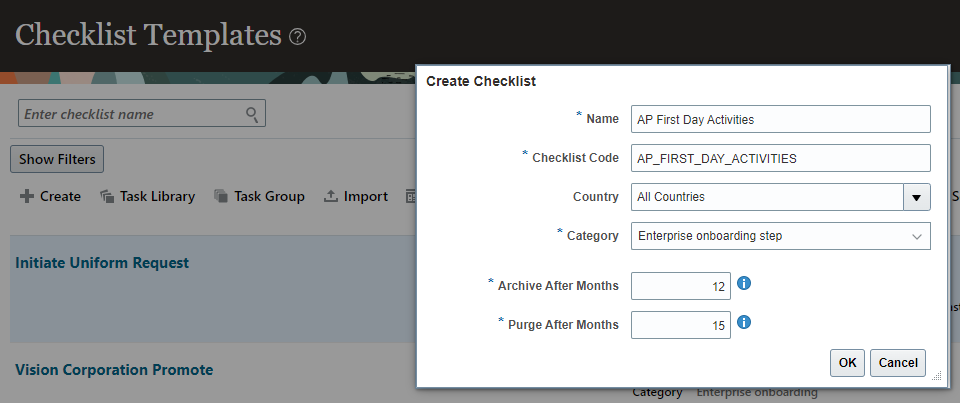
Click on OK button to proceed further. While selecting category you would have seen different types of checklist category delivered by oracle, each one of them is designed for different purpose. For this activity note that we have selected category type : Enterprise Onboarding Step.
You are on Checklist: AP First Day Activities page. On this page, update following fields on General tab, keep everything else unchanged.
1.1.1 Configure General Tab for Checklist
- Action Name : Hire
- Allocation Criteria : When the action record becomes effective <we have selected this option which means checklist tasks would be allocated automatically to employees as soon as that action is triggered.>
- Status : Active
- Effective Date : 1/1/1951
Click on Save button
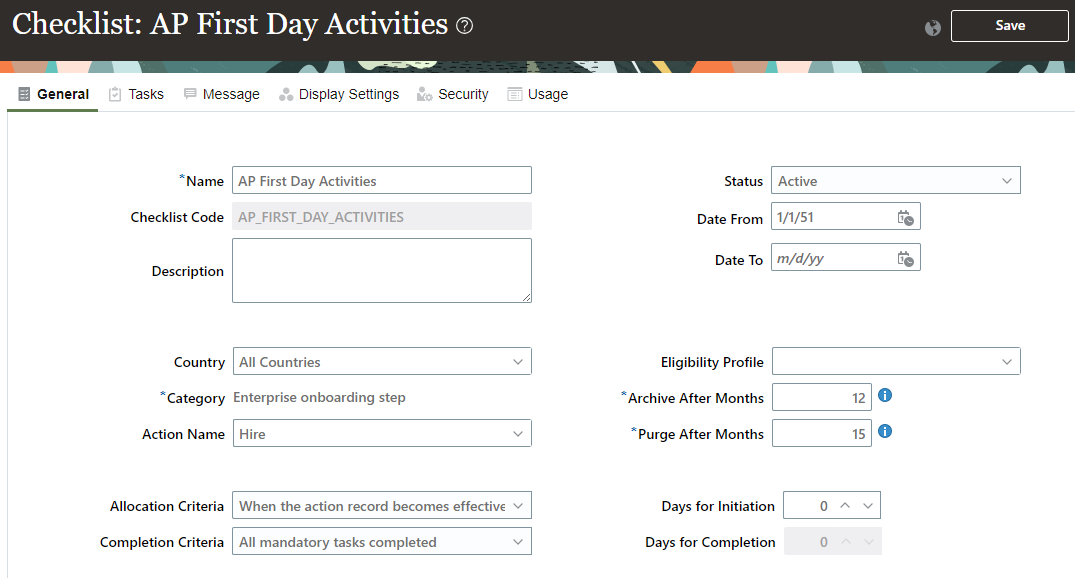
As we want the onboarding tasks to be allocated automatically we have selected value When the action record becomes effective for the field Allocation Criteria and we want task to be allocated when employees is hired so have selected value Hire for the field Action Name.
1.1.2 Configure Tasks Tab for Checklist
Click on the Tasks tab. This is the place where we create all the tasks that worker would perform the very first day.
1.1.2.1 Create first task : Verify and update personal details
Click on the Create button and select option Create Task and enter details as follow on the Details tab.
- Name : Verify and update personal details
- Sequence : 10
- Required : Yes
- Code : Accept system generated code
- Status : Active
- Target Duration : 1 Days
- Offset Days : 0
- Expire : 365 After assigned date
- Performer : Worker
- Owner : Initiator
- Task Type : Application Task
- Application Task : Personal Details
Click on Notification and Reminders tab. Although we are not changing anything here, be informed this is the place where you configure who would receive notification when a task is allocated, updated completed etc. You can also configure notifications using Alerts Composer.
Click on Display Settings tab and you will have option to control who can do what and can also rename the action label. As we want to keep it simple, no need to change anything here as well.
Click on Save and Close button and you are don with first task.
You will be back on Checklist: AP First Day Activities page where Tasks tab is active.
1.1.2.2 Create second task : Upload Photo for Access Card
Click on the Create button again and select option Create Task and then enter details as follows for this task.
- Name : Upload picture for access card
- Sequence : 20
- Required : Yes
- Code : Accept system generated code
- Status : Active
- Preceding task : Verify and update personal details
- Target Duration : 1 Days
- Offset Days : 0
- Expire : 365 After assigned date
- Performer : Worker
- Owner : Initiator
- Task Type : Application Task
- Application Task : Change Photo
Requirement is that employee would be able to perform this task only after they have verified their personal details therefore we have entered value in the Preceding Tasks field to achieve this.
Click on Save and Close button.
1.1.2.3 Create third task : Select laptop brand
Click on the Create button again and select option Create Task and then enter details as follows for this task.
- Name : Select laptop brand
- Sequence : 30
- Required : No
- Code : Accept system generated code
- Status : Active
- Preceding task : Verify and update personal details
- Target Duration : 1 Days
- Offset Days : 0
- Expire : 365 After assigned date
- Performer : Worker
- Owner : Initiator
- Task Type : Questionnaire
- Questionnaire : <Select questionnaire you configured for this for example : AP Select Laptop, If you have not configured questionnaire change the task type to Mannual>
Click on Save and Close button.
1.1.2.4 Create fourth task : Facilitate Office Orientation Tour
This is a manual task which would be performed by line manager of the employee. Click on the Create button again and select option Create Task and then enter details as follows for this task.
- Name : Facilitate Office Orientation Tour
- Sequence : 40
- Required : yes
- Code : Accept system generated code
- Status : Active
- Preceding task : Verify and update personal details
- Target Duration : 1 Days
- Offset Days : 0
- Expire : 365 After assigned date
- Performer : Line Manager
- Owner : Initiator
- Task Type : Manual Task
Since this task would be performed by line manager of the employee, Performer is set to Line Manager. We also selected task type to Manual Task.
Click on Save and Close button.
1.1.2.5 Create fifth task : Procure computer equipment
This is another manual task which would be performed by HR Specialist of the employee. We would identify HR specialist using Area Of Responsibility. To create this task, click on the Create button again and select option Create Task and then enter details as follows for this task.
- Name : Procure computer equipment
- Sequence : 50
- Required : yes
- Code : Accept system generated code
- Status : Active
- Preceding task : Verify and update personal details
- Target Duration : 1 Days
- Offset Days : 0
- Expire : 365 After assigned date
- Performer : Area of Responsibility
- Responsibility Type : Human Resources Representative <Or select any value available in your pod>
- Owner : Initiator
- Task Type : Manual Task
Click on Save and Close button.
With this we have completed all the journeys tasks required on the first day.

1.1.3 Configure Message Tab for Checklist
Click on the message tab and enter following text in the message box.Welcome aboard! We’re thrilled to have you join our team. Your first day is an exciting step, and we’re here to help you make the most of it. Below is a list of tasks we kindly request you to complete on your first day. These tasks are crucial for ensuring a seamless payroll process and providing you with all the necessary access to kick-start your journey with us.
1.1.4 Configure Display Settings Tab for Checklist
Click on the display settings tab, explore this tab and check what you can perform. We are not changing any properties here.
1.1.5 Configure Security Tab for Checklist
Click on the security tab. This tab allows to control security related to journey.
1.1.6 Configure Usages Tab for Checklist
We are not performing any task in this tab.
Click on the Save and Close button available on the Checklist: AP First Day Activities page, this will take you back to Checklist Templates page.
1.2 Create Checklist Template for First Month Activities
So far we have created a checklist template of category Enterprise onboarding step to capture all tasks that would be performed on the first day. We need to create one more checklist template of same category which will hold all task that employee can perform in the first month.
To create onboarding checklist for first month activities for our requirement, follow below steps
- Click on the Create button on the Checklist Templates page.
- Enter following details on the Create Checklist pop-up window.
- Name : AP First Month Activities
- Checklist Code : <Accept system generated code>
- Country : All Countries
- Category : Enterprise onboarding step
- Archive After Months : 12
- Purge After Months : 15
Click on OK button to proceed further.
1.2.1 Configure General Tab for Checklist
You are on AP First Month Activities page. On this page, update following fields on General tab, keep everything else unchanged.
- Action Name : Hire
- Allocation Criteria : When the action record becomes effective
- Status : Active
- Effective Date : 1/1/1951
- Days for Initiation : 0 <As the requirement is to allocate all tasks within this category only after employee has completed a week, we should ideally enter value 7 but to test this we dont want to wait 7 days therefor have enter 0>
Click on Save button
1.2.2 Configure Tasks Tab for Checklist
Click on the Tasks tab. This is the place where we create all the tasks that worker would perform which we have seen earlier.
1.2.2.1 Create first task : Collect your access card
Click on the Create button and select option Create Task and enter details as follow on the Details tab.
- Name : Collect your access card
- Sequence : 10
- Required : Yes
- Code : Accept system generated code
- Status : Active
- Target Duration : leave blank
- Offset Days : 0
- Expire : 365 After assigned date
- Performer : Worker
- Owner : Initiator
- Task Type : Manual Task
Click on Save and Close button.
1.2.2.2 Create second task : Share onboarding experience feedback
Click on the Create button and select option Create Task and enter details as follow on the Details tab.
- Name : Share onboarding feedback
- Sequence : 20
- Required : Yes
- Code : Accept system generated code
- Status : Active
- Target Duration : leave blank
- Offset Days : 0
- Expire : 365 After assigned date
- Performer : Worker
- Owner : Initiator
- Task Type : Questionnaire
- Questionnaire : <Select questionnaire you configured earlier, for example : AP Onboarding Feedback, if you haven’t configured, change the task type to manual>
Click on Save and Close button.
1.2.2 Configure Message Tab for Checklist
Click on the message tab and enter following text in the message box.
Click on the Save and Close button available on the Checklist: AP First Month Activities page, this will take you back to Checklist Templates page.
With this we have completed all required checklist templates of category Enterprise onboarding step. We now need to create another checklist template of category Enterprise onboarding.
1.3 Create Onboarding Checklist Template for Journeys
We need to create another checklist template that will club tasks from the two templates we have already created. While you are on Checklist Templates page, follow below steps to complete the configuration
- Click on the Create button on the Checklist Templates page.
- Enter following details on the Create Checklist pop-up window.
- Name : AP Onboarding Journeys
- Checklist Code : <Accept system generated code>
- Country : All Countries
- Category : Enterprise onboarding
- Archive After Months : 12
- Purge After Months : 15
Click on OK button to proceed further.
1.3.1 Configure General Tab for Journey
You are on Checklist: AP Onboarding Journeys page. On this page, update following fields on General tab, keep everything else unchanged.
- Action Name : Hire
- Allocation Criteria : When the action record becomes effective
- Status : Active
- Effective Date : 1/1/1951
Click on Save button. Click on Tasks tab.
1.3.2 Configure Tasks Tab for Journey
On this tab we create tasks to include Enterprise Onboarding Step checklist. Since we have configured two Enterprise Onboarding Step checklists earlier we will need to create two tasks here.
1.3.2.1 Configure First Task for First Day Activities
Click on the Create button and you will notice that you get only one option to select that is Create Task. Click on that and enter details as follows
- Name : AP First Day Tasks
- Sequence : 10
- Code : Accept code generated by system
- Status : Active
- Checklist Name : <Select the checklist template we created earlier : AP First Day Activities>
Click on Save and Close button.
1.3.2.2 Configure Second Task for First Month Activities
Click on the Create button again on the Checklist: AP Onboarding Journeys page and enter details as follows
- Name : AP First Month Tasks
- Sequence : 20
- Code : Accept code generated by system
- Status : Active
- Checklist Name : <Select the checklist template we created earlier : AP First Month Activities>
Click on Save and Close button. Click on the Message tab.
1.3.3 Configure Message Tab for Journey
On the Message tab enter details as follows
- Welcome Notification Title : Welcome to iavinash.com
- Welcome Notification Text : Please complete essential onboarding tasks via our portal to kickstart your journey. Reach out if you need assistance.
- Background Image URL : https://i.postimg.cc/J7BNLfhZ/Onboarding.jpg
- Processing Mode : Alerts based notification
In the Checklist Contacts section, click on the add button and enter details of the person whom worker can contact if they have any queries related to onboarding task. This is optional step.
On the Checklist: AP Onboarding Journeys page click on Save and Close button. With this we have completed our journey configurations. Its time to check how does it work.
Verify Journeys Configuration
We have completed our journeys configuration here and now its time to test the same and experience what journeys has to offer to employee, manager and HR Specialist. As the complete journeys configuration is based on the employees onboarding process we need to hire an employee to see journeys functionality work.
1. Hire an Employee
Navigation : My Client Groups » Quick Actions » Hire an Employee
Login as an HR Specialist and follow above navigation to hire an employee but keep following points in mind
- Ensure that employee’s hire date in today’s date otherwise checklist will be in deferred status if the hire date is future date and you wont be able to test until hire date is reached.
- Ensure that you have captured line manager details while hiring employee. You can select HR specialist you are logged in as line manager of employee you are going to hire.
- Ensure Action name is Hire.
- Once hired ensure employee role is attached to employee.
- Reset password of the employee so that you can login as that employee later and test journeys.
2. Experience Journey as HR Specialist
Ensure you are still logged in as an HR specialist and navigate to My Client Group » Journeys » Scroll down and click on Explore Tab
On this page just below the search field you will see several tiles, these are different checklist categories. Click on the Enterprise Onboarding checklist category and you will find all journey related to that. You will also find journey AP Onboarding Journeys which we have configured. If there are multiple journeys and you dont find it, make use of search filter.
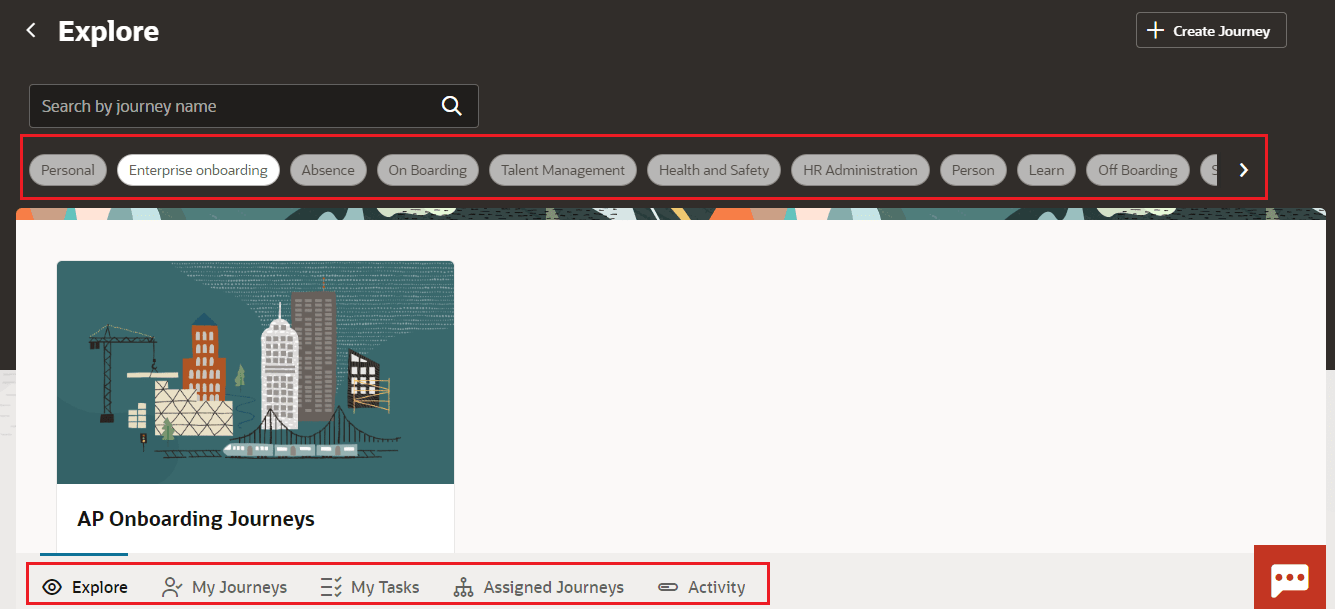
If you scroll below you will find several tabs. Let’s explore each tab one by one. First click on Explore tab if not already clicked.
2.1 Experience Explore Tab of Journeys
Here you will find all predefined and personal journeys. Line managers and HR Specialist can create new journeys from here. On top right hand side of the page, you will notice a + Create Journey button. Don’t resist yourself and click on that button. You will see options to create a new personal journey from scratch. This is covered in details here » Learn To Configure And Use Oracle Personal Journeys, which you can read after completing activities from this article but for now click on the Cancel button to come back to Explore page.
From this tab you can also assign journeys to others or your self. Lets search for the journey we have created “AP Onboarding Journeys” and click on on it to open it.
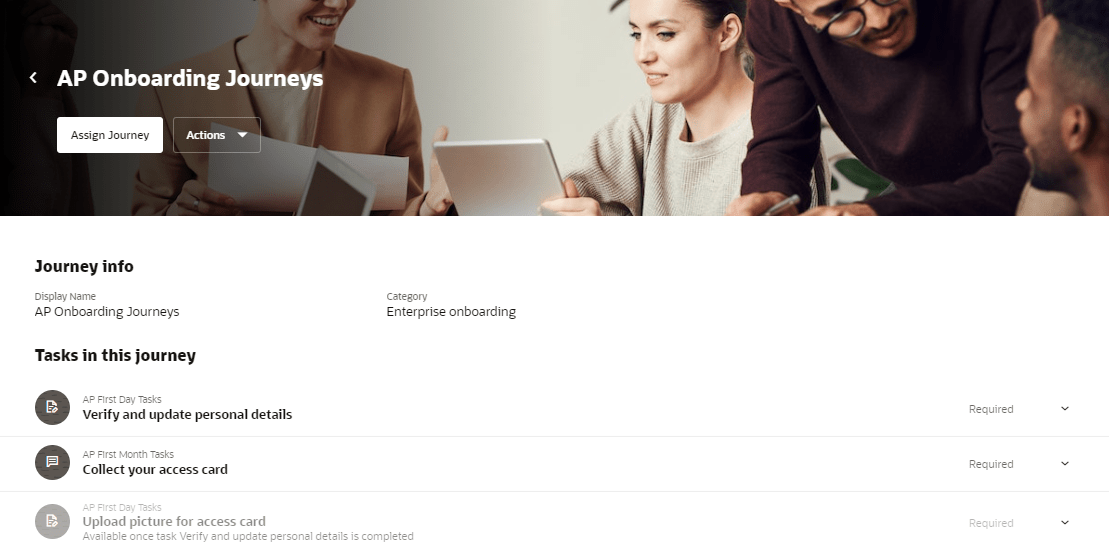
If you scroll down you will find all the tasks that we created earlier under heading Tasks in this journey. On the top you will find following two buttons
- Actions : If you click on that you get option Add to My Journeys, which will assign journey to your self. For now dont click on this as we dont want to assign ourselves.
- Assign Journeys : Through this you can assign journeys to others. Click on this button and enter details as follows
- When to assign journey? : Leave it todays date
- Comment : Enter some comments why do you want to assign this journey.
- Whom is this journey for? : Here you get option to assign checklist to a person, an organization or direct reporters of a manager. Select option Person.
- Select Person : Search for a person to whom you want to assign journey and lets call this person Mr. X. Select any person other than we just hired.
- Click on the Assign button at the top right corner.
You will be back on AP Onboarding Journeys page. Click on the back arrow < button beside journeys name and you will be back to Explore tab.
2.2 Experience Assigned Journeys Tab
Click on the Assigned Journeys tab. Here you find list of all the journeys assigned to your team. I believe to improve the performance, oracle doesn’t display any journeys here until you make any search and you see a big text that reads “Looks like you haven’t searched for a journey or a person yet”.
In the search field enter AP Onboarding Journeys and click on that search icon. It will list down minimum two employees as follows
- Employee we hired.
- Another employee Mr. X whom we assigned this journey in the previous step.
Using this tab you can also delete a journey assigned to workers, edit them, force close them or assign additional ad-hoc task within a journey.
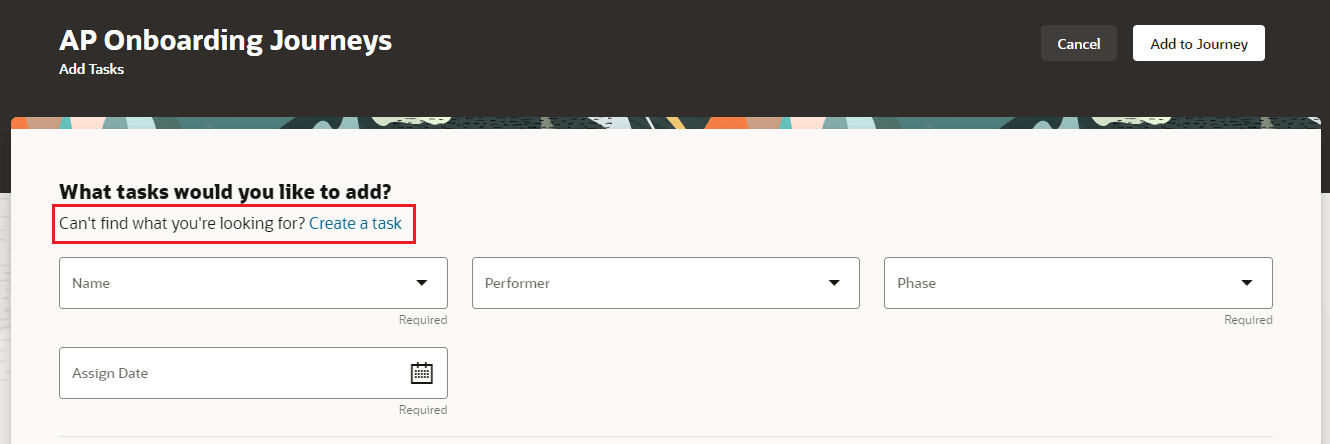
While you are still on Assigned Journeys tab, click on that Mr. X from the search result section. On the upper right corner, you get a button + Add Tasks, click on that which will open AP Onboarding Journeys : Add Task page. Click on the Name field and you get option to select a task from the task library. If we want to create a task from scratch click on the Create a task hyperlink, which is available next to text Can’t find what you’re looking for? and you get option to create task from scratch, here fields you see are exactly same as what we have seen earlier while creating our tasks, only difference is that it is on redwood page.
We are not going to create any new task here so just click on Cancel button, you will be back on Add Task page, click on the Cancel button again to fall back on onbording journey page for Mr. X. Beside + Add tasks button (which we just explored now), you get another Action button, click on that you see following three options
- Force Complete
- Edit Journey
- Delete Journey
You are your own to explore these options, but as part of this exercise click on the Delete Journey option. You get a confirmation message that reads “If you delete this journey, you will also delete all of its tasks.” adhere to your decision and click on Delete button.
You will be back to Assigned Journeys tab and if you search our journey AP Onboarding Journeys, Mr. X is gone and we see only one employee who we hired earlier.
2.3 Experience Activity Tab of Journeys
Click on Activity tab. When you mass assign a journey to multiple people you can track the progress and status of that mass assignment inside the activity tab, but the question here is how do you mass assign journeys?? Think again as we have already covered that inside this article.
To understand the concept better lets go back to Explore tab and perform following activities
- Search for journey : AP Onboarding Journeys
- Click on it to open it
- Click on Assign Journey button
- For Whom is this journey for? select Direct
- In Select a Person filed search for a manager
- Click on Assign button
Wait for a moment and you will realize that application has taken you to Activity tab
A process has been submitted to mass assign onboarding journey to all employees reporting to that manager you selected earlier. It might initially show in pending status, click on the Refresh button until this process is finished then click on the Enterprise Onboarding and you will find that process with status Completed. Click on the process name and you will find name of all assignment part of this process and their status.
3. Experience Journey as Employees
We have covered three out of five tabs, to cover remaining two we will login as an newly hired employees who we just recruited. So login as a new employee and follow below navigation
Navigation : Me » Journeys » Click on My Journeys tab
3.1 Experience My Journeys Tab
In this tab you find all journeys assigned to yourself. Click on Enterprise Onboarding tile and you will find that AP Onboarding Journeys is assigned to employee (make use of search filter if you don’t see it). Click on the journey name to open it.
You will find all five following tasks we configured earlier is assigned to user
- Verify and update personal details
- Upload picture for access card
- Select laptop brand
- Collect your access card
- Share onboarding feedback
You will notice that second task Upload picture for access card is disabled, this is because this task is locked until we complete preceding task that is Verify and update personal details.
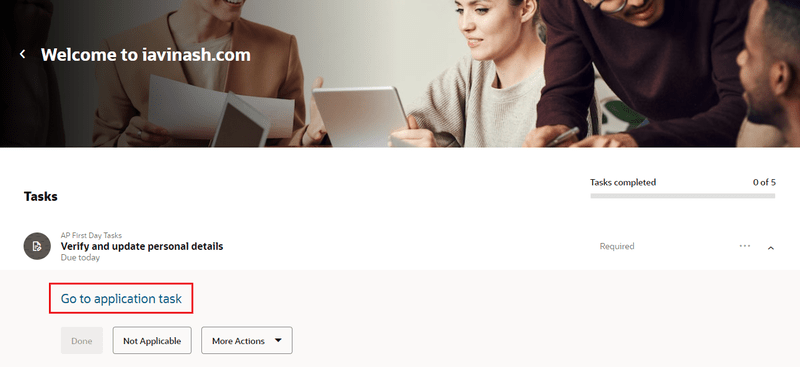
Click on the first task Verify and update personal details to expand it.
You will see a link Go to application task to complete this task. Click on the same, which will take you to Personal Details page where you can verify your personal record and update the same if required. Once done click on the Back (back arrow ‹) button to return to journeys page. Click on the Done button to mark this task completed.
Now the second task Upload picture for access card is enabled. Click on it to expand it. Click on Go to application task and it will take to Change Photo Page where you can upload your picture. Once done come back and mark this task completed.
Click on third task Select laptop brand to expand it. This time you will get direct option to select laptop of your choice from dropdown list as this is not an application task but a questionnaire. Once done click on Done button mark this task completed.
Please note by clicking on Not Applicable button you can skip any task. If you click on More Actions you get option to add the task to your calendar for reminder.
Following two tasks should be assigned to employee only after completing a week but we had to wait for a week for these tasks to appear therefore we decided to add them from first day itself
- Collect your access card
- Share onboarding feedback
Scroll up and click on the back button beside onbording notification tile Welcome to iavinash.com. You are back on My Journeys page.
3.2 Experience My Tasks Tab of Journeys
Click on My Tasks tab. Inside this tab you see list of all tasks assigned to you across all journeys. Click on Enterprise Onboarding tile and you will find all those 5 tasks, complete following two task which we didn’t complete earlier.
- Collect your access card
- Share onboarding feedback
4. Experience Journey as Line Managers
With this you have completed all onboarding tasks from employees prospective and we have explained functionality of all five tabs of journeys. Logout from employee login and login back as a manager of the employee and follow below navigation
Navigation : My Tram » Journeys » Click on Assigned Journeys tab
4.2 Experience Assigned Journeys Tab
We have already explored this tab earlier, but if you remember you configured 7 onbording tasks, out of which 5 tasks employee has already completed but following two tasks are due with line manager (and HR specialist) in our case this line manager also happens to be HR specialist so both these tasks are assigned to line manager.
- Facilitate Office Orientation Tour
- Procure Computer Equipment
On the Assigned Journeys tab, search for the employee we hired and application will fetch him/her. Click on the employee name to open journey tasks.
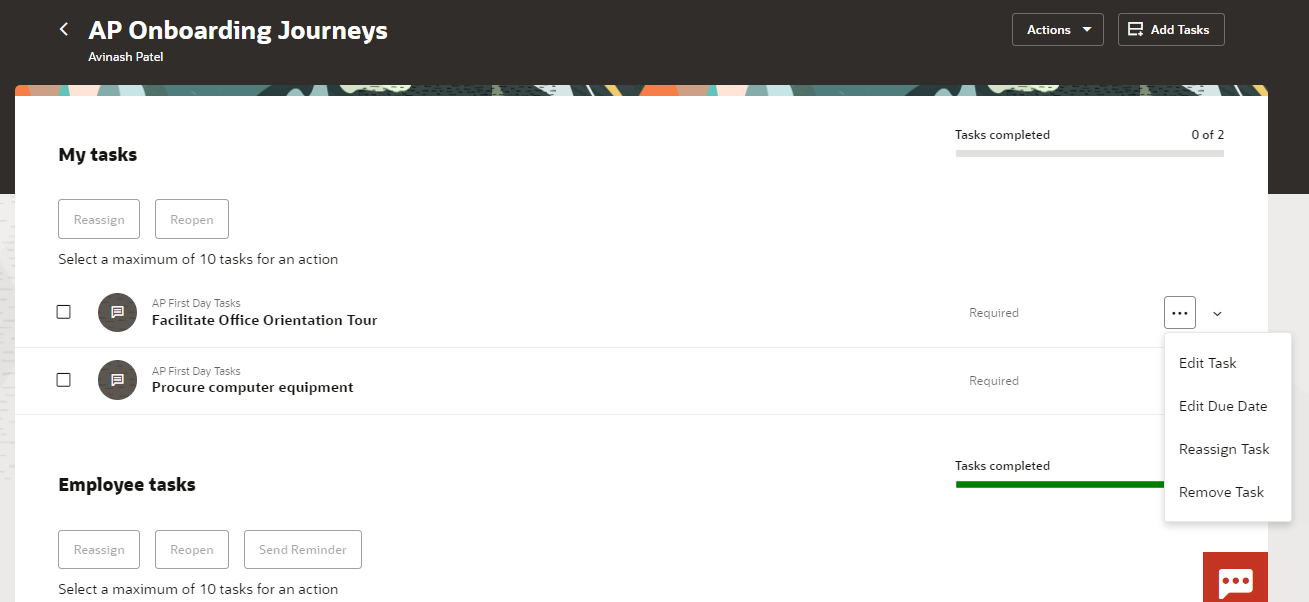
On this page you will see those two tasks are listed under heading My Tasks. You will also see five tasks which employee has completed earlier under heading Employee task
4.2.1 Learn to Reassign Journey Tasks
As manager is on business travel he/she can’t offer office orientation tour to employee therefore he wants to reassign this task to some one else.
Click on the Action button (three dots) against task Facilitate Office Orientation Tour and select option Reassign Task, this will bring a pop-up window on this screen search for the person whom you want to reassign task in the field Whom to reassign task to?. Once done click on Save button.
You will notice that this task has moved out from My tasks section to another section down called Other’s tasks
4.2.2 Learn to Reopen Journey Tasks
As a line manager (HR Specialist) activity you also need to procure a computer equipment for the employee and to check what configuration you have to procure, you scroll below to Employee task section and click on the task Select laptop brand to expand it and and you find that employee has selected Apple Macbook Pro. Suddenly you realize that you have discontinued this variation since last week.
To give employee another attempt to select different variation. Click on the three dots (Action) icon and select option Reopen Task.
4.2.3 Learn to Edit Due Date of Journey Tasks
Since you want to give additional time to employee to complete this task, click on the Action button again for the task Select laptop brand and select option Edit Due Date. Change the due date from a week later from todays date and click on Save button.
4.2.4 Learn to Edit Journey Tasks
Click on the action button again for the task Select laptop brand and select option Edit Task. In the Add instructions for this task field enter following text.
Also enable Enable comments checkbox. Click on Save button.
4.2.5 Learn to Send Reminder for Journey Tasks
You observe that employee has not yet completed this task and want to send a reminder. Click on the Action button and select option Send a Reminder.
5. Experience Journey
Logout and login back as employee.
You will notice employee has received an FYI bell notification (reminder) to complete the task. Click on that link to open it.
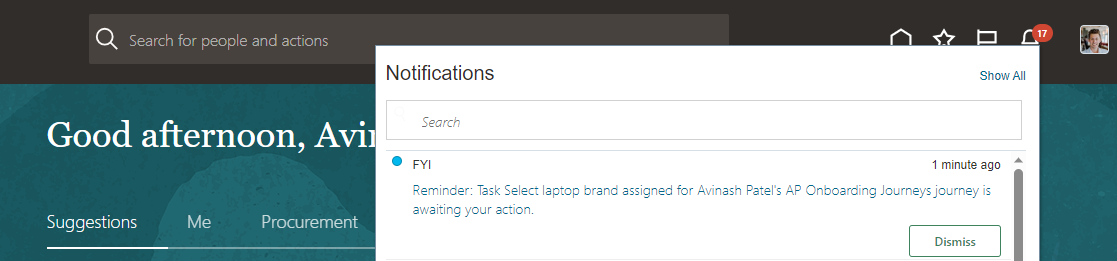
You will find some text encouraging you to complete the task at the earliest. You can customize this text message using Alerts Composer.
Click on the Act Now link available in that message, which will take you to onboarding journey we configured earlier. Scroll below and click on task Select Laptop Brand to expand it. You will find the task message entered by manager and also an option to enter comment.
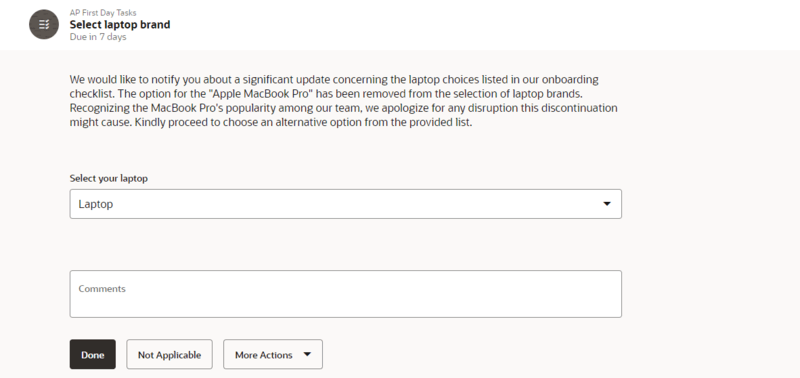
Change your laptop selection and click on Done button. Log out. Login back as line manager and complete the task Procure Computer Equipment. With this we have completed all onboarding tasks except “Office Orientation Tour” which was assigned to a different person by line manager. If you have any patience left, login as that employee and go to My Tasks tab of journey and complete that task